
System Settings Overview
System Settings sets the rules and defaults for each part of UPVOIT. It is divided into seven tabs: General, Request, Quote, Work Order, Invoice, Payroll and Notifications. The selected tab is highlighted.
Each tab has its own Save button at the bottom right. Save stores only the settings on that tab, so save before moving to another tab.
General
The General tab holds company-wide settings that affect several modules:

-
Client Hub Link – the link used to access the client portal. Click the copy icon next to it to copy the link.
-
Enable Client Portal for Contacts – allows a client’s contact persons to log in to the client portal.
-
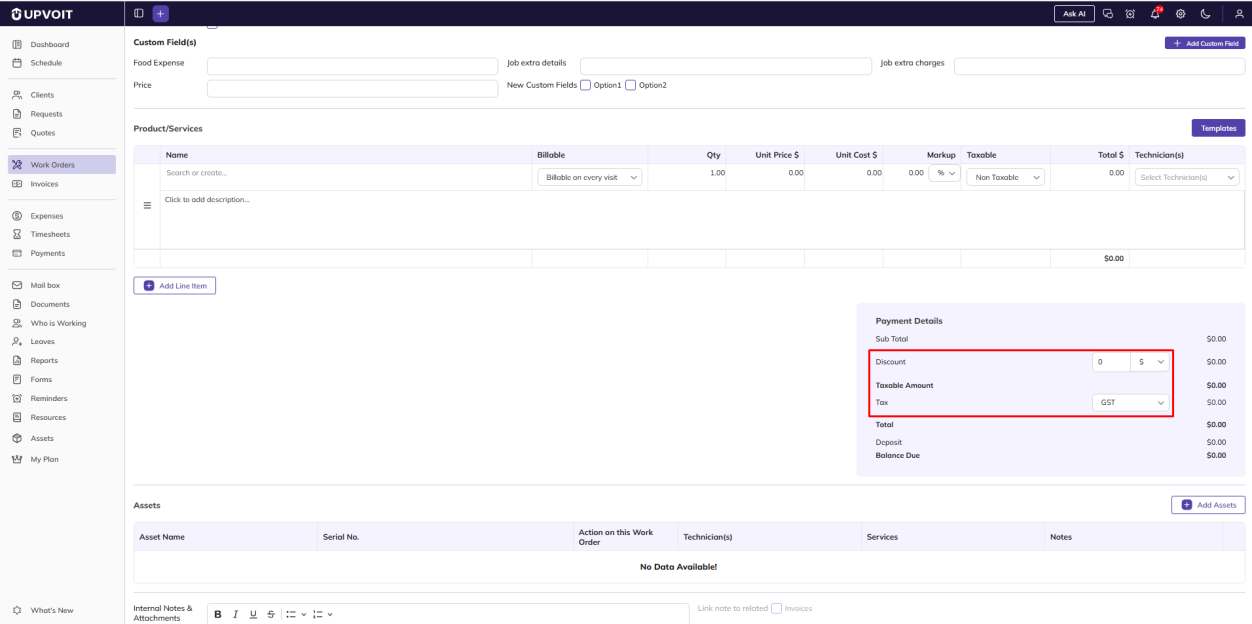
Tax & Discount Order – decides whether tax is applied before or after the discount, and where the tax appears in the payment summary.
-
Apply tax after discount – tax is calculated after the discount is taken off.
-
Apply tax before discount – tax is calculated before the discount is taken off.

-
-
Tax & Discount Settings for Labor and Expenses – decides whether tax is applied to labor and expenses. Tick Enable Tax for Labor to apply tax to labor, and Enable Tax for Expenses to apply tax to expenses.
-
Markup – when Enable Markup for Service is ticked, a Markup column appears on service line items. It shows the markup between the unit price and the cost price.


-
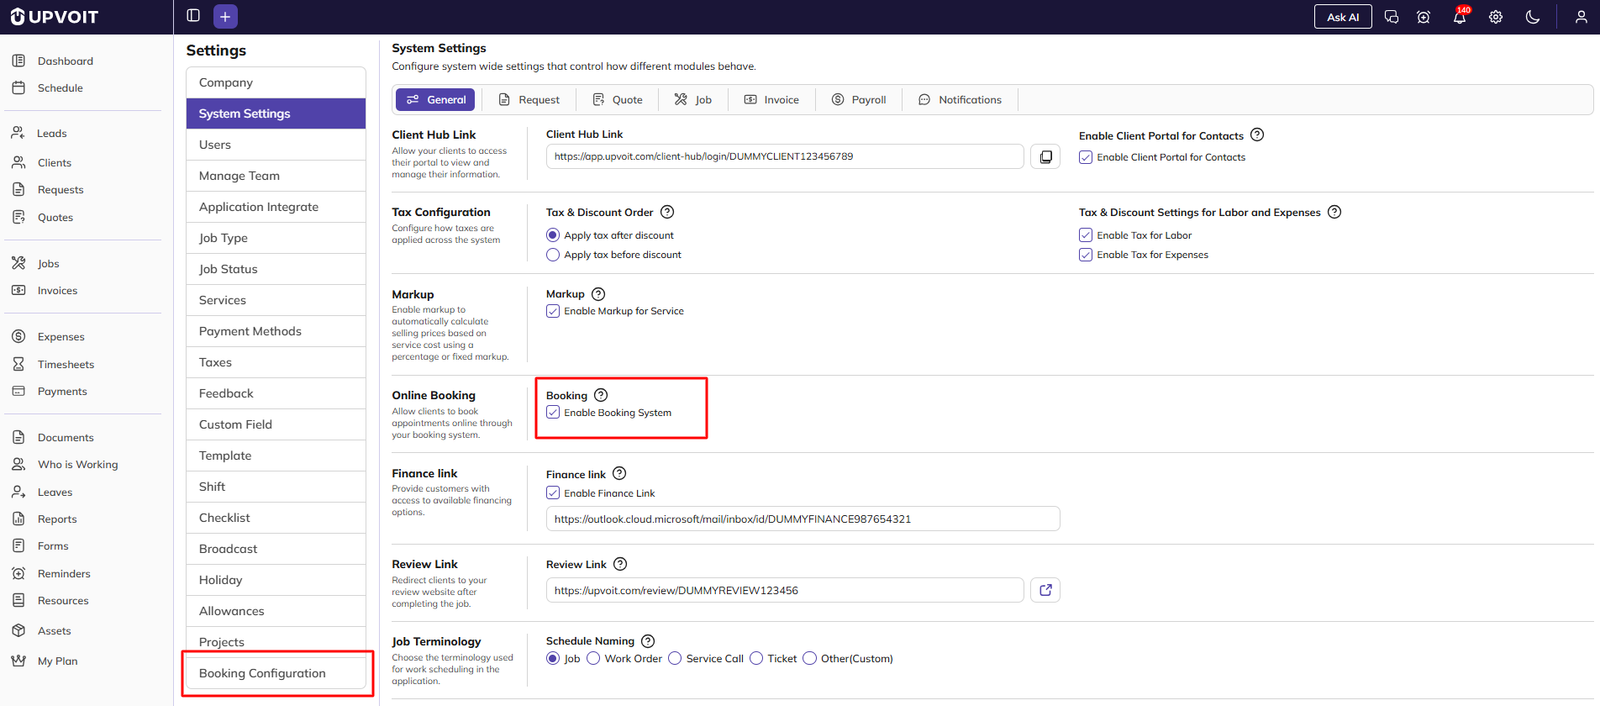
Booking – when Enable Booking System is ticked, the Booking Configuration menu appears in Settings. Bookings are created from there.
-
Finance link – when Enable Finance Link is ticked, a box appears where you enter your finance link.


-
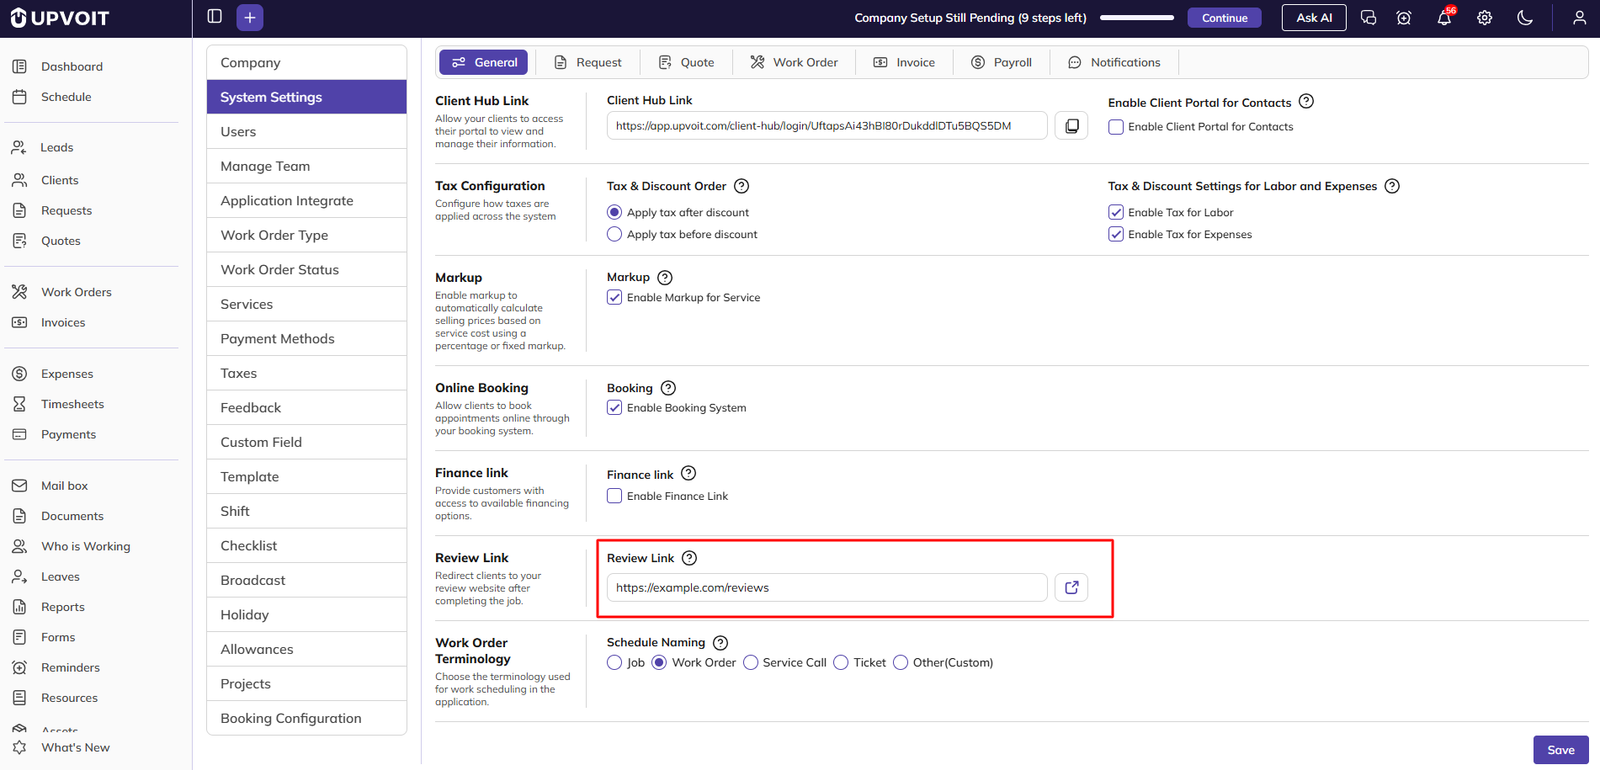
Review Link – the link clients use to leave a review for your company.

-
Schedule Naming – lets your company choose the term used for scheduled work: Job, Work Order, Service Call, Ticket or Other(Custom). In the example, Work Order is selected.

Request

The Request tab controls how clients send service requests to your company, how requests are titled, and which emails are sent when a request is submitted.
-
Magic Link – a link to your company’s online Request Form. Share it with clients (for example, on your website or in an email) so they can fill in the form and send a request to your company. Click the copy icon next to the link to copy it.
-
Success Message – the message shown to the client when the request form is submitted successfully.
-
Error Message – the message shown to the client when the request form cannot be submitted.
-
Request Title Generation – decides how request titles are created.
-
Input manually – the title is typed in for each request.
-
Automated – the title is created automatically in the format set in Request Title (for example, client first name and PO number). The title can still be changed after it is created.

-
-
Send Email Notification of Request Submission – when ticked, the Email Template is shown. This email is sent to the addresses in To, CC and BCC each time a request is submitted.
-
Send Request Acknowledgment Email To Submitter – when ticked, a second Email Template is shown. This email is sent to the person who submitted the request, to confirm it was received. Other people can be copied in using CC and BCC.

In both email templates, you can set the Subject Header and write the Email Body using the formatting toolbar. Words in curly brackets, such as {requestTitle} or {clientName}, are replaced with the request’s details when the email is sent.
On The Way
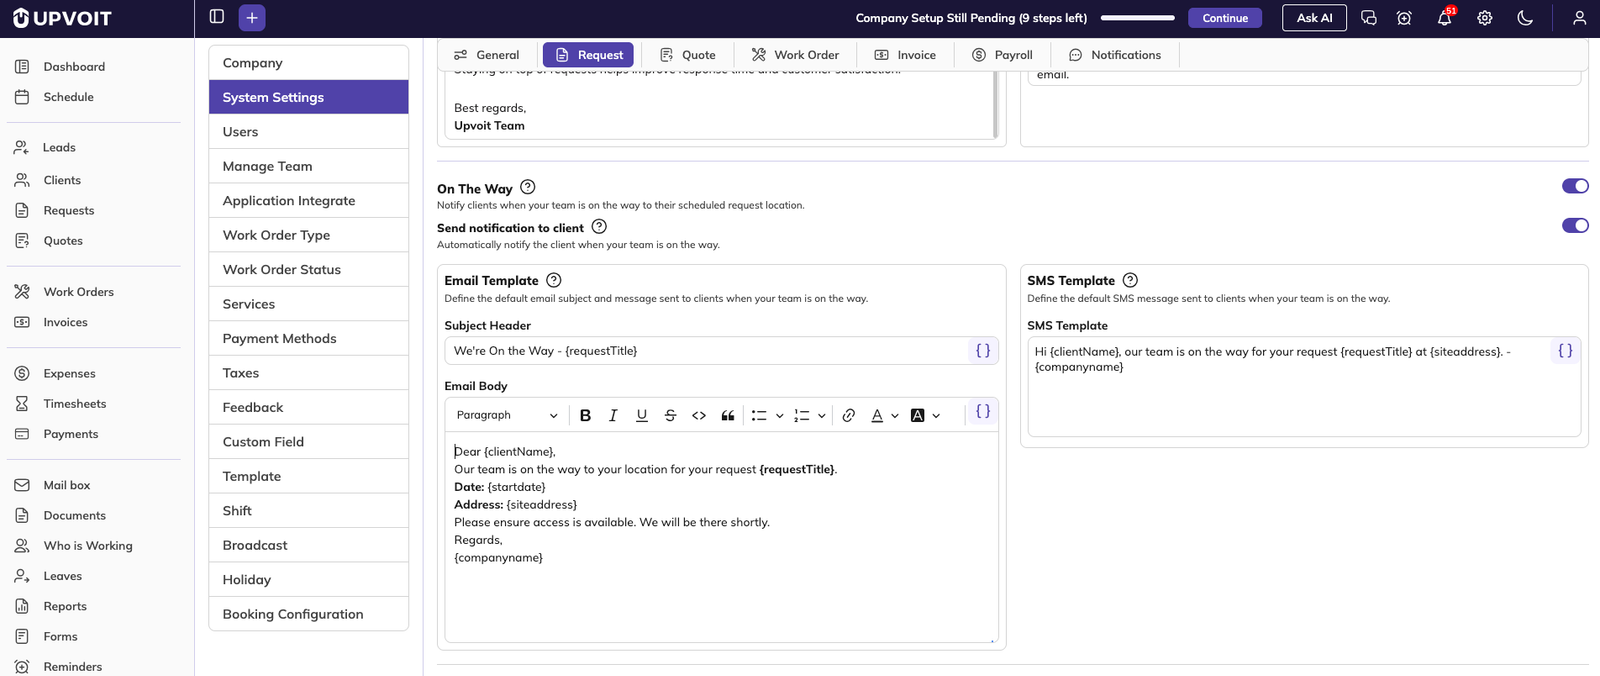
Switch on On The Way so technicians can mark that they are on the way to a request, for example when travelling to an assessment visit. When it is switched on, one more option appears:
-
Send notification to client: switch this on to tell the client automatically that the technician is on the way.
When Send notification to client is switched on, two templates appear:
-
Email Template: the Subject Header and Email Body of the email sent to the client. For example, the subject We’re On the Way – {requestTitle}.
-
SMS Template: the text message sent to the client. For example, Hi {clientName}, our team is on the way for your request {requestTitle} at {siteaddress}.
Words in curly brackets are replaced with the request’s details when the message is sent. Use the { } button to add them.
The Request Form
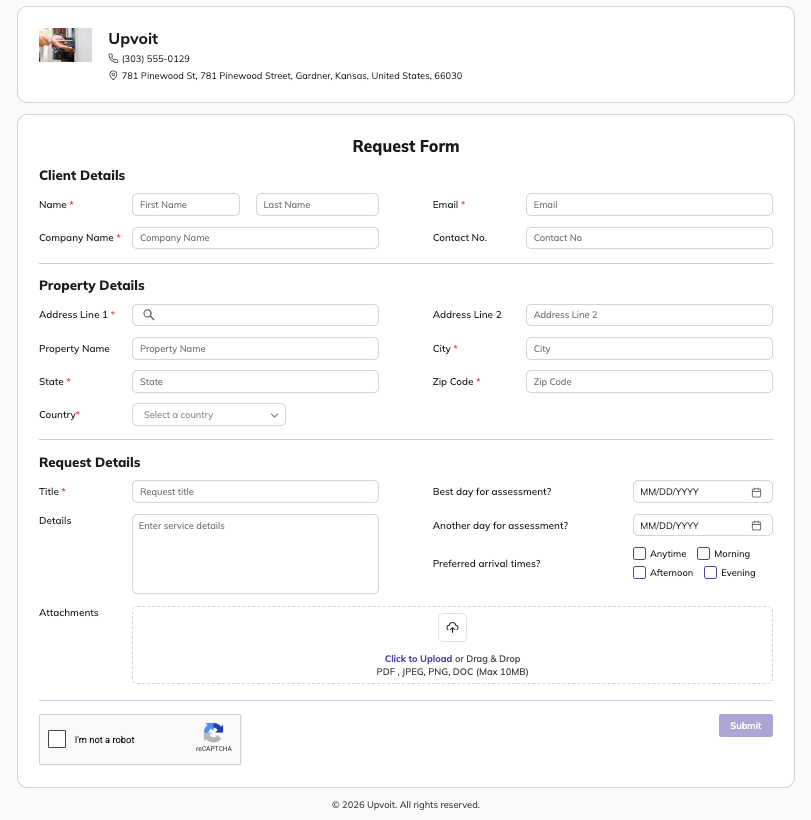
When a client opens the Magic Link, the Request Form opens. The top of the form shows your company logo, name, phone number and address from Company Configuration.
Quote
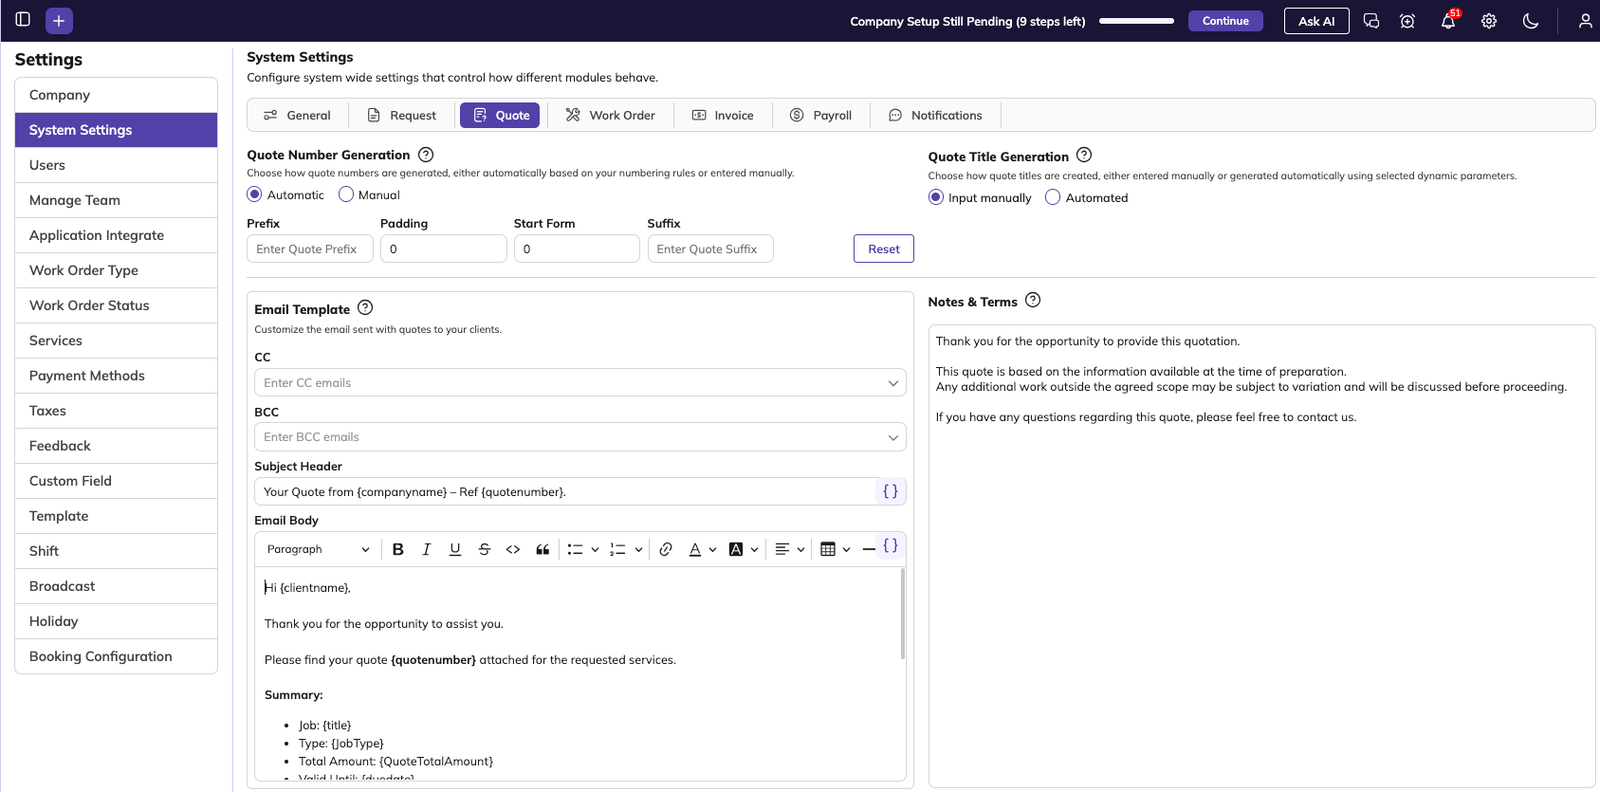
The Quote tab sets the defaults used when creating and sending quotes.
-
Quote Number Generation – decides how quote numbers are created.
-
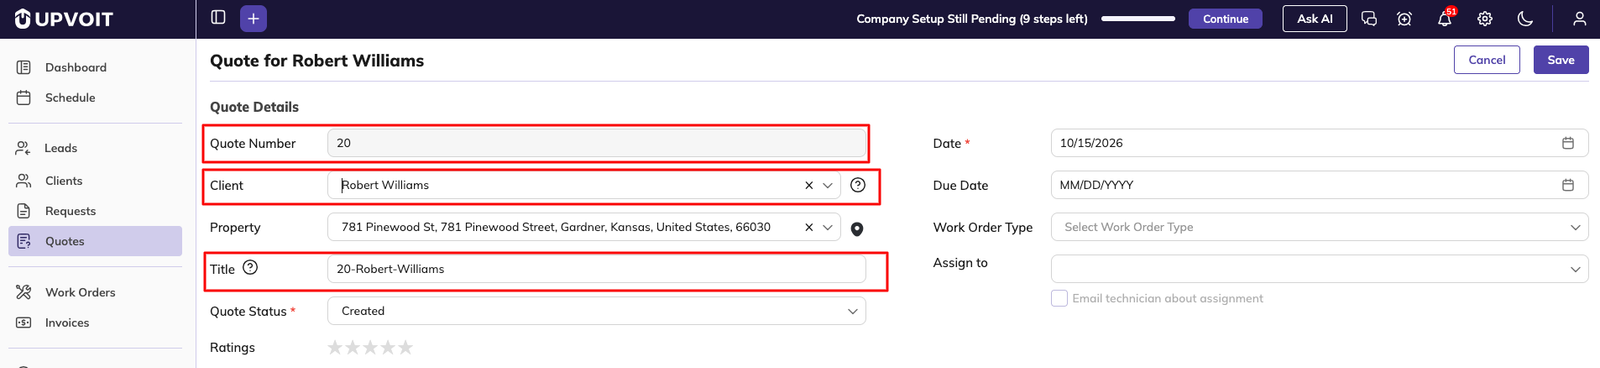
Automatic – the system gives each quote a number. The number cannot be changed while creating the quote.
-
Manual – the quote number is entered by the user when creating the quote.
-
-
Quote Title Generation – decides how quote titles are created.
-
Input manually – the title is typed in for each quote.
-
Automated – the title is created automatically in the format set in Quote Title (for example, quote number and work order type).
-
-
Email Template – the email used when a quote is sent to the client by email. You can set default CC and BCC addresses, the Subject Header and the Email Body.
How the email template is used

-
Notes & Terms – the default notes and terms added to every new quote. They are filled in automatically when a quote is created and are visible to the client on the quote (for example, under Terms & Notes).
When you click Send on a quote, the Send Quote window opens with the email already filled in from this template:
You can change these details before sending. Choose Send by Email, SMS or Email & SMS, and tick Include quote PDF as attachment to attach the quote PDF. Then click Send.
Work Order
The Work Order tab controls how work orders are tracked, numbered, titled, scheduled and completed. These settings affect every new work order, so review them before your team starts creating work orders. The settings are described in the order they appear on screen.
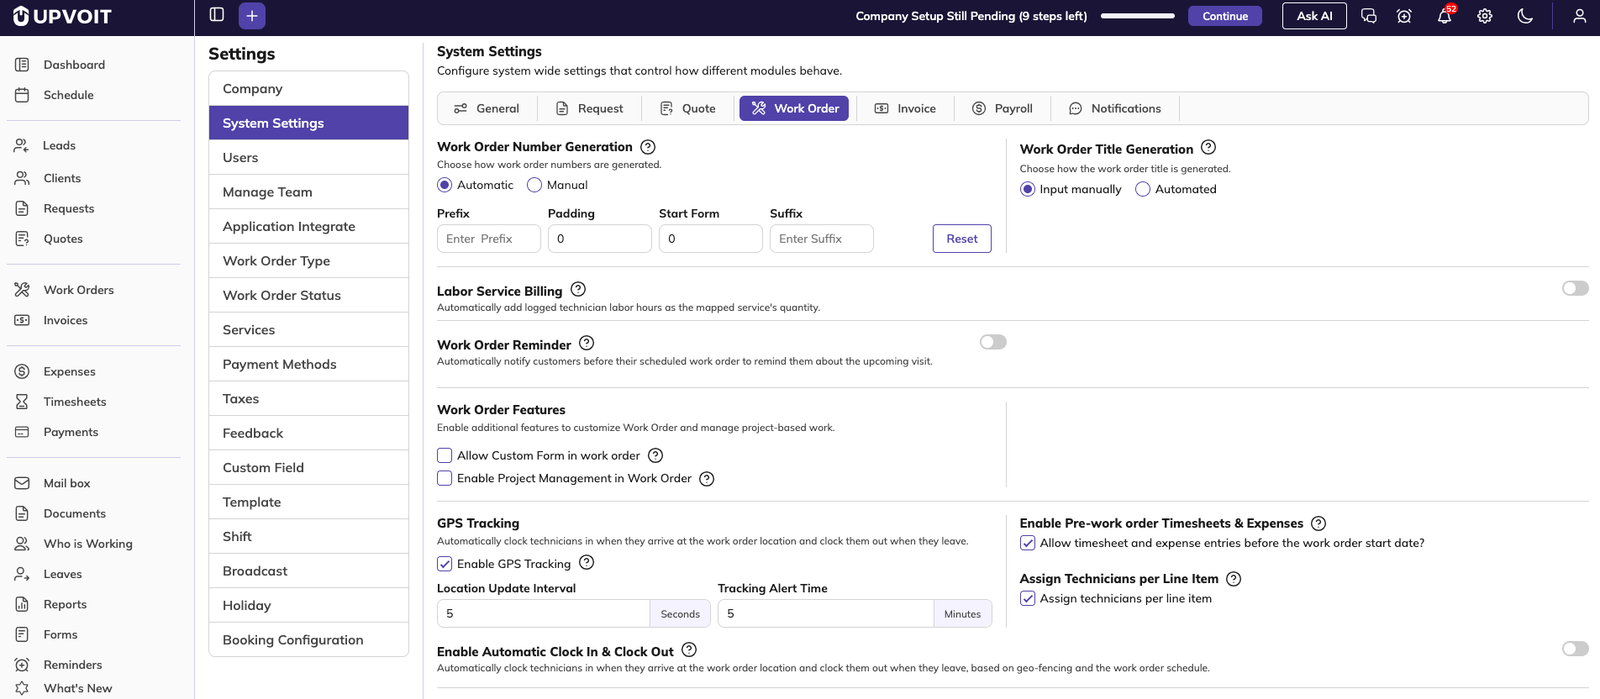
Work Order Number Generation
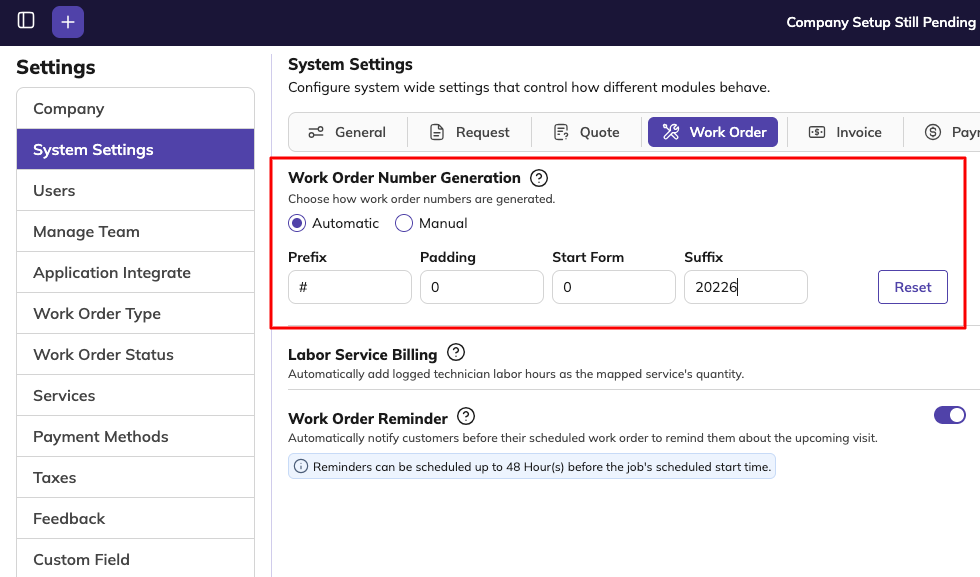
Every work order has a number, which is shown when a new work order is created. This setting decides who creates that number.
-
Automatic – the system gives each new work order the next number in order. This avoids duplicate or missing numbers and is recommended for most companies.
-
Manual – the user types the number when creating each work order. Use this if your company already follows its own numbering system.
For Automatic numbering, you can set the number format:
-
Work Order Prefix – text added before the number, such as a short code for your company.
-
Work Order Padding – the number of digits. For example, 0000 gives a 4-digit number, so work order 25 is shown as 0025.
-
Work Order Start Form – the number that numbering starts from. For example, with 1608, the next work order starts from 1608. This is useful when moving from another system, so numbering continues from your last number.
-
Work Order Suffix – text added after the number.
Work Order Title Generation

This decides how titles are created for new work orders.
-
Input manually – the user types a title for each work order. Use this when titles need to describe each job in your own words.
-
Automated – the title is created automatically in the format set in Work Order Title (for example, {jobnumber} uses the work order number as the title). This keeps titles consistent across all work orders.
Work Order Reminder

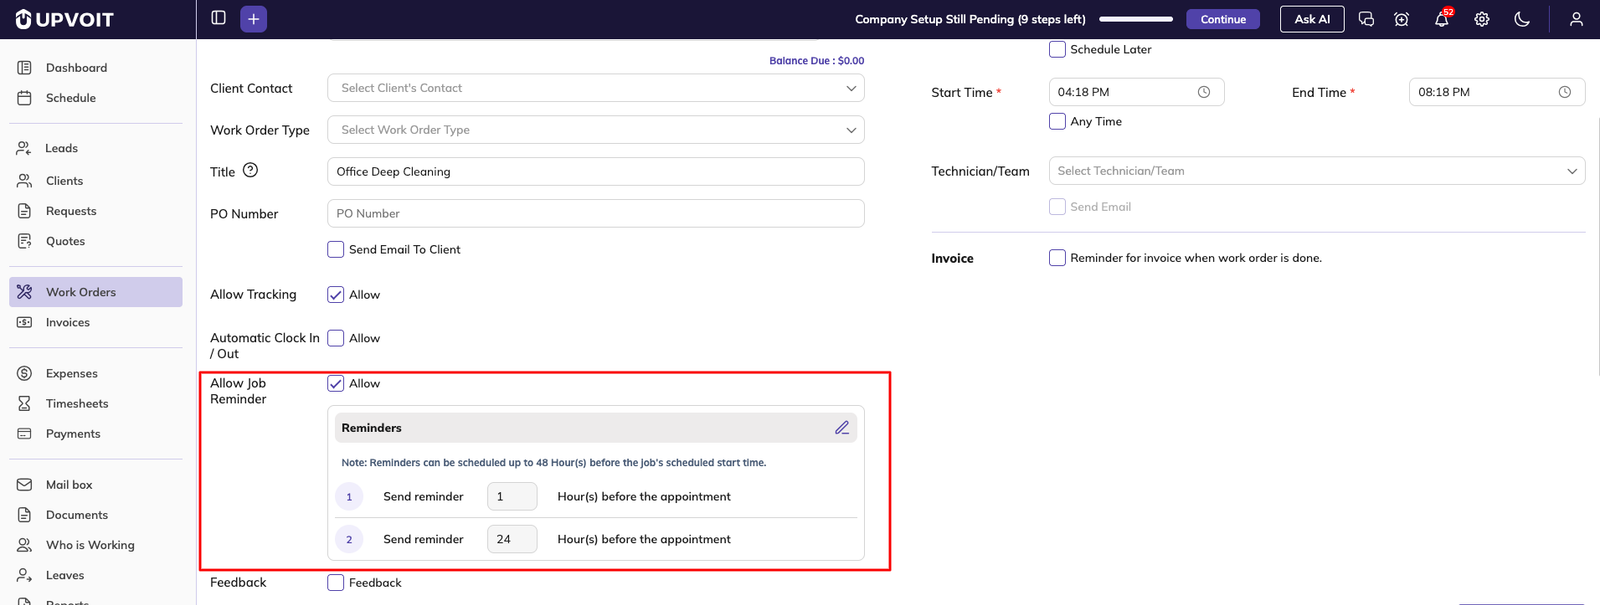
When this switch is on, the system automatically notifies customers before a scheduled work order, so they know a technician will be visiting their home. This helps reduce missed visits and saves the office from calling each customer.
The reminder settings are shown only when the switch is on. Switching it on displays three sections: Schedule Work Order, Email Template and SMS Template. When the switch is off, these sections are hidden and no reminders are sent.
-
Schedule Work Order – sets when reminders are sent.
-
Each reminder is set as Send reminder [number] Hour(s) before the work order’s scheduled start time.
-
Reminders can be scheduled up to 48 hours before the scheduled start time.
-
More than one reminder can be set. For example, one reminder 24 hours before and another 2 hours before. Click + Add Reminder to add a reminder, and the red bin icon to remove one.
-
-
Email Template – the reminder email, with a Subject Header and Email Body.
-
SMS Template – the reminder text message.
In both templates, words in curly brackets, such as {ClientName} or {JobTitle}, are replaced with the work order’s details when the message is sent.
When this setting is on, the reminders are also shown when creating a work order. Once a reminder is set, the system sends the email and SMS to the client at the scheduled time.
Enable Custom Form
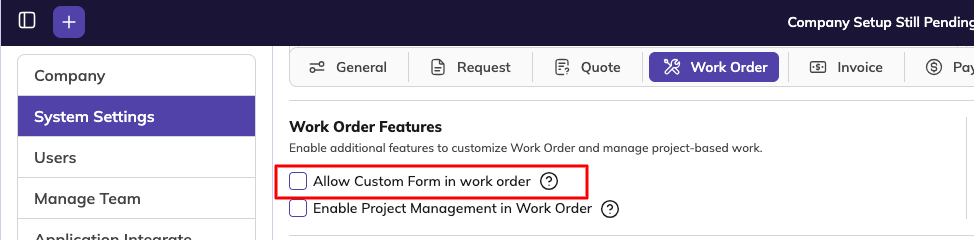
When Allow Custom Form in Work Order is ticked, a custom form option is shown when creating a work order, and the user can choose a form from the dropdown. Use this to collect extra information on a job, such as an inspection form.
Enable Project Management
When Enable Project Management in Work Order is ticked, the Projects menu appears in Settings. When creating a work order, the user can then choose a project from the dropdown. This groups related work orders under one project, which is useful for larger jobs spread across several work orders.


Enable GPS Tracking
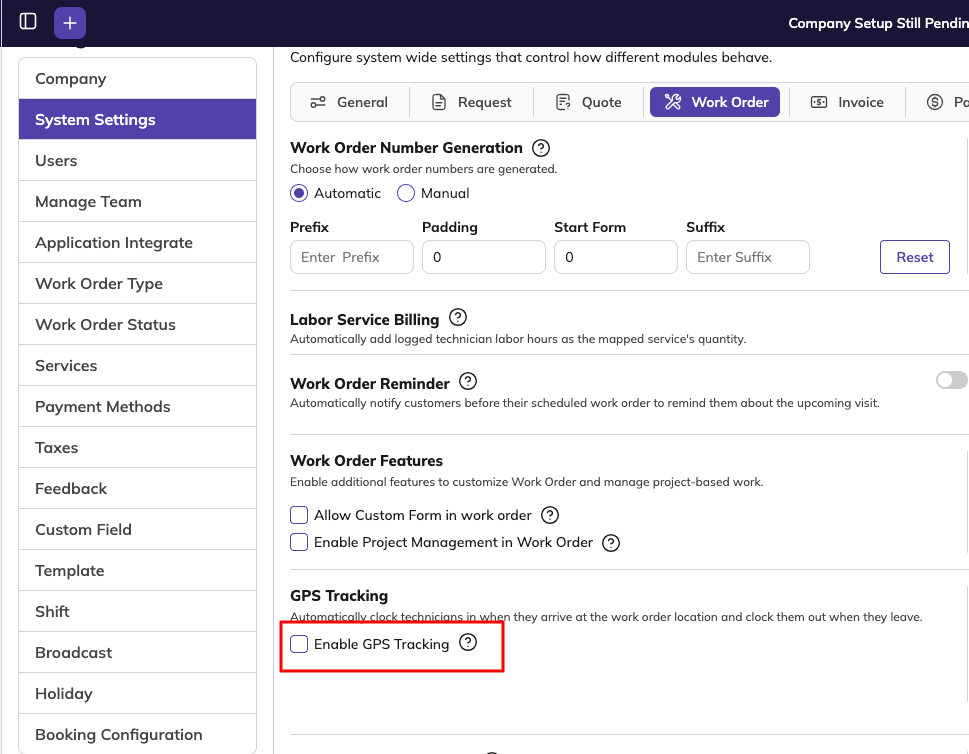
This setting turns real-time GPS tracking of technicians on or off. Technicians are tracked through their mobile devices while they are on a job. When it is not ticked, technician locations are not tracked, and the settings below are hidden.
When Enable GPS Tracking is ticked, these settings appear:
-
Location Update Interval (seconds): how often the technician’s location is updated. For example, 10 updates the location every 10 seconds.
-
Tracking Alert Time (mins): the time used for tracking alerts, in minutes.
-
Enable Automatic Clock In & Clock Out: a switch for automatic clock in and clock out (see below).
Enable Pre-Work Order Timesheets & Expenses
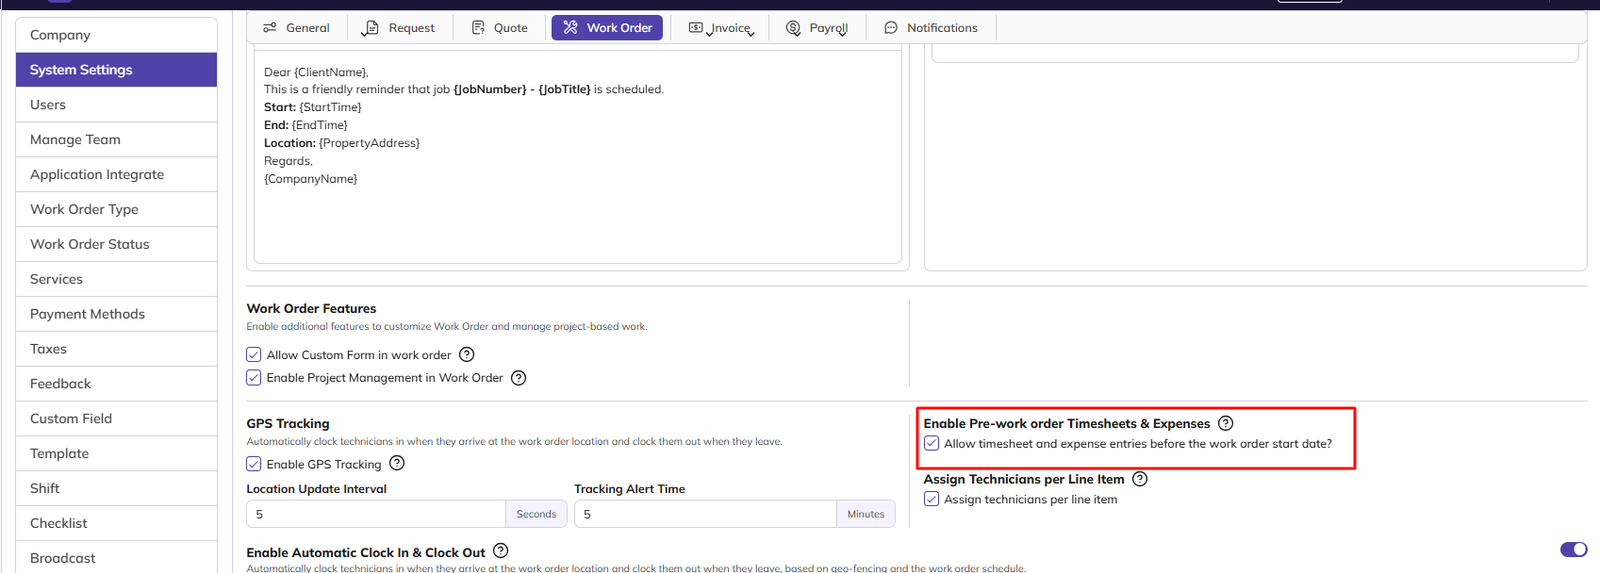
This decides whether technicians can record time or expenses before the work order’s start date.
-
Not ticked (default) – timesheets and expenses can only be entered on or after the start date.
-
Ticked – team members can record hours or expenses before the work begins, for example for preparation work or buying materials in advance.
Assign Technicians per Line Item

When ticked, technicians can be assigned to each line item (service or material) instead of the whole work order. This is useful when different technicians handle different parts of the same job.
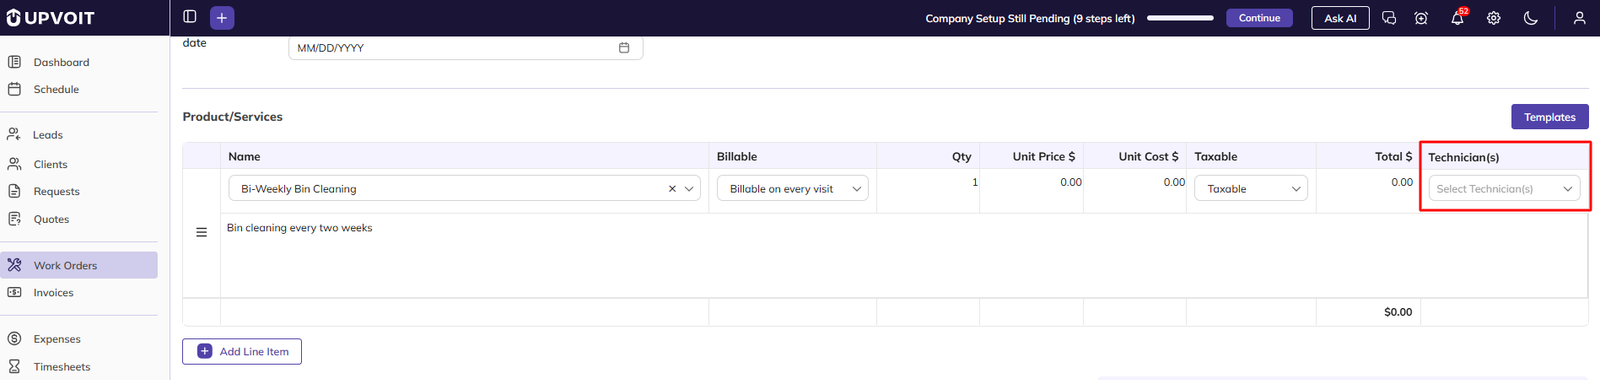
With this setting on, a Technician(s) column appears in Product/Services when creating a work order. Use the Select Technician(s) dropdown on each line to choose who is responsible for it.
Enable Automatic Clock In & Clock Out
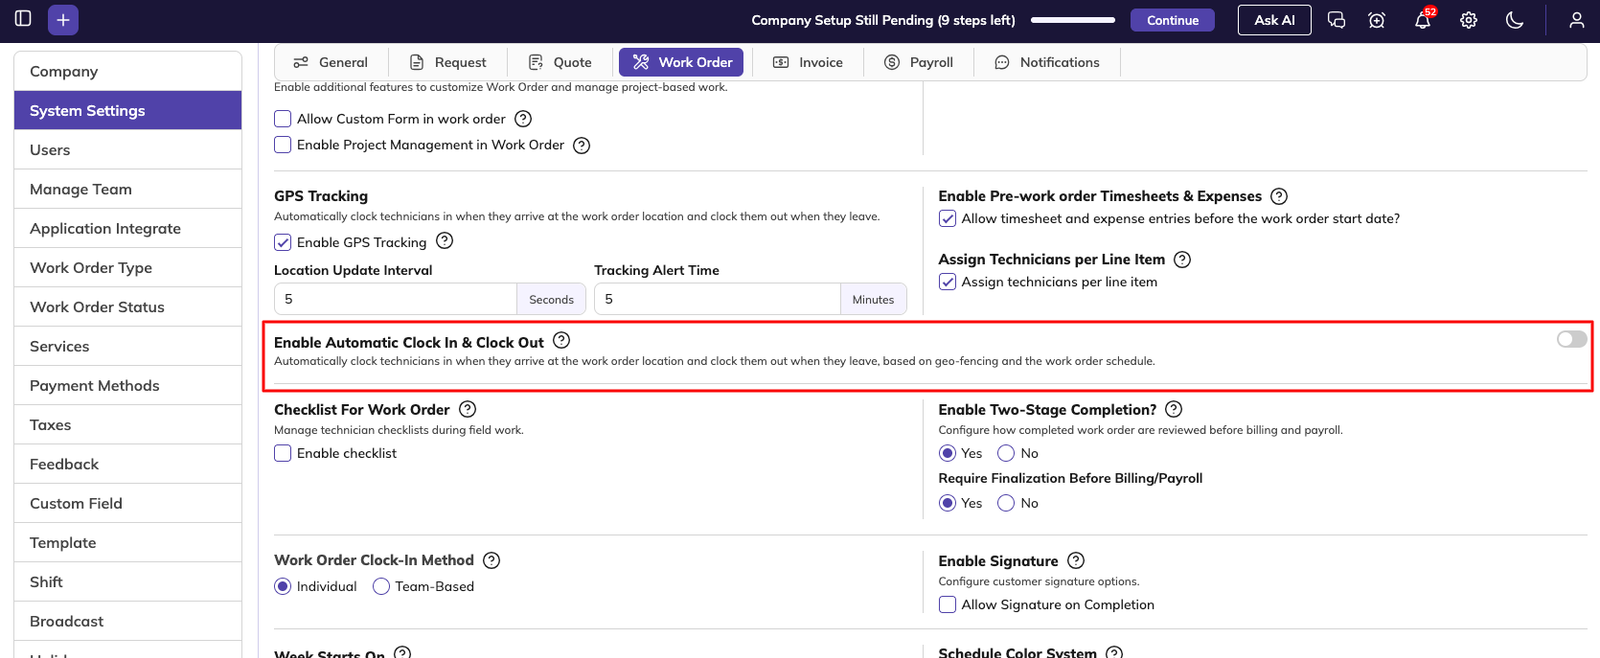
This feature uses geo-fencing and the work order schedule. Technicians are clocked in automatically when they arrive at the work order location, and clocked out automatically when they leave. This saves technicians from clocking in and out by hand and keeps time records accurate.
When the switch is on, two panels appear: Clock in settings and Clock Out Settings.

Clock in settings
-
Automatic Clock In: clocks technicians in automatically when they enter the work order location. When this switch is on, two more settings appear:
-
Allow Early Clock In: how early before the scheduled start time a technician can be clocked in automatically. For example, At Start Time means no earlier than the scheduled start.
-
Minimum Time at Location: how long a technician must stay at the work order location before being clocked in automatically. For example, Immediate clocks them in as soon as they arrive.
-
Clock Out Settings
-
Automatic Clock Out: clocks technicians out automatically when they leave the work order location. When this switch is on, one more setting appears:
-
Grace Period After Leaving: how long a technician can be away from the work order location before being clocked out automatically. For example, Immediate clocks them out as soon as they leave.
-
Where these settings are used
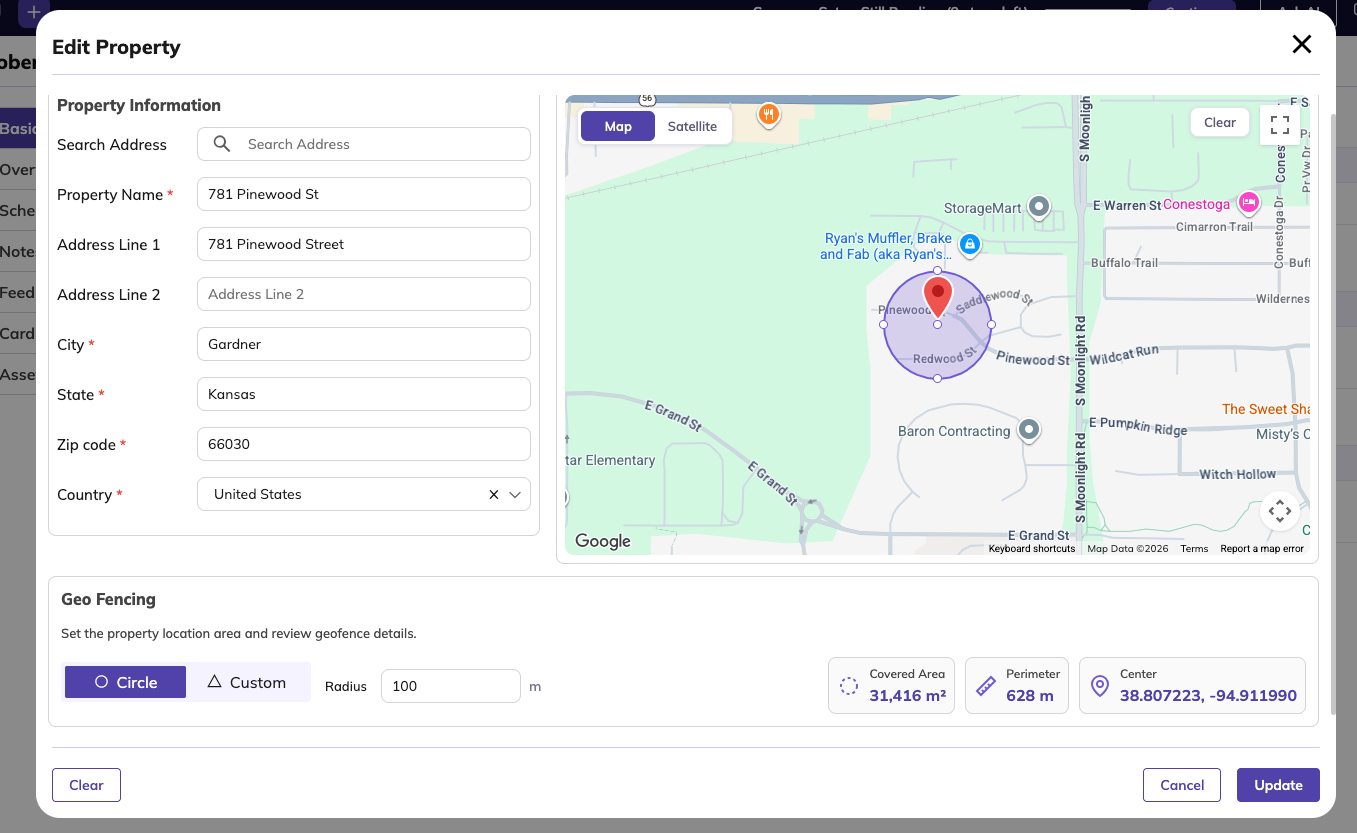
Automatic clock in and clock out work through geo-fencing. A geo-fence is a virtual boundary around a property’s location. When a technician’s device enters or leaves this boundary, UPVOIT clocks them in or out using the settings above.
Geo-fencing is set up on properties in two places:

-
Client properties: when you create or update a property on a client’s Basic Details tab, using Add Property or Edit Property. See Client Management, 6. Properties.
-
Work order property: when you create or edit a work order, for the property where the work takes place.
When Enable GPS Tracking and Enable Automatic Clock In & Clock Out are both on, the technician is clocked in on arrival at the work order’s property and clocked out on leaving it.
Checklist for Work Order

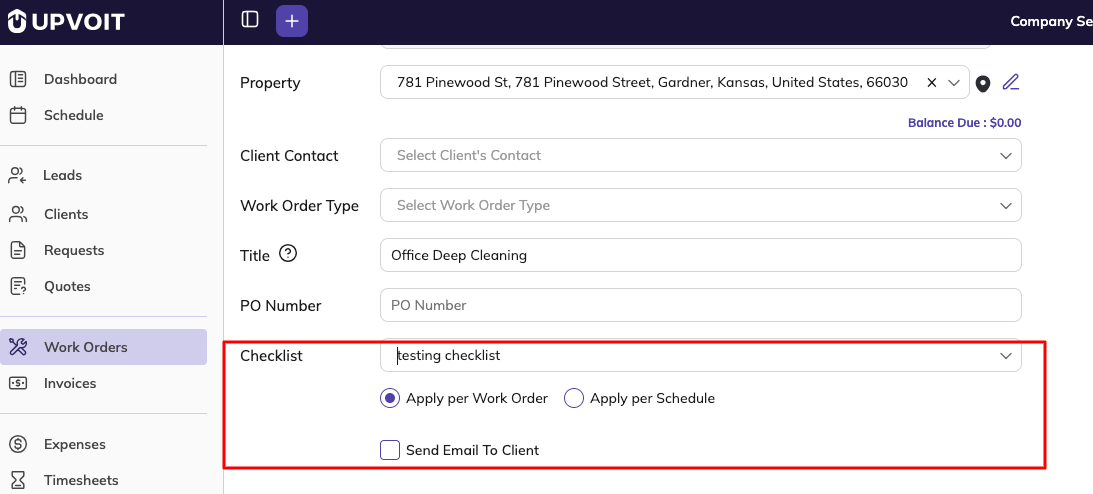
Checklists make sure technicians follow the same step-by-step tasks during the work, for example safety checks or cleaning steps. Tick Enable checklist for work order/schedule to use checklists on work orders.
When it is ticked, the Checklist menu appears in Settings. Checklists are created there and then used inside work orders.
Choose how checklists are applied:
-
Apply per Work Order – one checklist applies to the whole work order. Use this when the tasks are done once for the job.
-
Apply per Schedule – a checklist applies to each schedule (visit). Use this when the same tasks must be done on every visit, such as recurring maintenance.
Checklist Completion Requirement decides whether the checklist must be finished:
-
Not Required – the work can be completed even if the checklist is not finished.
-
Required for Schedule – the checklist must be completed before the work can be completed. Use this when the checklist steps are mandatory.
Enable Two-Stage Completion?
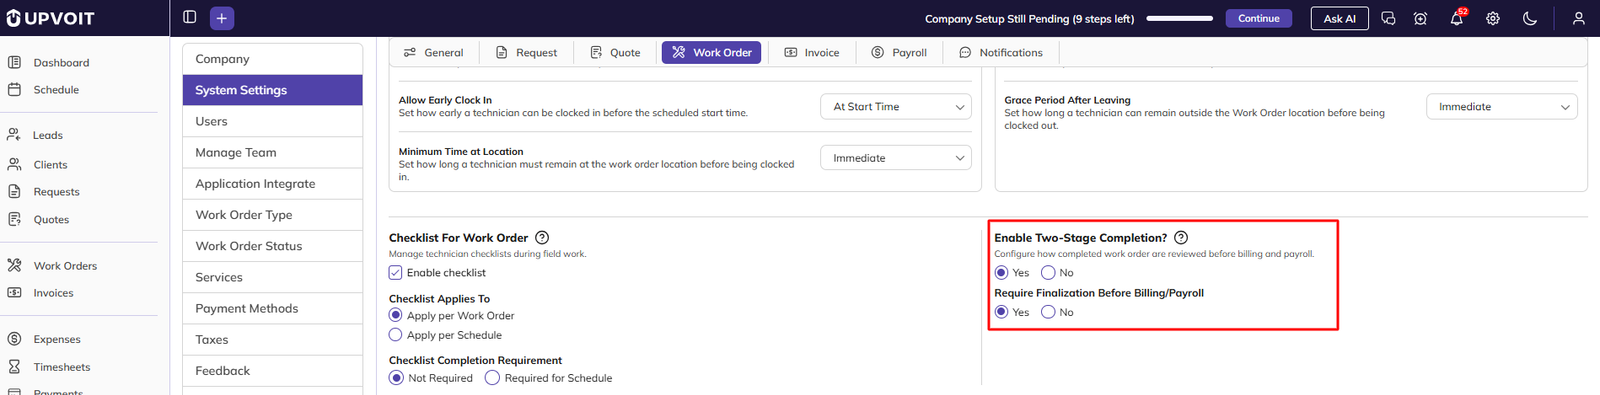
This controls how work orders are completed and when labour entries appear in invoices and payroll. It gives better accuracy and internal control, because the work can be checked before it is fully finalized.
-
No – the work order is completed in one step.
-
Yes – completion happens in two stages, and one more option is shown:
-
Require Finalization Before Billing/Payroll – when set to Yes, the work order must be finalized before its labour is used in invoices and payroll. This stops unchecked hours from being billed to the client or paid to technicians. When set to No, labour can be used before the work order is finalized.
-
Work Order Clock-In Method
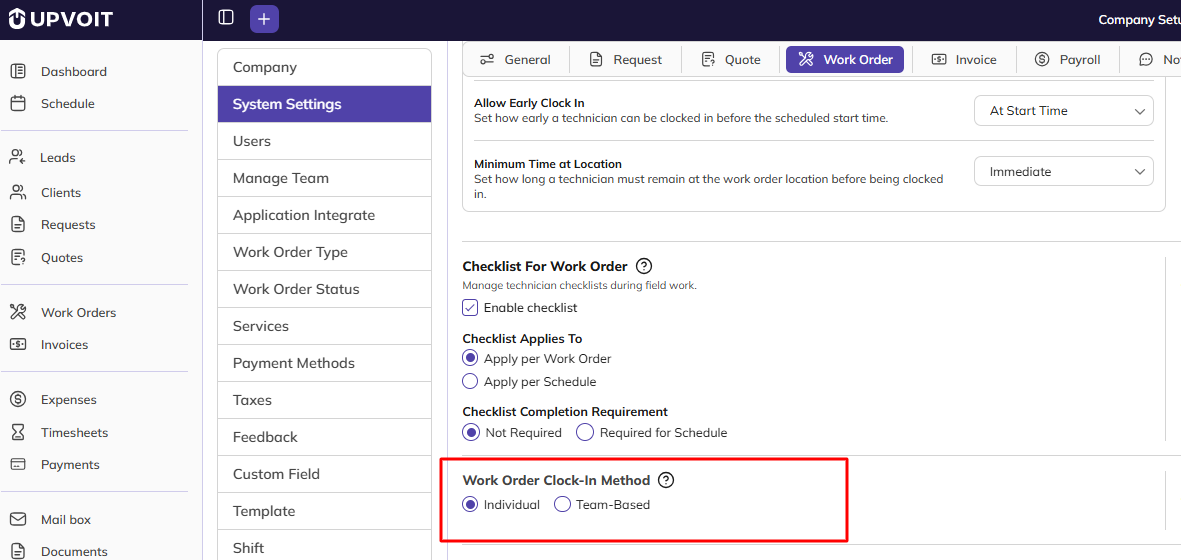
This decides how technicians clock in and out of a work order, which affects how their time is recorded.
-
Individual – each technician clocks in and out separately. Each person’s time is recorded on its own.
-
Team-Based – the team clocks in together. Two further options are shown:
-
the supervisor clocks in on behalf of the team, or
-
anyone assigned to the work order can clock in for the team.
-
Enable Signature
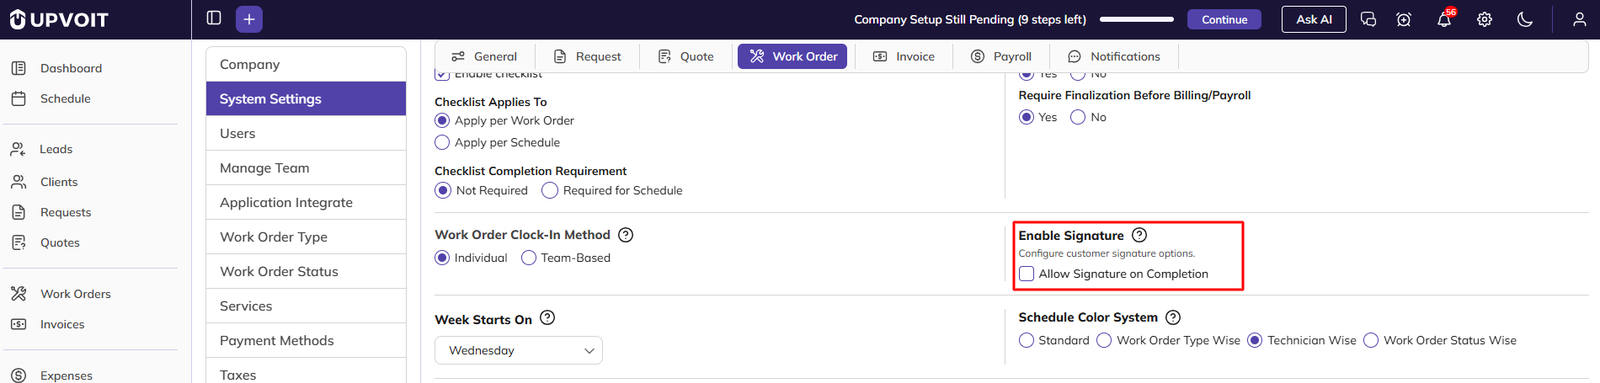
When Allow signature on work order completion is ticked, the technician can collect the customer’s signature when completing a work order. The signature is saved securely with the work order as an image, as proof that the customer accepted the work.
Enter the consent text in Signature Consent. This is the statement the customer agrees to when signing, for example: “I confirm the work has been completed to my satisfaction.”
Week Start Day
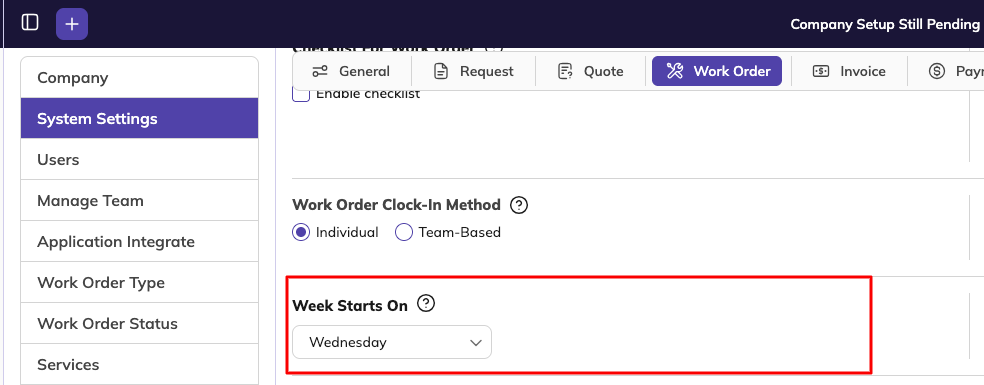
This decides which day the calendar week starts on (for example, Thursday). Set it to match your company’s working week.
Schedule Color System
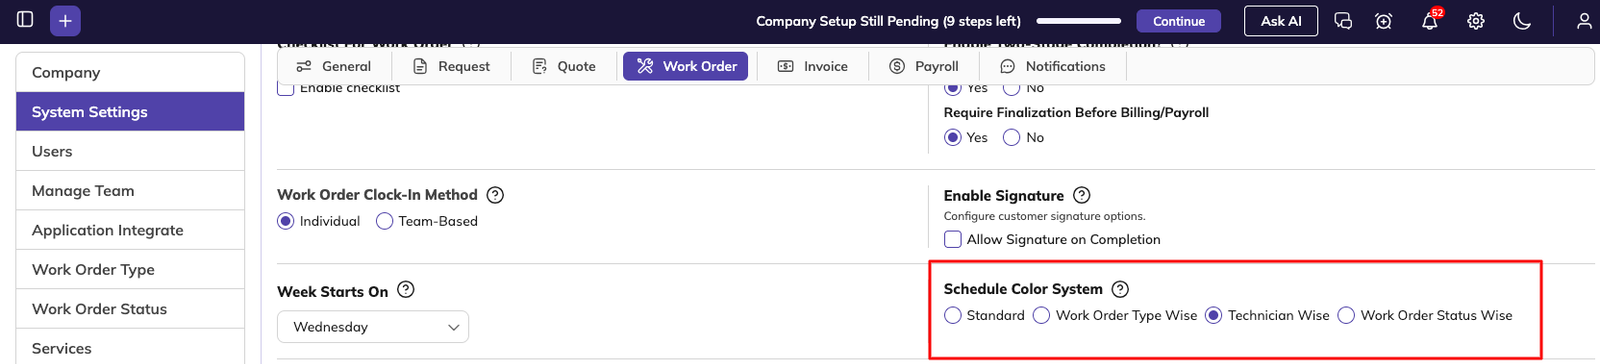
This decides the colours used for work orders on the calendar. It helps your team see at a glance what is scheduled.
-
Standard – the default colours.
-
Work Order Type Wise – each work order type has its own colour, so you can see which kinds of work are planned.
-
Technician Wise – each technician has their own colour, so you can see who is working on what.
-
Work Order Status Wise – each status has its own colour, so you can see which work orders are scheduled, in progress or completed.
Email Template
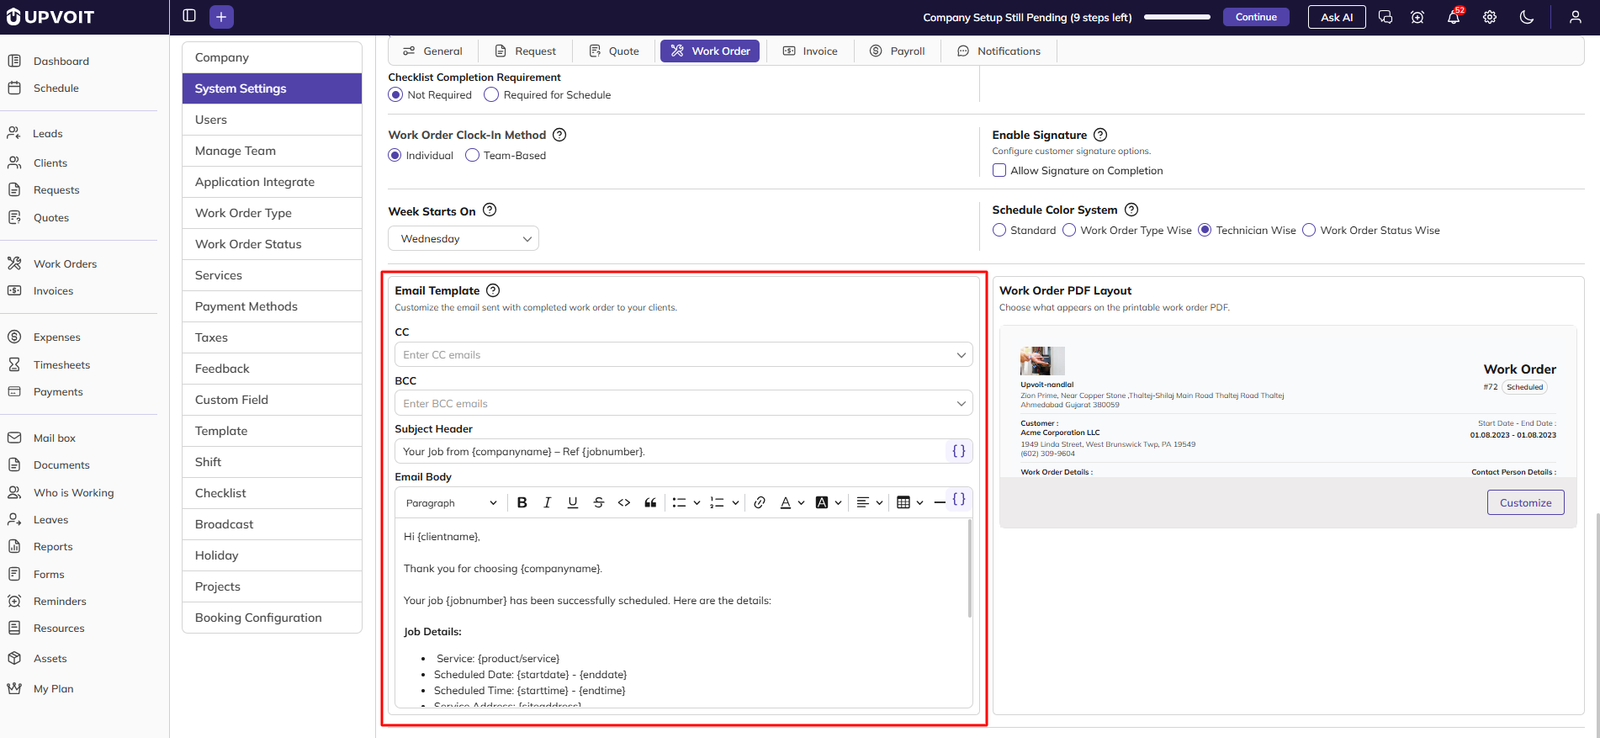
This is the default email sent to customers from a work order. Set the default CC, BCC, Subject Header and Email Body here. Words in curly brackets, such as {clientname}, are replaced with the work order’s details.

To send it, click Email on a work order. The email opens already filled in from this template. Check or edit it, tick Include work order PDF as attachment if needed, and click Send Email.
Work Order PDF Layout
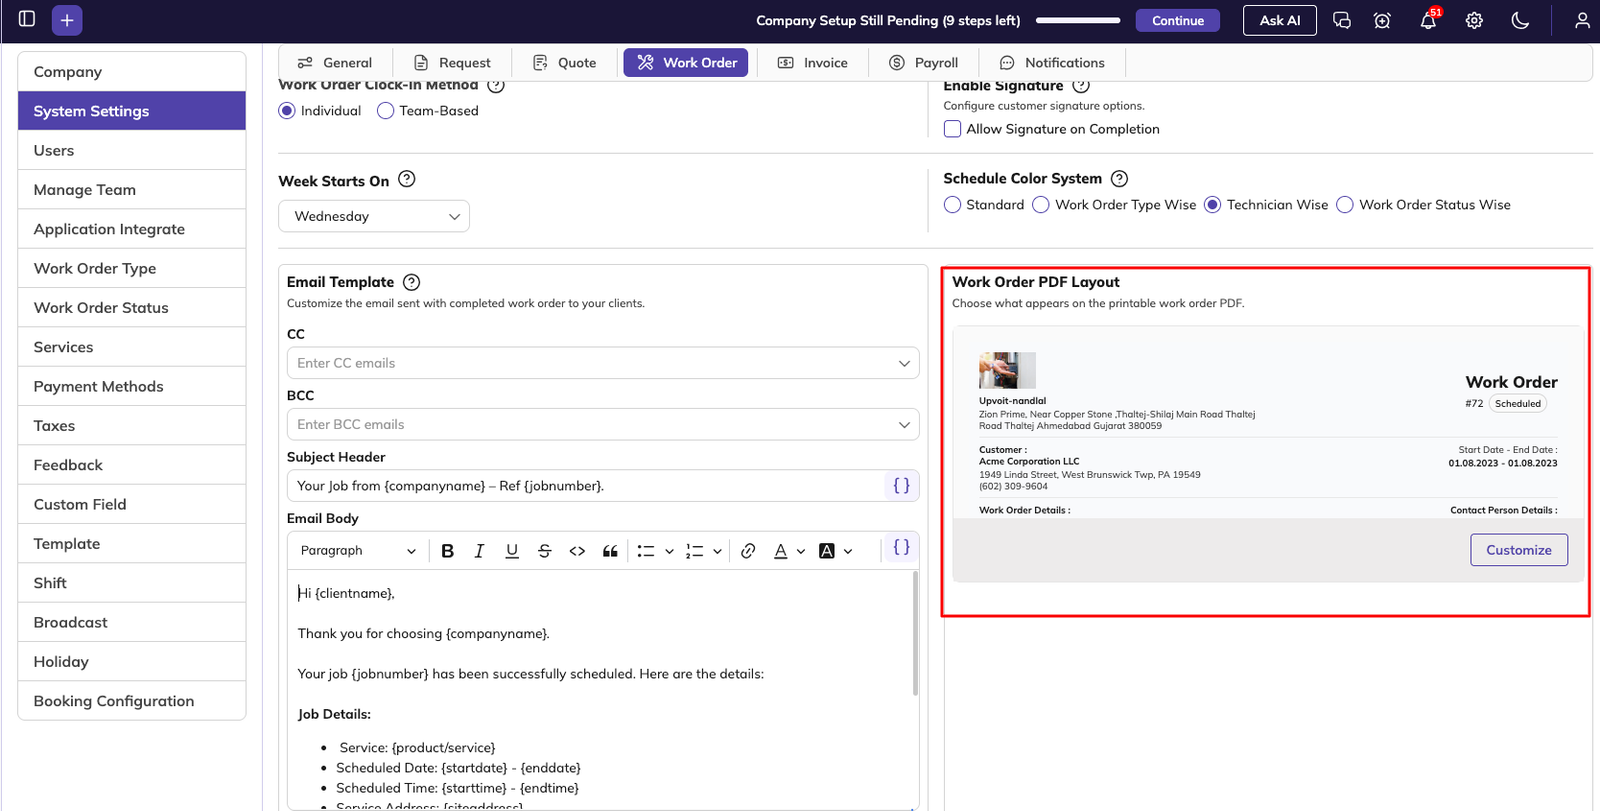
Once a work order is created, its PDF can be downloaded and shared with the customer. This setting shows a preview of the work order PDF. Click Customize to choose which fields are shown on it. The PDF includes your company logo and details from Company Configuration.
Invoice
The Invoice tab controls how work is billed to clients, how invoices are numbered, how they look, how they are sent, and how clients are reminded to pay. The settings are described in the order they appear on screen.

Invoice Number Generation

This controls the format of automatically generated invoice numbers:
-
Invoice Prefix – text added before the number. For example, INV- gives INV-001.
-
Invoice Padding – adds leading zeros so all numbers are the same length. For example, a padding of 4 gives 0001, 0002.
-
Invoice Suffix – text added after the number. For example, -2026 gives 001-2026.
-
Reset – restarts invoice numbering from 1. This is useful for starting new numbering each year.
Billing Mode
Billing Mode decides how work orders are billed to clients. It also changes which settings appear on this tab and which tables appear on the work order page. There are three options: Flat Fee, Labor Based and Hybrid.
Flat Fee
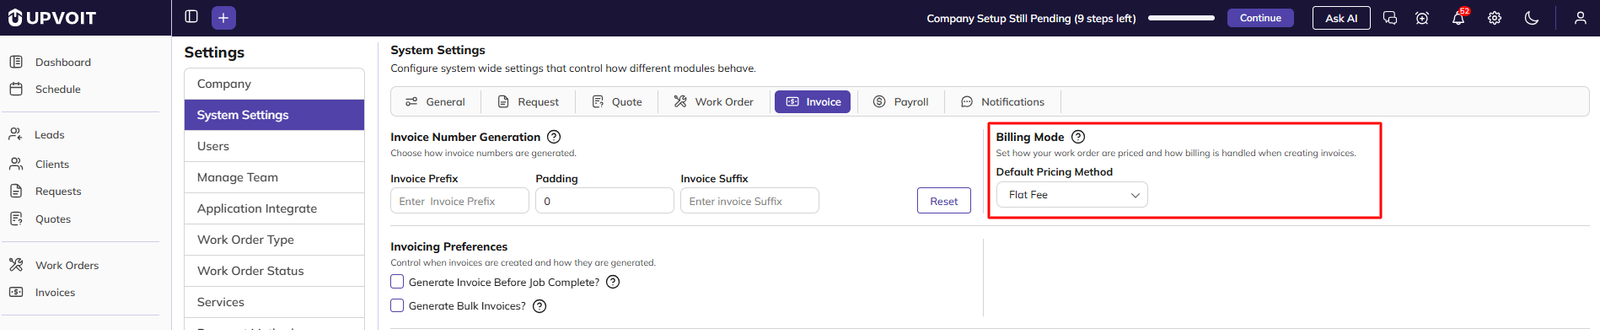
Use Flat Fee when clients are billed only for the services and products on the work order, not for the hours worked.
-
On this tab, the Work Order hours are billable to clients by default. and Overtime Calculations for Billable Hours settings are hidden.
-
On the work order page, only the Product/Service table is shown. The Labor and Expenses tables are not shown.
Invoicing Preferences
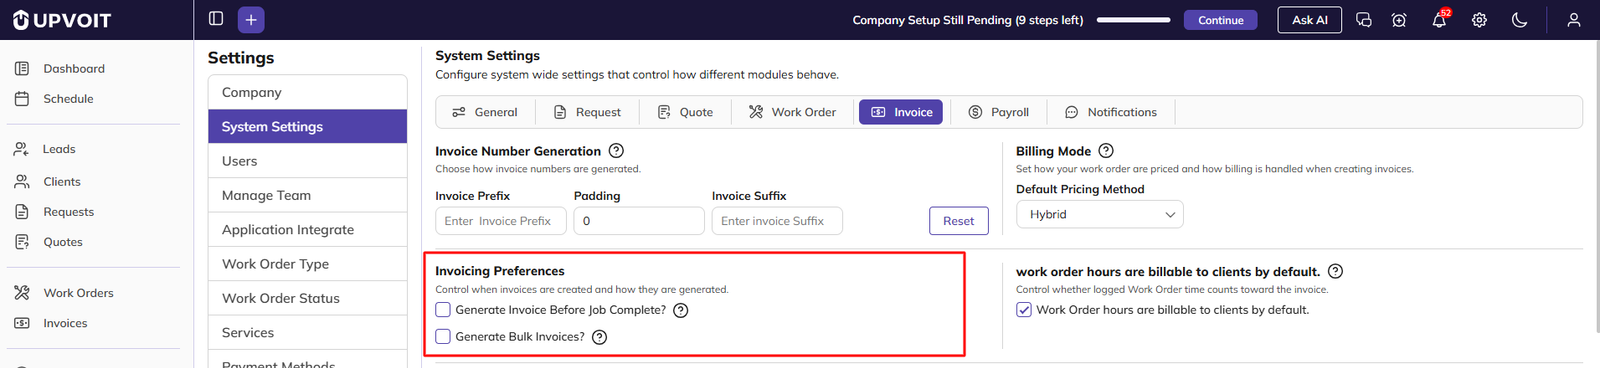
Generate Invoice Before Job Complete?
This allows invoices to be created before a work order is completed.
-
Not ticked (default) – invoices can only be created after the work order is completed.
-
Ticked – invoices can be created for work orders that are still in progress or partly completed. This is useful for progress billing, advance payments or milestone-based invoicing.
Labor Based
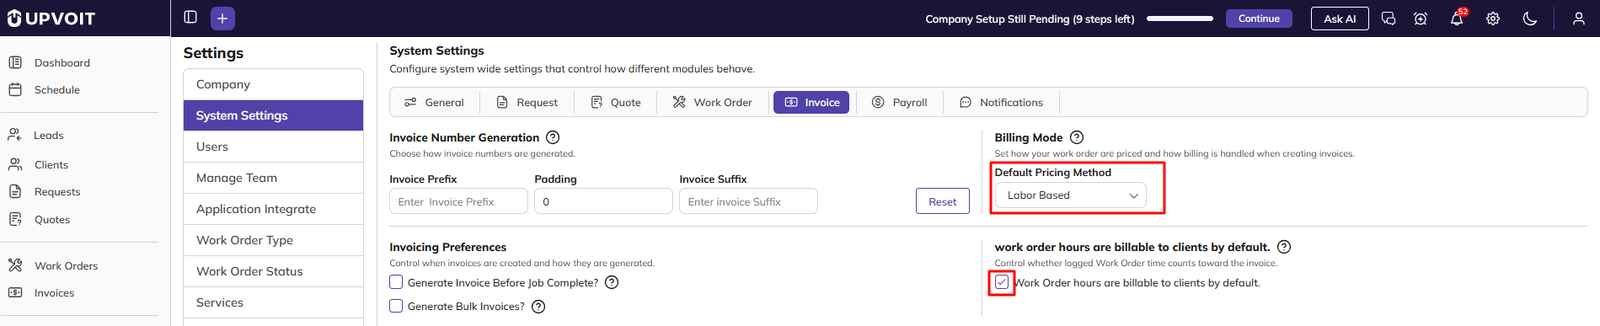
Use Labor Based when clients are billed for the time and expenses recorded on the work order.
-
On this tab, Work Order hours are billable to clients by default. is shown but is not ticked.
-
On the work order page, the Labor and Expenses tables are shown. New hours and expenses are not marked as Billable by default. You can tick Billable on each entry that should be charged to the client.
Hybrid

Hybrid works the same way as Labor Based, but hours are billable by default.
-
On this tab, Work Order hours are billable to clients by default. is shown and is ticked.
-
On the work order page, the Labor and Expenses tables are shown. When adding time, Billable is already ticked, so the hours are included in the client’s invoice.
For both Labor Based and Hybrid, the default can be changed on this tab, and Billable can still be ticked or unticked on each entry in the work order.
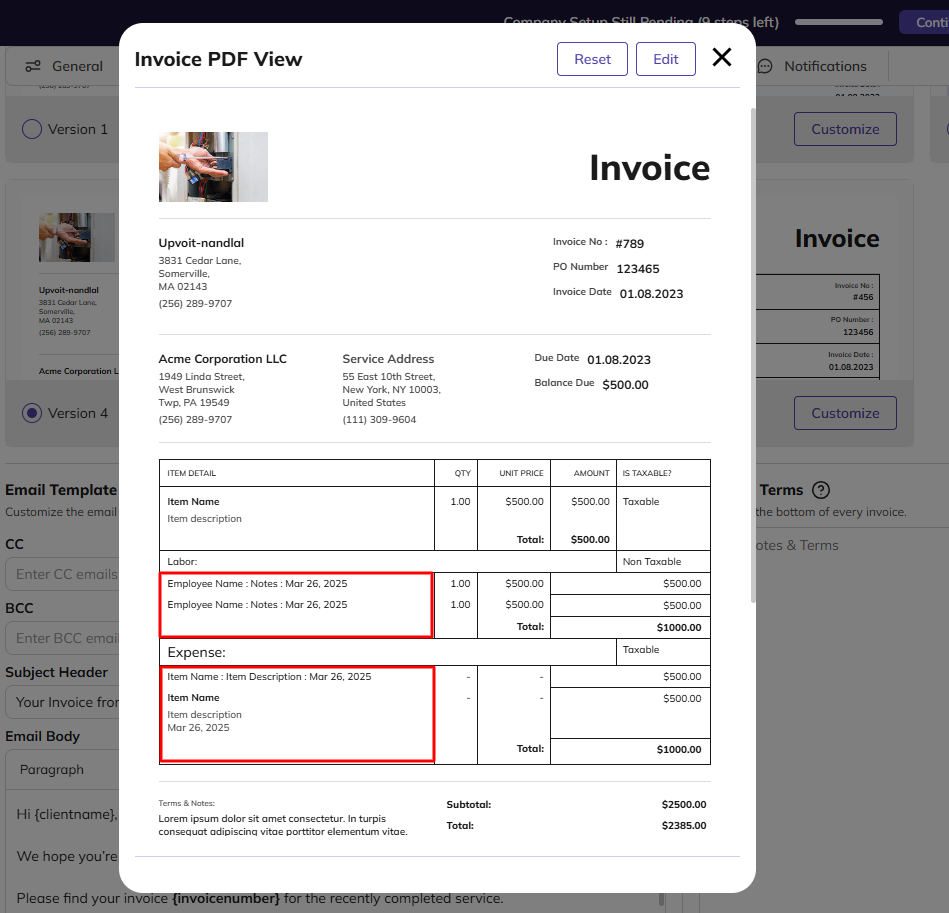
Expense & Hours Line Item Description for Invoice PDF
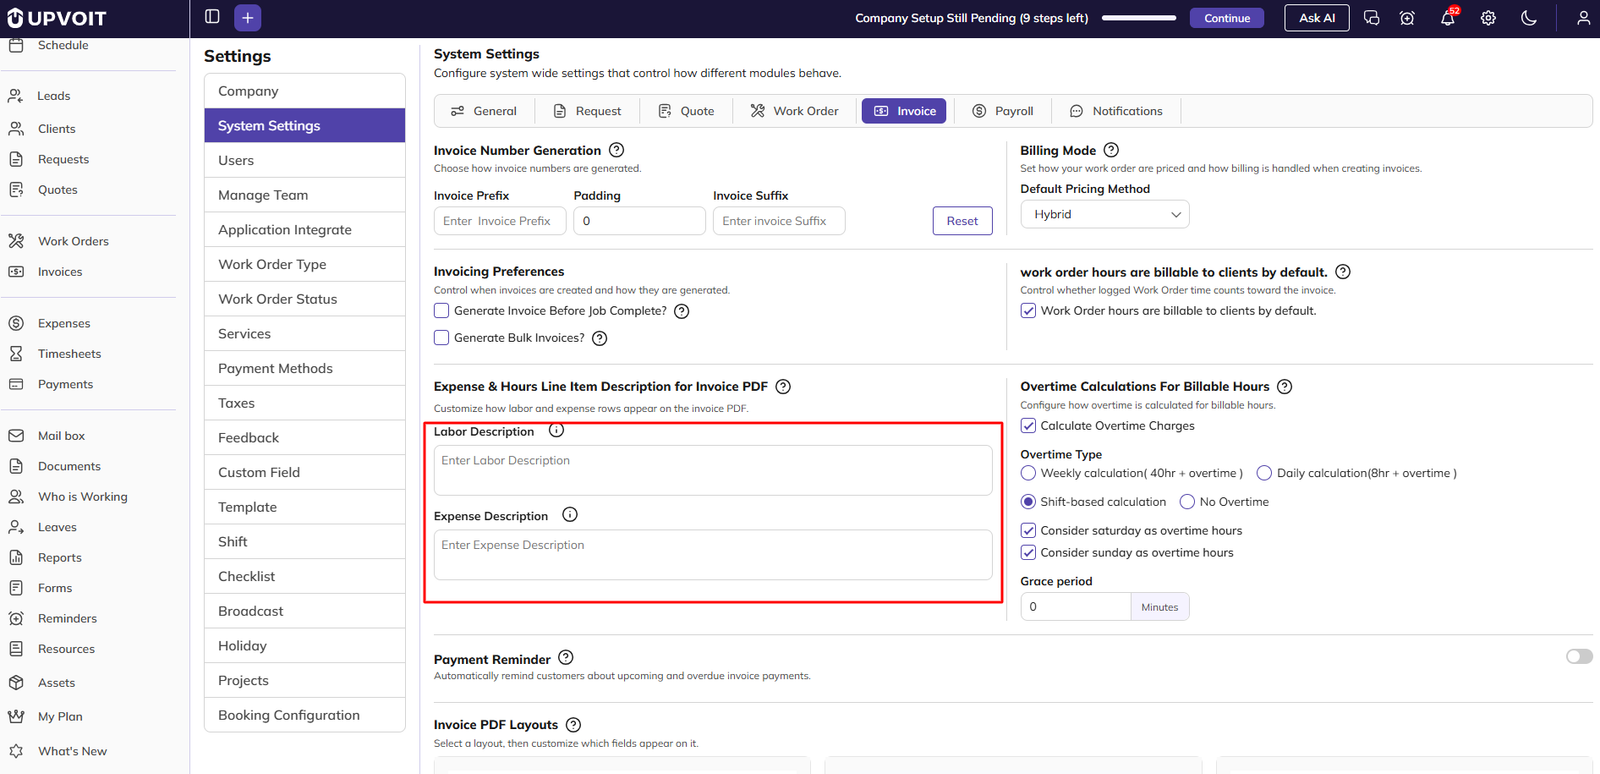
This sets how labor and expense entries are described on the invoice PDF. Enter a description format in Labor Description and Expense Description, using variables in curly brackets. When an invoice is created, the variables are replaced with the real details, such as the technician’s name, date and notes.
When to use This is used to provide client clear breakdowns of who did the work, when, and what was done.
Overtime Calculations for Billable Hours
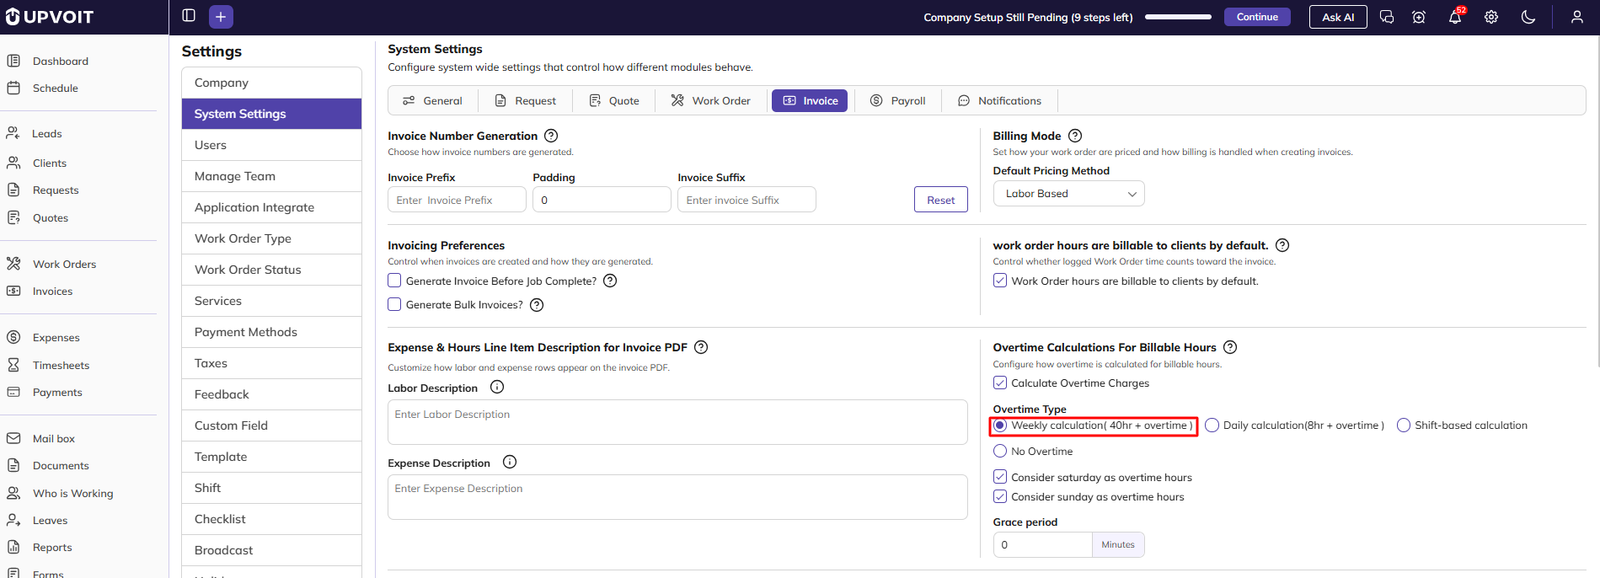
This controls how overtime hours are identified and billed when you charge clients for hours worked. Tick Calculate overtime for invoice, then choose the Overtime Type:
-
Weekly calculation (40hr + overtime) – any hours above 40 in a week are billed as overtime.
-
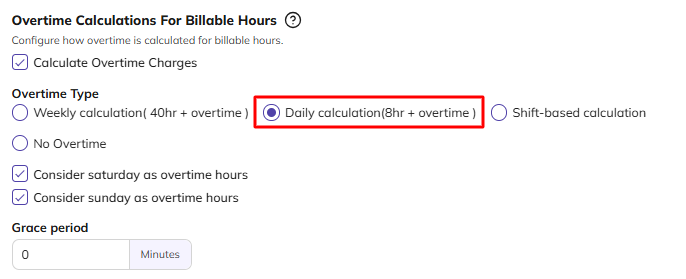
Daily calculation (8hr + overtime) – any hours above 8 in a day are billed as overtime.
-
Shift-based calculation – hours worked outside the technician’s scheduled shift are billed as overtime.

-
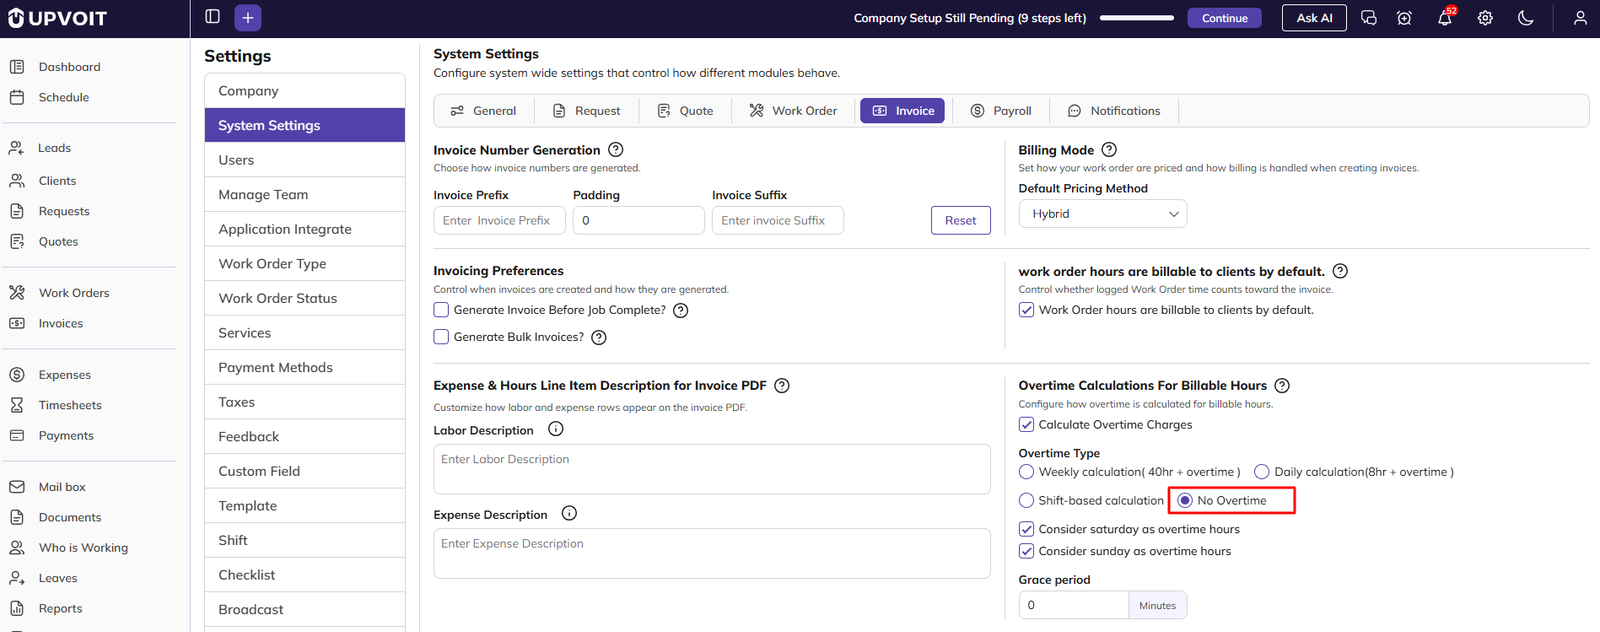
No Overtime – overtime is not calculated automatically. Overtime hours can be set manually.
Additional options:
-
Consider Saturday as overtime hours and Consider Sunday as overtime hours – all hours worked on these days count as overtime.
-
Grace period – a small buffer before overtime starts. For example, with a grace period of 5 minutes, overtime starts only when the time goes more than 5 minutes past the limit.
Payment Reminder

When the Payment Reminder switch is on, reminders are automatically sent to clients before the due date and after the invoice becomes overdue. Switching it on displays the reminder settings:
-
Before Due Date – reminders sent a set number of days before the due date.
-
After Due Date – reminders sent a set number of days after the due date.
Click + Add Reminder to add more reminders, and the red bin icon to remove one.
Each section has its own email and SMS template:
-
Before Invoice Due – the message sent before the due date.
-
After Invoice Is Overdue – the message sent after the due date.
Each template has a Subject Header, Email Body and SMS Template. Words in curly brackets, such as {InvoiceNumber} or {OutstandingBalance}, are replaced with the invoice’s details when the reminder is sent.
Generate Bulk Invoices?

This setting lets you create several invoices at once, instead of creating them one by one.
-
When Generate Bulk Invoices? is ticked, a Create Bulk Invoice button appears at the top right of the Invoice Overview page, next to Create Invoice. When it is not ticked, the button is hidden and invoices must be created one at a time.

-
Clicking Create Bulk Invoice opens a list of clients. You can select multiple clients and multiple invoices, then create all the invoices together.
Invoice PDF and Line Item Descriptions
Invoice PDF Layouts
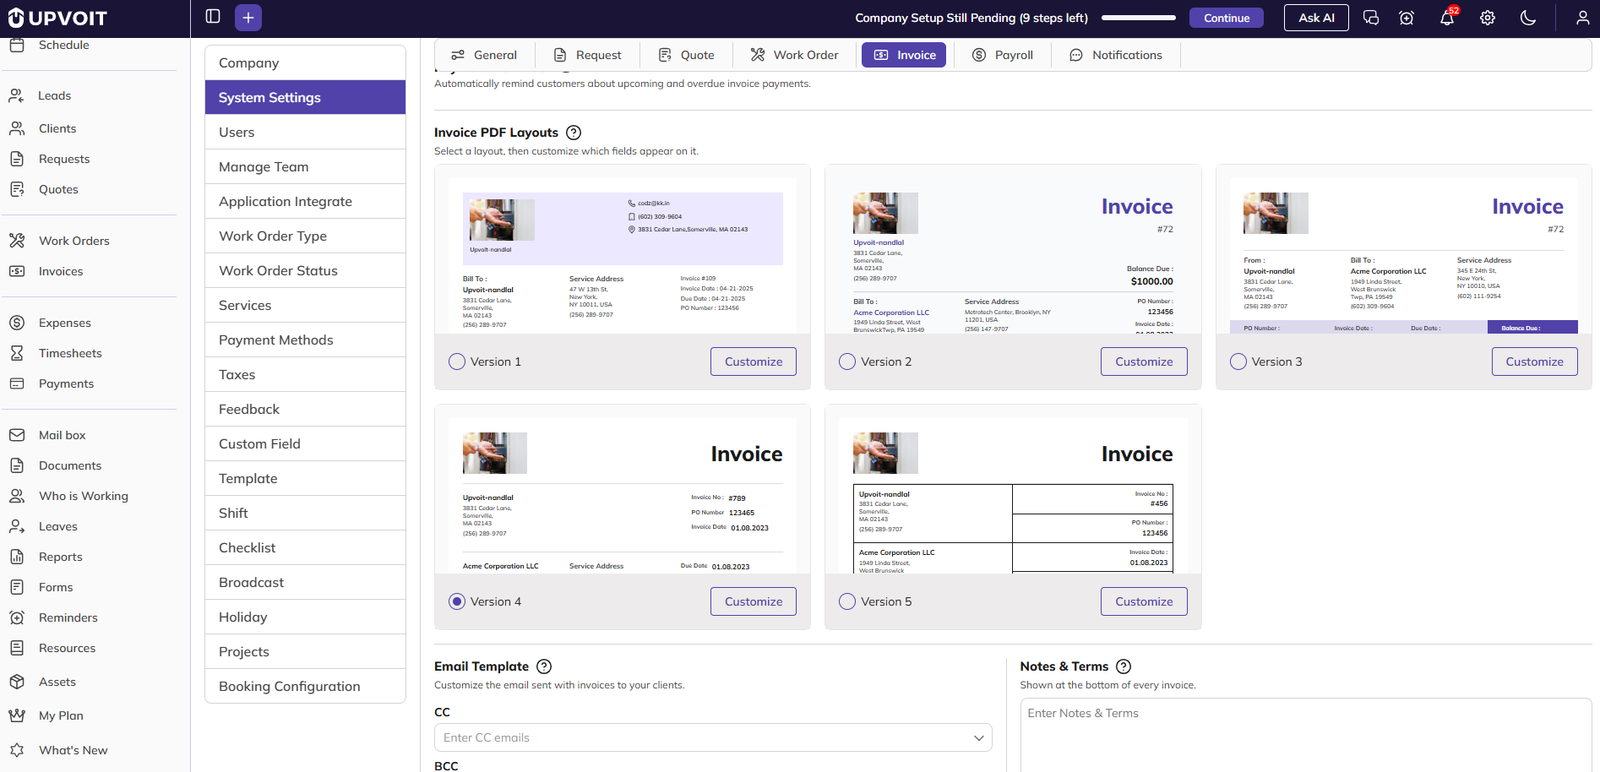
Choose how your invoices look when they are downloaded or sent as a PDF. UPVOIT provides five ready-made layouts (Version 1 to Version 5). Pick the one that best matches your branding. The layout controls how your company details, client details, line items, totals and notes appear on the invoice. Click Customize under a version to adjust it.

Email, Payment Link and Notes
Email Template

This is the default email used when invoices are sent to clients. Set the default CC, BCC, Subject Header and Email Body here. Words in curly brackets, such as {invoicenumber} or {clientname}, are replaced with the invoice’s details when the email is sent.
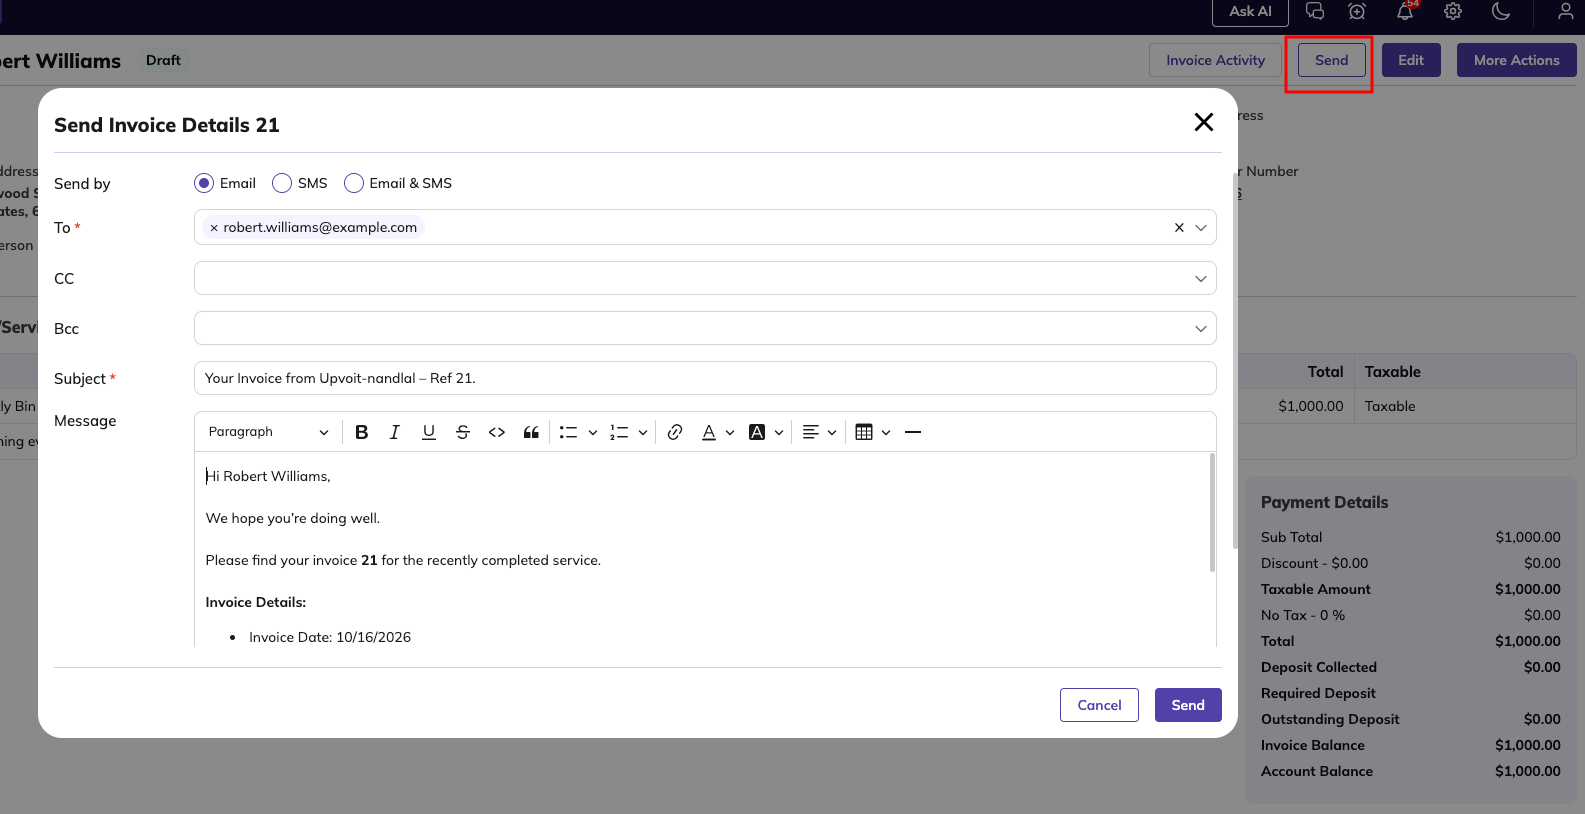
To send an invoice, click Send on the invoice page. The Send Invoice Details window opens with the subject and message already filled in from this template.
-
Choose Send by Email, SMS or Email & SMS.
-
Check the To address and the message, and edit them if needed.
-
Tick Include invoice PDF as attachment if needed.
-
Click Send.
Generate Payment Link Via
Choose the payment provider used to create the online payment link that clients use to pay the invoice (for example, Stripe).
If the invoice already has an active payment link from any provider, that link is used in the email and PDF, even if a different provider is selected here. The selected provider is used only when a new link needs to be created.
Send Invoice to Clients Automatically
When ticked, each invoice is sent to the client automatically as soon as it is created, so you don’t need to click Send.
Notes & Terms
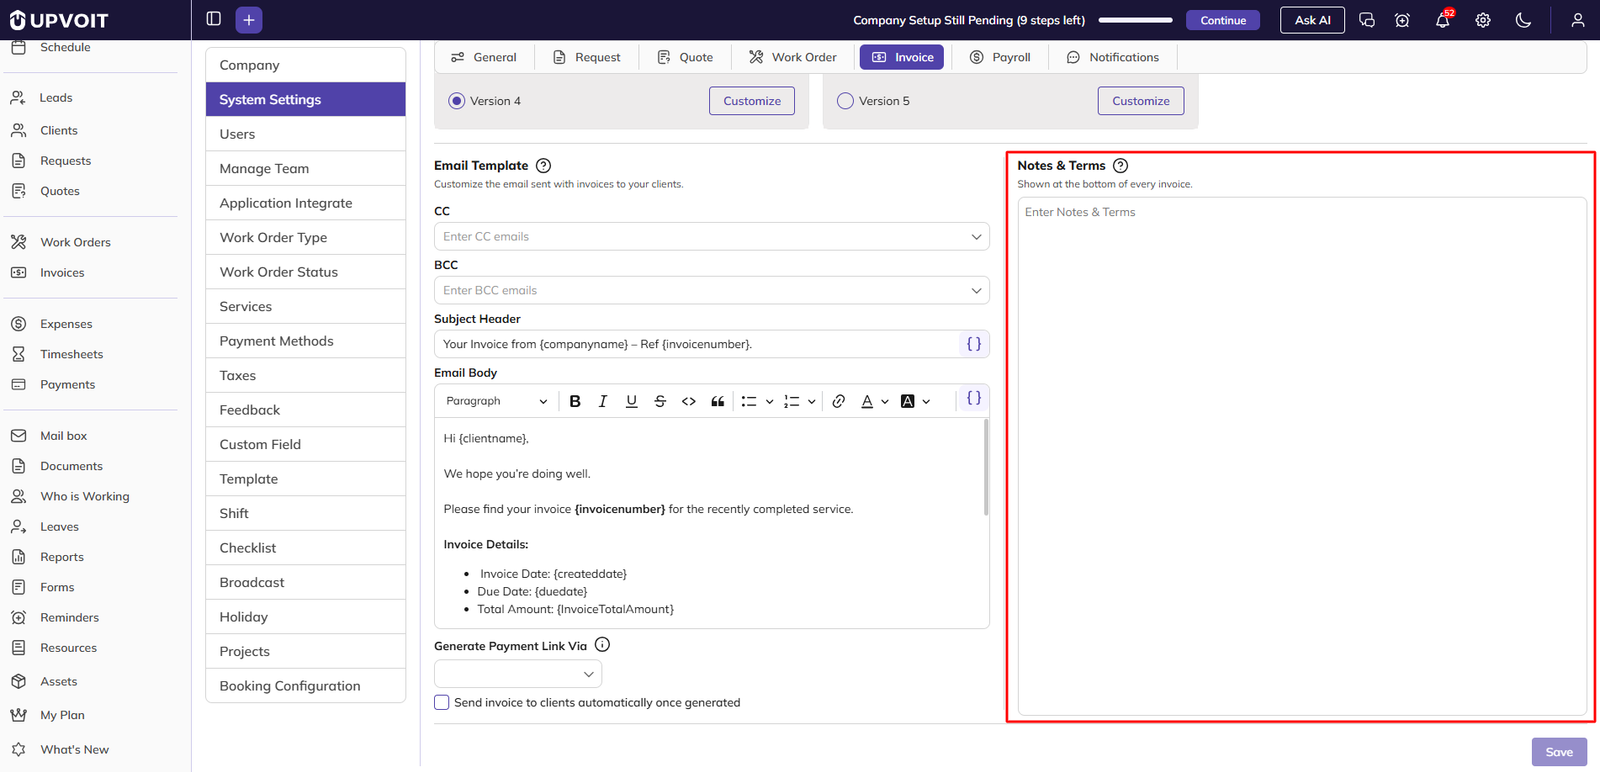
Use Notes & Terms to set the standard notes and terms and conditions that appear automatically on every new invoice. For example:
-
Notes – a thank-you message or support contact details.
-
Terms & conditions – payment rules, late fees, or a return or refund policy.
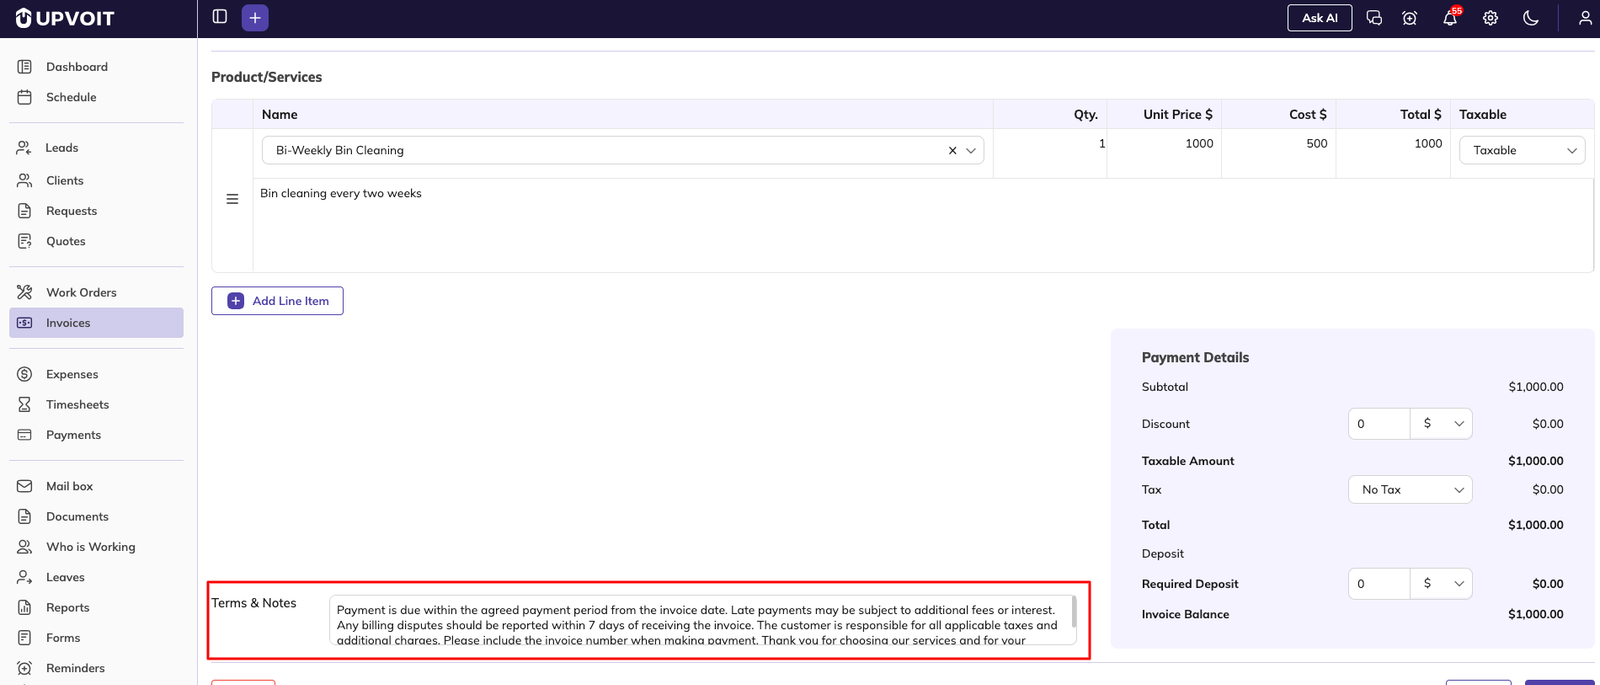
When you create an invoice, this text is filled in automatically in Terms & Notes. You can still edit it on each invoice if needed. The text is also shown on the invoice page and on the invoice PDF sent to the client.
Payroll
The Payroll tab controls how technicians’ time is counted and paid: overtime, payroll periods, which work orders are included, clock-in rounding, allowances, travel, breaks and leave approvals. These settings affect pay only. Billing to clients is set on the Invoice tab.
Overtime, Payroll Period and Work Orders
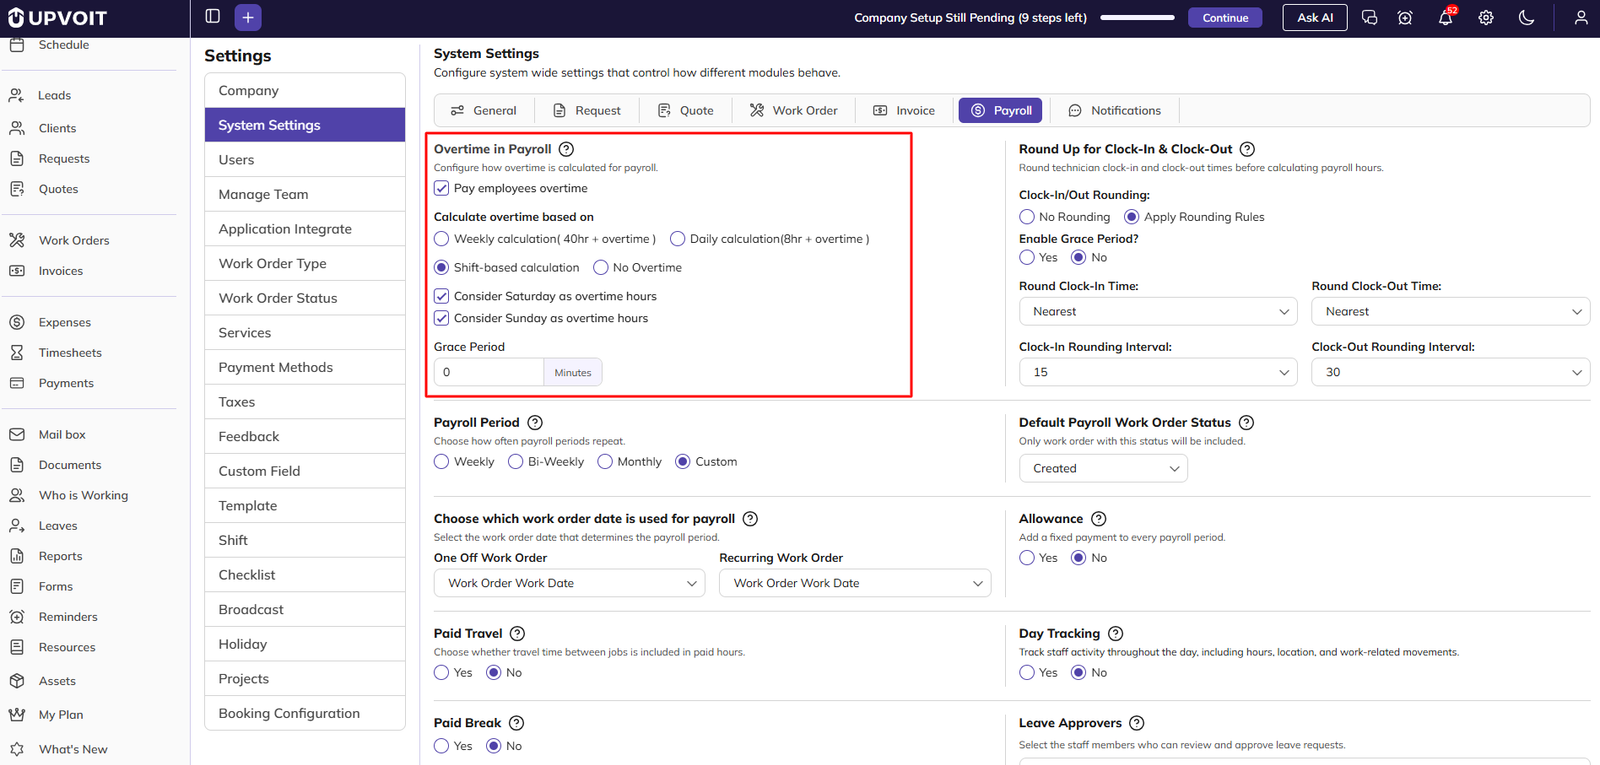
Overtime in Payroll
The Payroll tab controls how technicians’ time is counted and paid: overtime, payroll periods, which work orders are included, clock-in rounding, allowances, travel, breaks and leave approvals. These settings affect pay only. Billing to clients is set on the Invoice tab.
Where these settings are used
These settings are applied when labor is added to a work order. When you open a work order and click Add Time in the Labor section, the Payroll part of the Add Time window is calculated using these rules. For example:
-
Straight hours and overtime are split according to Overtime in Payroll.
-
Clock-in and clock-out times are rounded according to Round Up for Clock-In & Clock-Out.
-
Travel time and break time are counted as paid or not, according to Paid Travel and Paid Break.
-
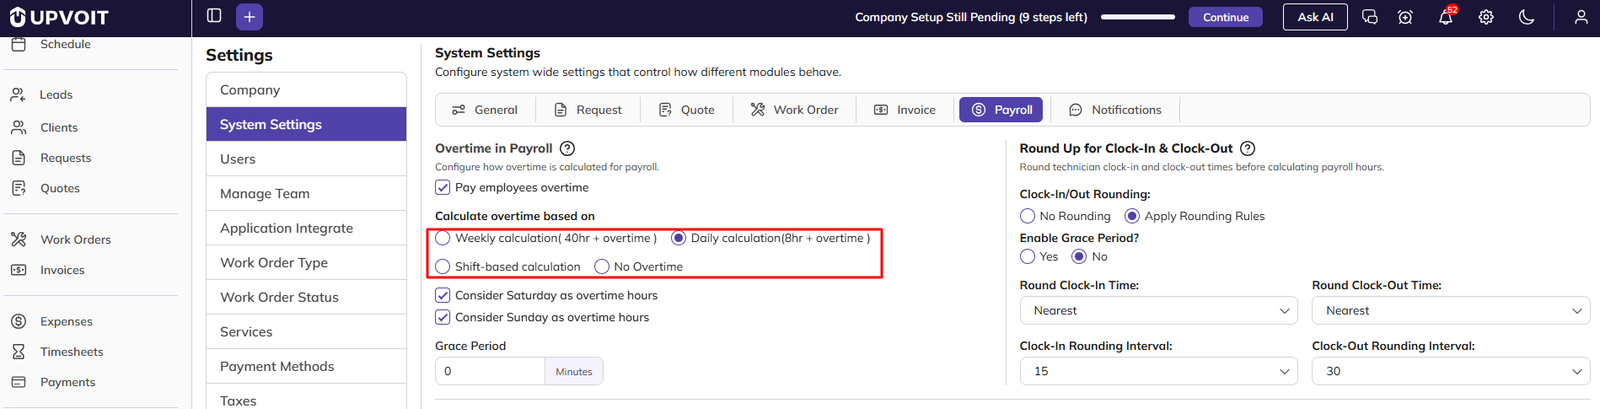
Weekly calculation (40hr + overtime) – hours above 40 in a week are paid as overtime.
-
Daily calculation (8hr + overtime) – hours above 8 in a day are paid as overtime
-
Shift-based calculation – hours worked outside the technician’s scheduled shift are paid as overtime.
-
No Overtime – overtime is not calculated automatically.
Tick Consider Saturday as overtime hours or Consider Sunday as overtime hours to pay all hours on those days as overtime. Grace Period is a small buffer before overtime starts. For example, with 5 minutes, overtime starts only when the time goes more than 5 minutes past the limit.
Round Up for Clock-In & Clock-Out
This setting rounds technicians’ clock-in and clock-out times before their paid hours are calculated. It removes odd minutes so payroll is simpler and more consistent. It can also act as a lateness rule.
Clock-In/Out Rounding
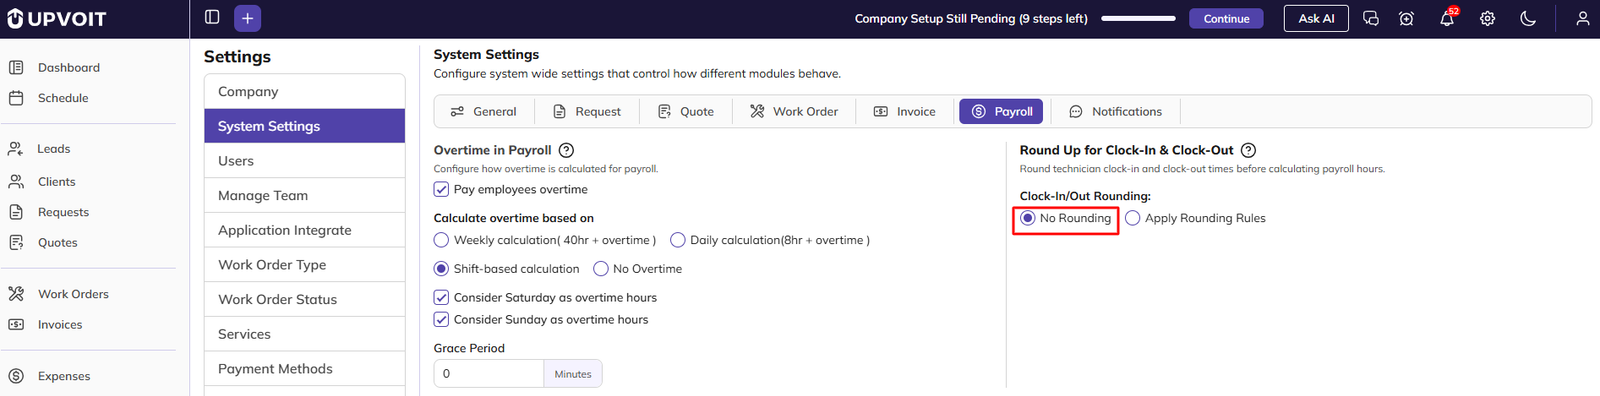
-
No Rounding – the exact clock-in and clock-out times are used, to the minute. No other options are shown.
-
Apply Rounding Rules – times are rounded, and the rounding options are shown.
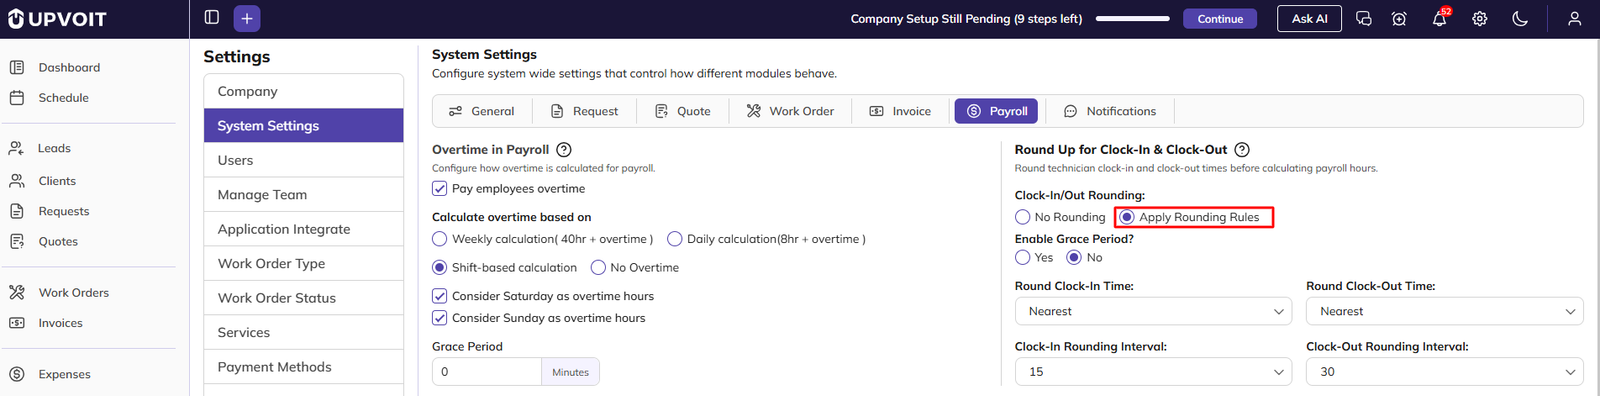
When Apply Rounding Rules is selected, set the rules separately for clock-in and clock-out:
-
Round Clock-In Time / Round Clock-Out Time – the rounding method:
-
Upward – always rounds forward to the next interval. With 15 minutes, a clock-in at 9:07 becomes 9:15. This acts as a penalty for late arrival.
-
Downward – always rounds back to the previous interval. With 15 minutes, 9:07 becomes 9:00. This is more lenient for staff.
-
Nearest – rounds to the closest interval. With 15 minutes, 5:07 becomes 5:00 and 5:08 becomes 5:15.
-
-
Clock-In Rounding Interval / Clock-Out Rounding Interval – the rounding step in minutes (for example, 5, 10, 15 or 30).
Enable Grace Period?
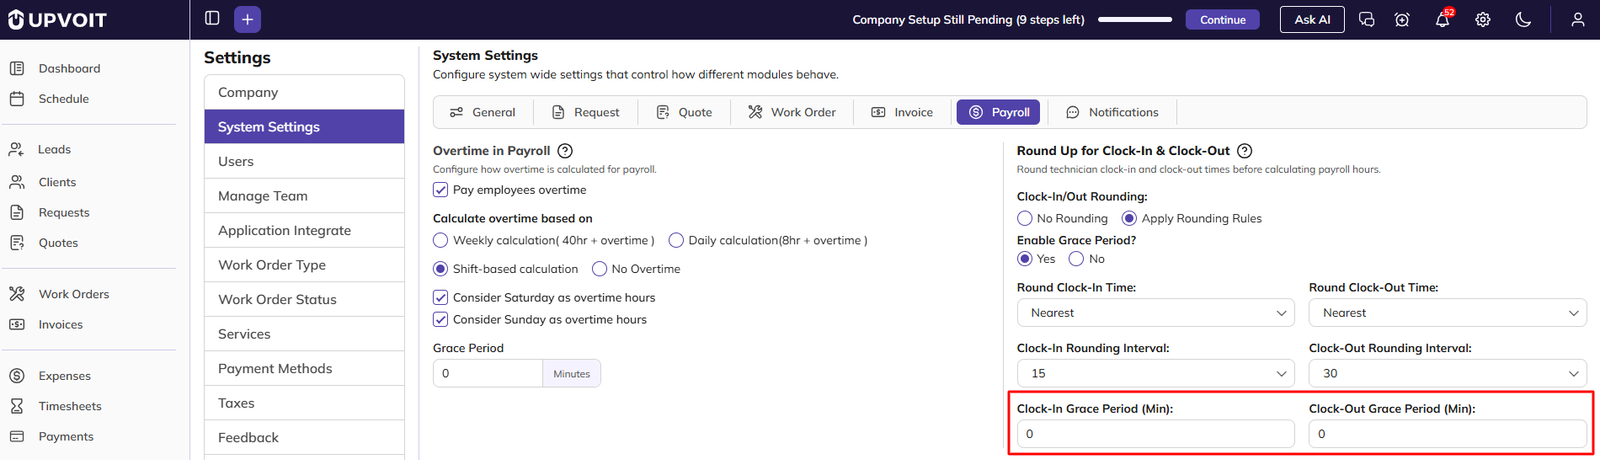
This option is shown only when Apply Rounding Rules is selected.
-
No – no grace period is used.
-
Yes – two more fields are shown:
-
Clock-In Grace Period (Min) – the grace minutes allowed for clock-in.
-
Clock-Out Grace Period (Min) – the grace minutes allowed for clock-out.
-
When to use it
-
To simplify payroll by removing odd minutes.
-
To encourage punctuality, by rounding late clock-ins upward.
-
Avoid rounding if you must pay exact-to-the-minute times for legal or compliance reasons.
Payroll Period
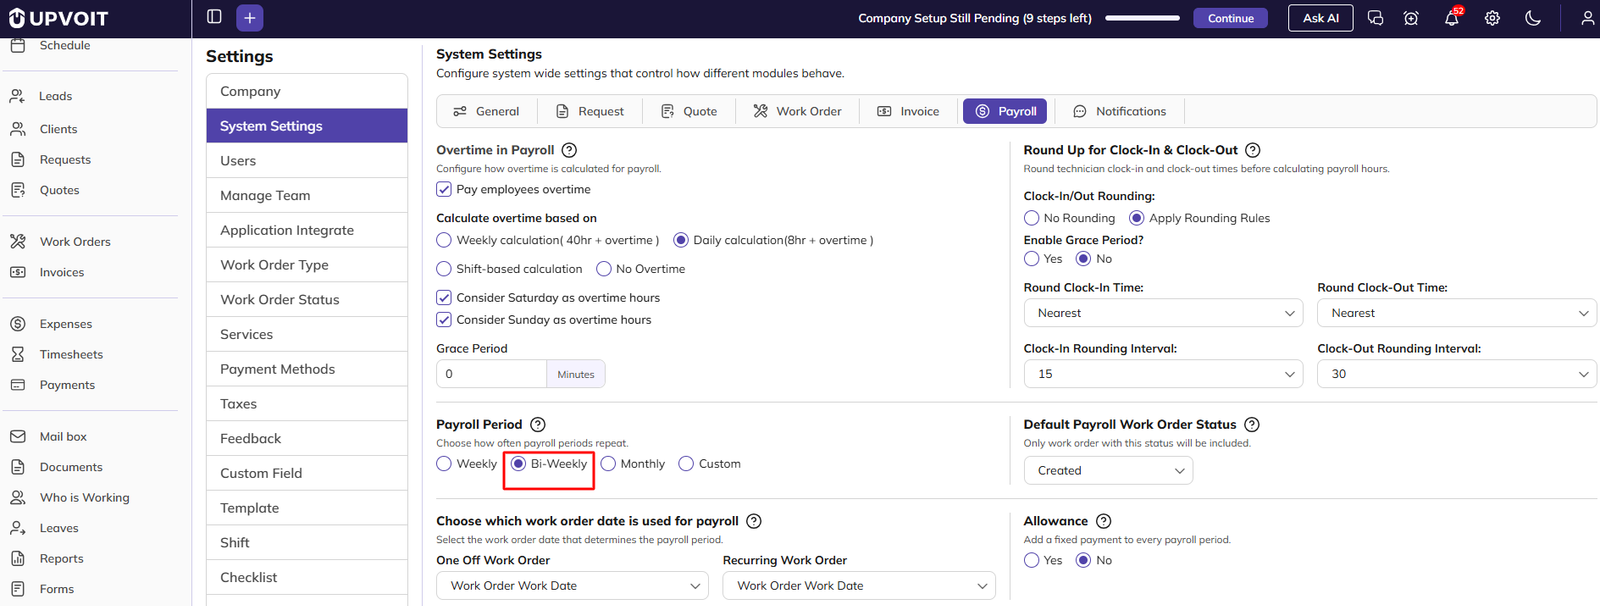
Payroll is created from the labor added to work orders. The Payroll Period sets how often payroll is calculated for your team, and it controls the date range filter on the Timesheets page.
-
Weekly – payroll every 7 days. The Timesheets date filter shows one week by default.
-
Bi-Weekly – payroll every 14 days. The Timesheets date filter shows two weeks by default.
-
Monthly – payroll once a month. The Timesheets date filter shows one month by default.
-
Custom – set your own period. On the Timesheets page, select the date range manually.
On the Timesheets page, the date range is shown at the top (for example, 09/28/2026 – 10/04/2026). Use the arrows to move to the previous or next period, or click Today to return to the current period.
Choose the option that matches how you pay your staff, such as weekly wages or monthly salaries. Use Custom if your contracts or local laws require a different payroll cycle.
Default Payroll Work Order Status
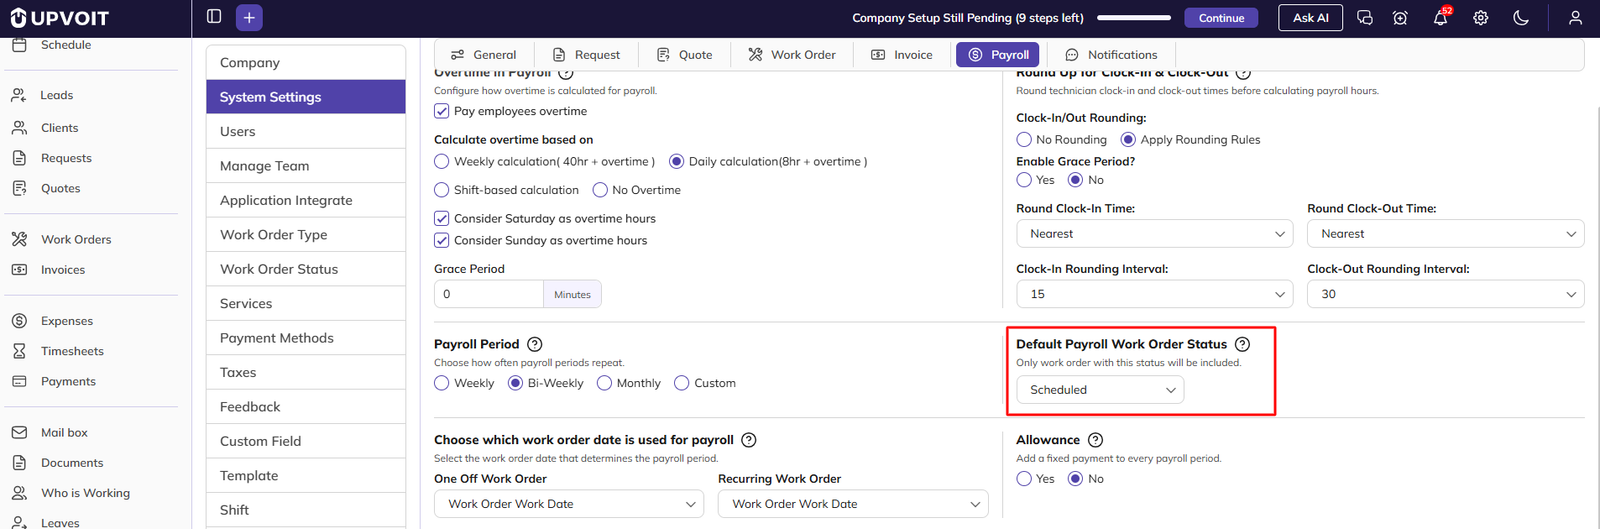
This sets the work order status used by default in the Timesheets status filter, next to the date range.
Only hours and expenses from work orders with that status are shown, and you can still change the filter manually when needed.
For example, if the default status is Scheduled, the Timesheets page shows only hours and expenses from Scheduled work orders. This keeps hours from unfinished or unapproved work orders out of payroll.
After changing this setting, log out and log back in to see the new default on the Timesheets page.

Choose which work order date is used for payroll
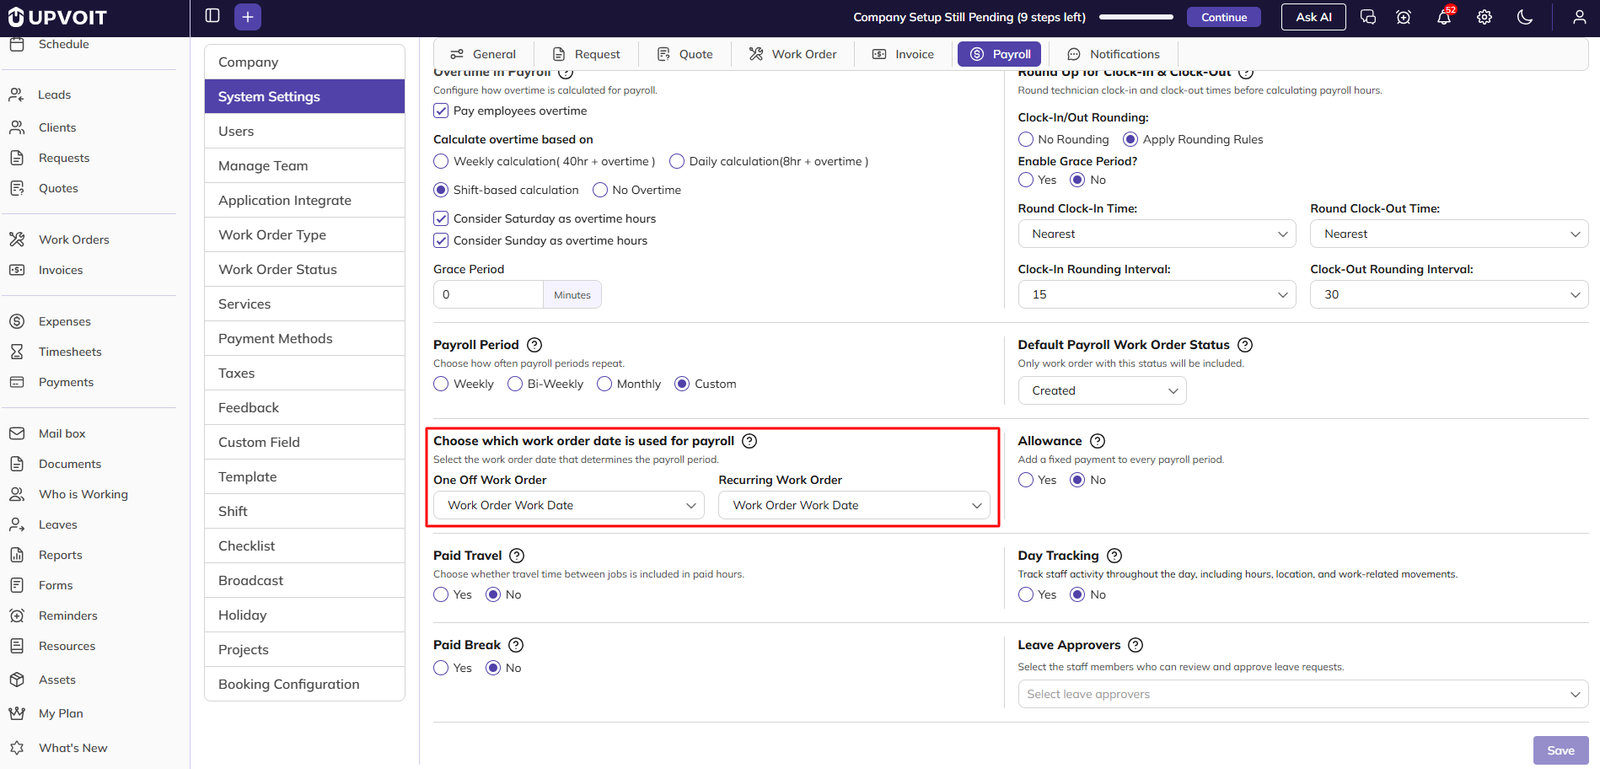
This setting decides which work order date is used to place hours and expenses into a payroll period. It works as a filter on the Timesheets page: when a date range is selected, hours are shown according to the chosen date.
Set it separately for:
-
One Off Work Order Payroll Run By – for single work orders.
-
Recurring Work Order Payroll Run By – for repeating work orders.
Choose carefully. The wrong option can place hours in the wrong payroll period.
The options
The examples below use the same work order: it starts on May 1, the work is done on May 2 and 3, and it is completed on May 4.
-
Work Order Completed Date – all hours are recorded on the date the work order is completed, however many days the work took. In the example, all hours are recorded on May 4.
-
Best when you pay only after the whole work order is finished and checked.
-
Note: hours may all fall into one payroll period, even if the work spanned several weeks.
-
-
Work Order Work Date – hours are recorded on the actual days the technicians worked. In the example, hours are recorded on May 2 and May 3.
-
The most accurate option for hourly or daily pay, because hours fall into the exact period they were worked.
-
Note: technicians must log their time correctly each day.
-
-
Work Order Start Date – all hours are recorded on the date the work order started. In the example, all hours are recorded on May 1.
-
Best for project-based or contract payments.
-
Note: the daily and hourly breakdown is lost.
-
Allowance, Travel, Tracking, Breaks and Leave
Allowance
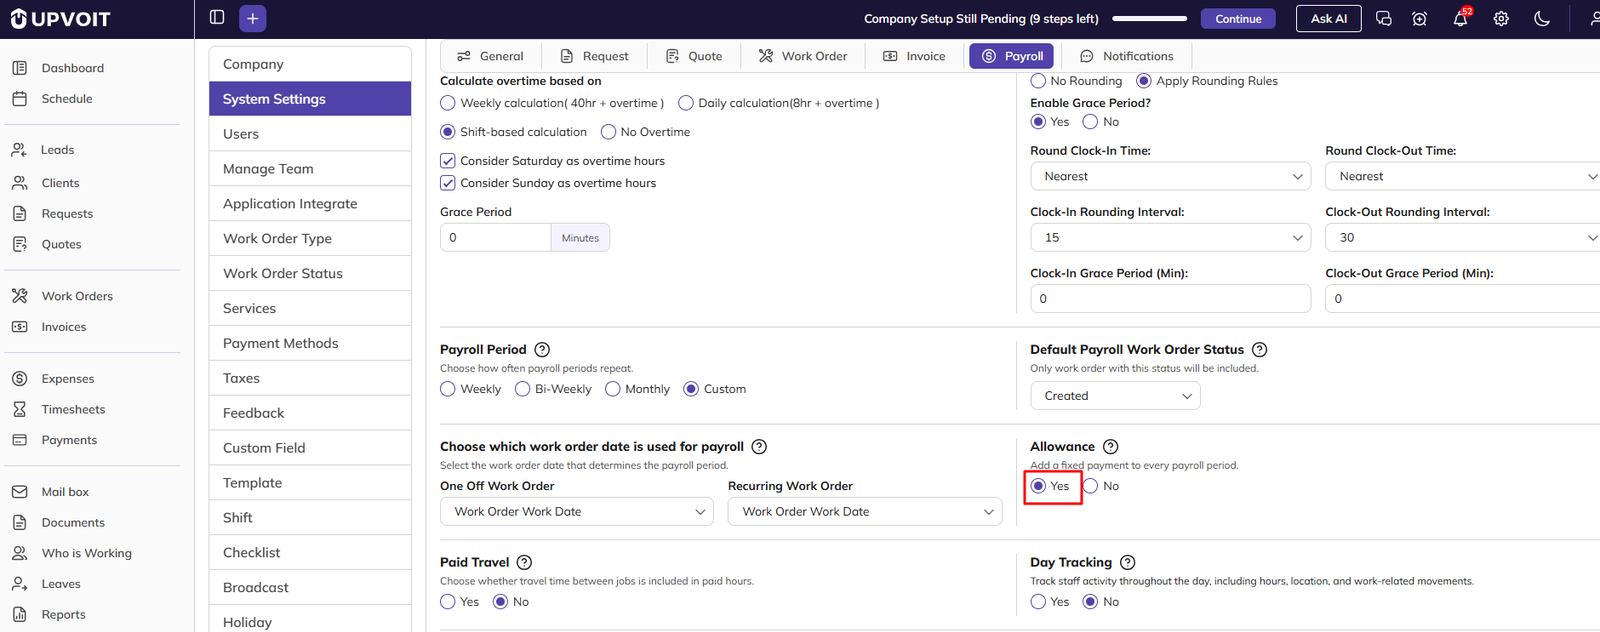
Allowances are extra amounts paid to technicians on top of their pay, such as a travel allowance. When Add Allowance is set to Yes, the Allowances menu appears in Settings. When it is set to No, the menu is hidden and allowances are not used.
Note: Allowances are covered in more detail in the Allowances section.
Paid Travel
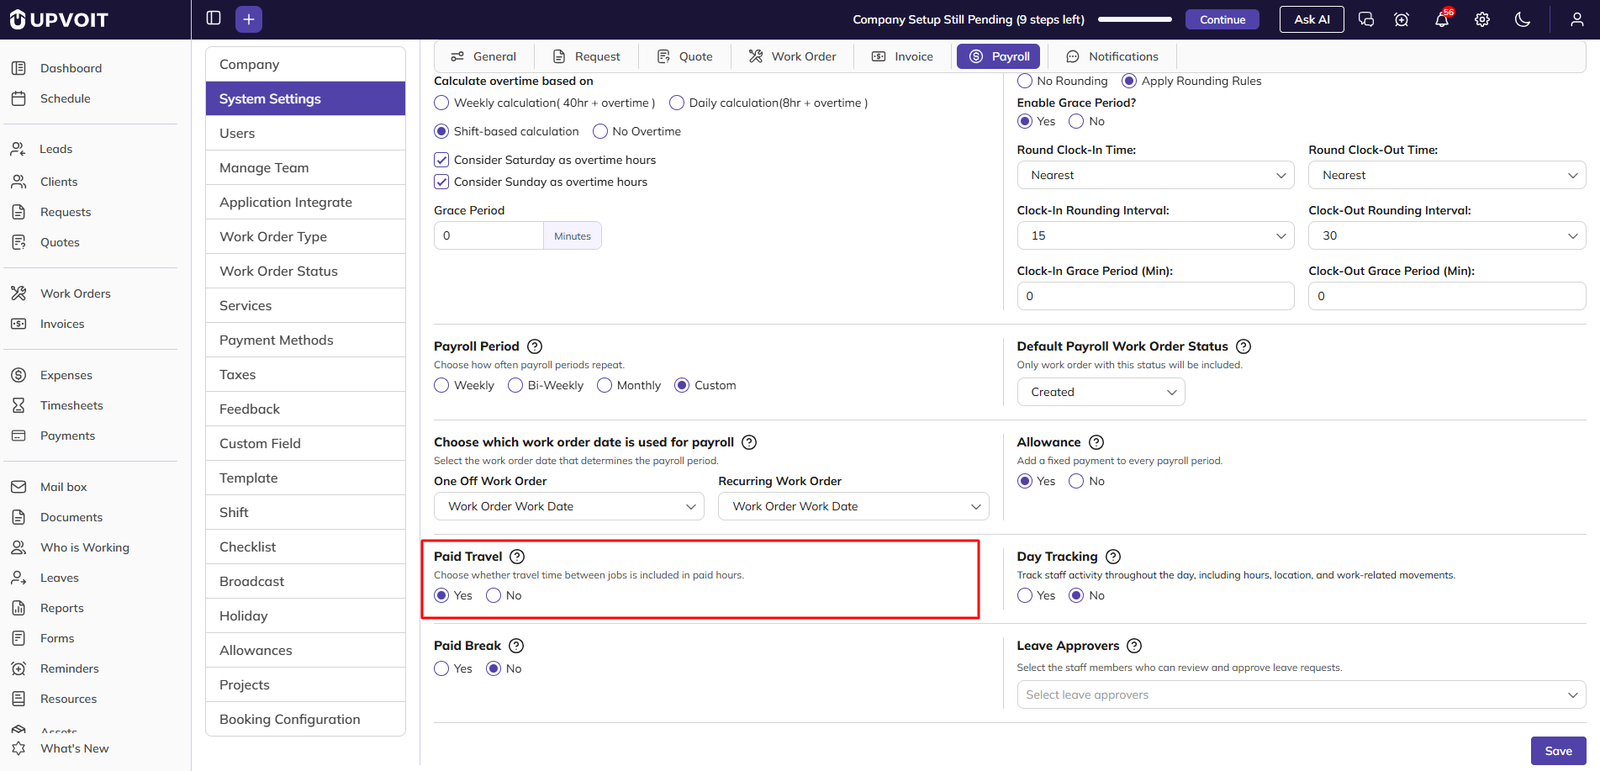
This decides whether technicians are paid for the time spent travelling to and between work orders.
-
Yes – travel time is counted as paid hours.
-
No – travel time is not paid.
Day Tracking
This tracks each technician’s full working day, not just the time spent on a work order.
When Allow Day Tracking is set to Yes:
-
The Location Update Interval (seconds) field is shown. It sets how often the technician’s location is updated.
-
The Day Timesheet tab is shown on the Timesheets page. It shows everything the technician does from the moment they start for the work order: travel time, clock-in, break time, clock-out, and travel time to the next work order.
To let clients know when a technician is on the way, also turn on the On The Way email and SMS notification in the Communications tab.
When Allow Day Tracking is set to No, the location interval field is hidden and the technician’s day is not tracked.
Paid Break
This decides whether technicians are paid for their break time.
-
Yes – break time is counted as paid hours.
-
No – break time is not paid.
Leave Approvers
Choose the people responsible for approving leave requests. Click Leave Approvers and select their names from the dropdown. You can select more than one person.
Communications
The Communications tab controls the automatic notifications sent to customers and technicians when something happens on a work order. It has two sub-tabs:
-
Email – automatic emails.
-
SMS – automatic text messages.
Each sub-tab has its own Save button, so save the Email and SMS settings separately.
Notification events
Both sub-tabs have the same four events:
-
Work Order Create – sent when a new work order is created. It can be sent to the Customer, the Technician, or both.
-
Work Order Update – sent when anything on a work order is changed. It can be sent to the Customer, the Technician, or both.
-
Work Order Complete – sent to the Customer when the work order is completed.
-
On The Way – sent to the Customer when the work order status changes to On The Way, so the customer knows the technician is coming.
A notification is sent only when its checkbox is ticked. When a checkbox is not ticked, nothing is sent to that person for that event.
Who receives customer emails
-
If a contact person is selected on the work order, the email is sent to the contact person.
-
If no contact person is selected, the email is sent to the client’s primary email.

When you tick Customer or Technician under an event, the email template for that person is shown:
-
CC and BCC – default addresses to copy in.
-
Subject Header – the email subject.
-
Email Body – the email message.
Customer and technician emails have separate templates, so each can receive a different message for the same event. Use the { } button to add variables such as the client name or work order number. They are replaced with the work order’s details when the email is sent.
SMS
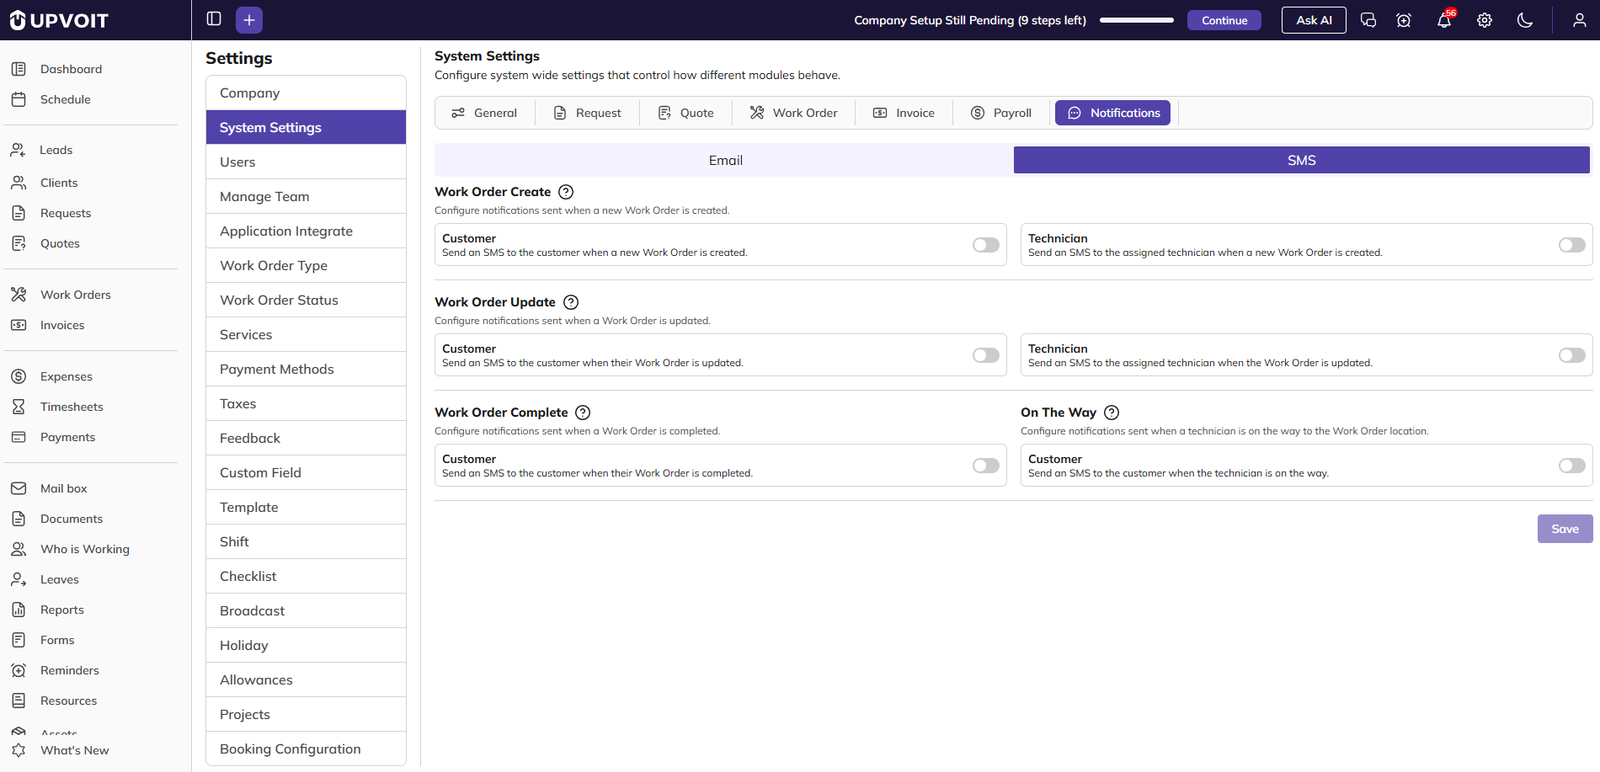
When you tick Customer or Technician under an event, an SMS Template field is shown. Enter the text message for that person. Use the { } button to add variables, in the same way as email.
Did this answer your question?


