
Asset Management Overview
The Assets module tracks the equipment and machinery your business owns or services, whether company property or customer equipment installed at a client’s site. You can record each asset’s details, warranty and maintenance information, assign it to a technician, link it to jobs, and see its full service history. You can also import many assets at once from a spreadsheet.
Assets List
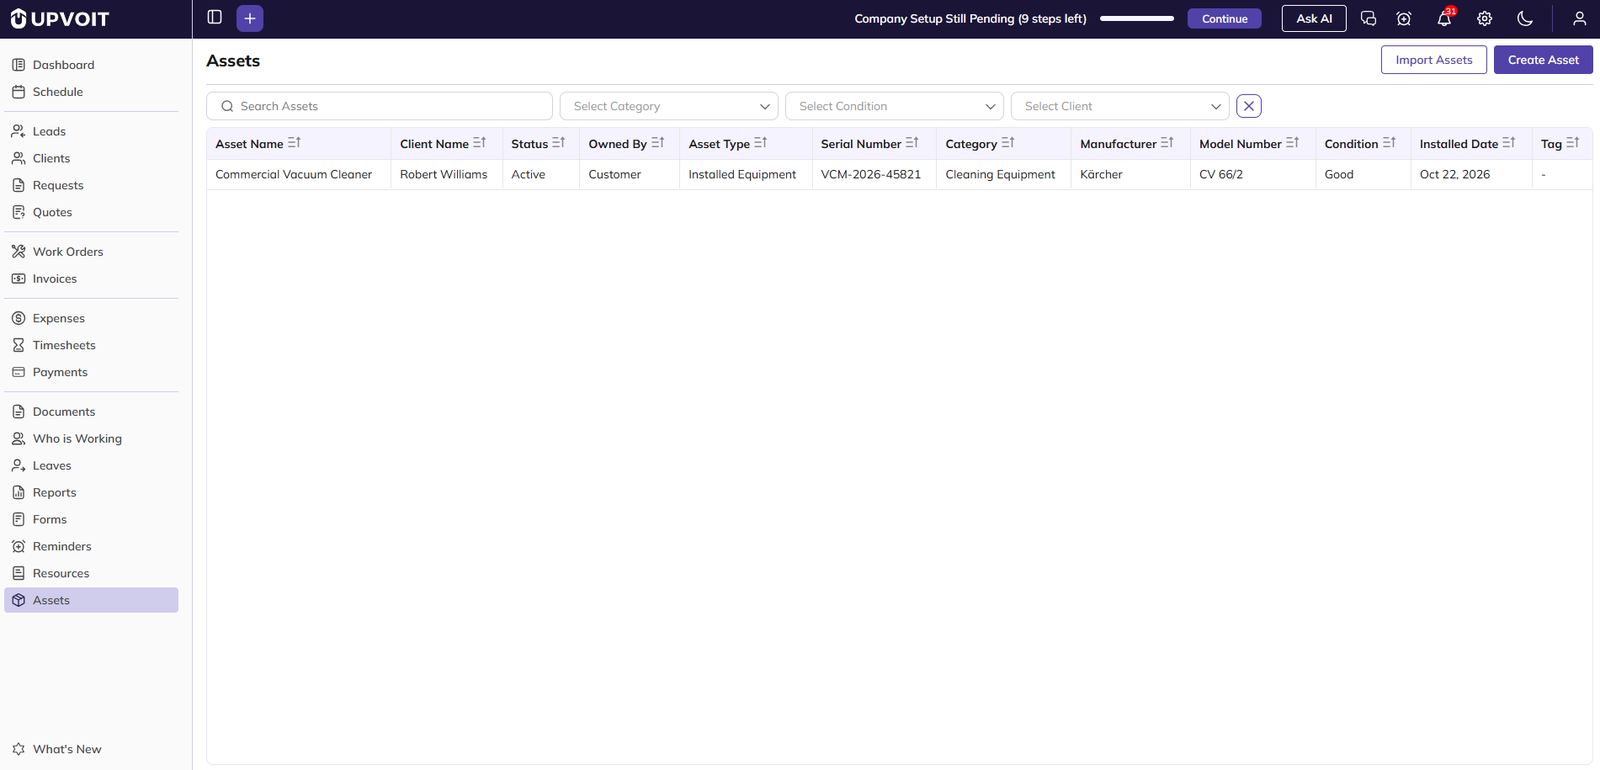
The Assets List shows every asset in your account. Each column can be sorted. The list shows:
-
Asset Name: The title given to the asset.
-
Client Name: The customer who owns the asset. It shows “–” for company-owned assets.
-
Status: The asset’s current state.
-
Owned By: Whether the asset belongs to the Company or a Customer.
-
Asset Type, Serial Number, Category, Manufacturer, Model Number: The asset’s identification details.
-
Condition: The condition recorded under Warranty & Maintenance.
-
Installed Date: The date the asset was added to a job with the action Installed. See Installed Date below.
-
Tag: Labels used to group assets.
Searching and filtering the list
-
Type an asset name or detail in the Search Assets bar.
-
Use Select Category to show assets in a particular category.
-
Use Select Condition to filter by asset condition.
-
Use Select Client to show assets belonging to a specific client.
-
Click the ✕ button to clear all filters.
Click any row to open that asset’s detail page. To add a new asset, click Create Asset. To add many assets at once, click Import Assets.
Create Asset
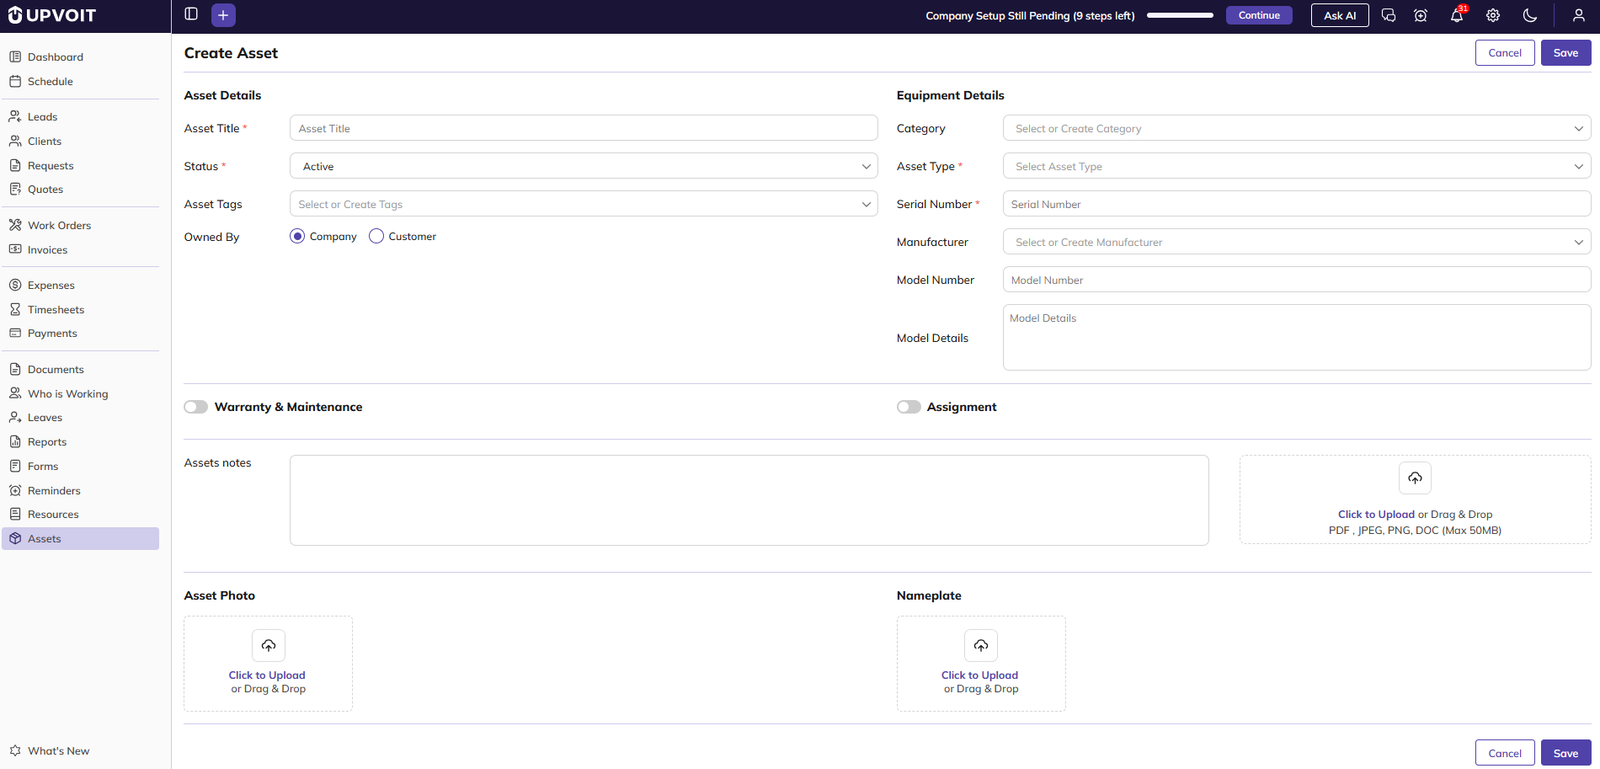
Fields marked with a red asterisk (*) are required.
Asset Details

-
Asset Title*: The name of the asset.
-
Status*: The asset’s current state. It defaults to Active. The options are:
-
Active
-
Inactive
-
Replaced
-
Retired
-
Installed
-
-
Asset Tags: Pick an existing tag or type a new one to create it.
-
Owned By: Choose Company for your own assets or Customer for client equipment.
When Customer Is Selected
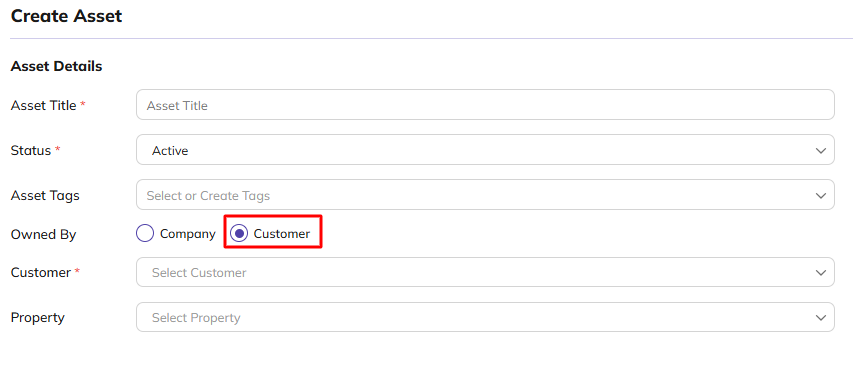
Selecting Customer shows two more fields:
-
Customer*: The client who owns the asset.
-
Property: The client’s property where the asset is located.
Equipment Details
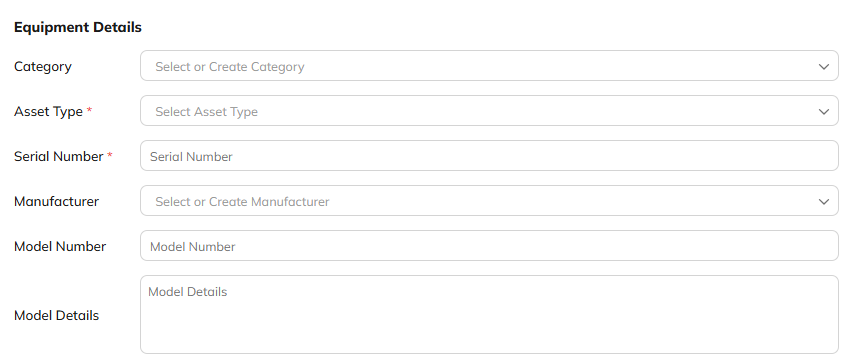
-
Category: Pick an existing category, or type a new name and click Create New “…” to add it.
-
Asset Type*: The kind of asset. The options are:
-
Installed Equipment
-
Tool
-
Portable Equipment
-
Vehicle
-
Machinery
-
Consumable / Part
-
Other
-
-
Serial Number*: The asset’s unique serial number.
-
Manufacturer: Pick an existing manufacturer or type a new one to create it.
-
Model Number / Model Details: The model and any extra specifications.
Note: Categories, Tags and Manufacturers have no separate master list. You can only create them from their dropdowns while creating or editing an asset.
Installation Details
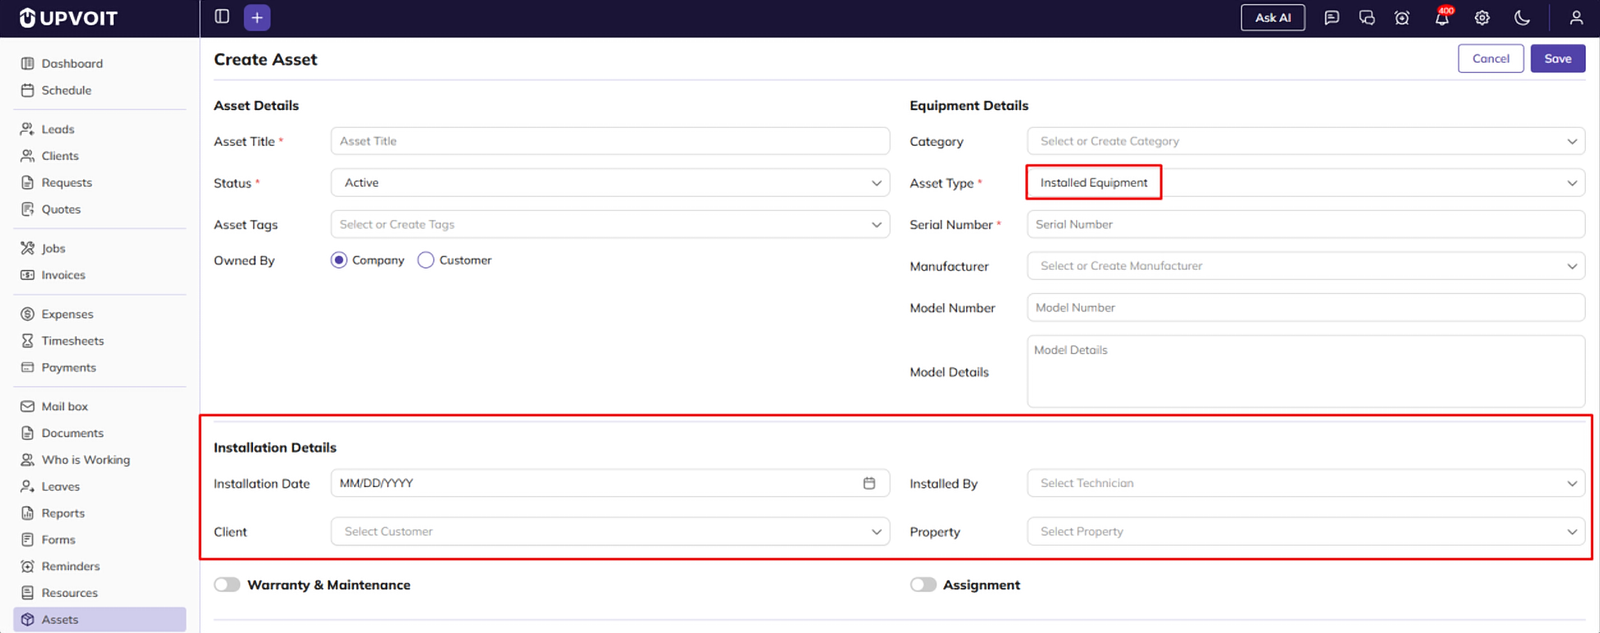
This section appears only when Asset Type is set to Installed Equipment. For any other asset type, it is hidden.
-
Installation Date: The date the equipment was installed.
-
Installed By: The technician who installed the equipment.
-
Client: The client at whose site the equipment is installed.
-
Property: The property where the equipment is installed.
How Client and Property are filled
-
Owned By – Customer: The Customer and Property selected in Asset Details are filled in automatically as the Client and Property. These fields are locked and can’t be changed here.
-
Owned By – Company: Client and Property are not filled in. Select the Client and Property where the equipment is installed.
Note: Installation Date and Installed By are optional. When the asset is installed through a job, both are updated from the job, even if you entered them here. See Installed Date below.
Warranty & Maintenance and Assignment

Both sections are off by default. Turn on their toggles to show the fields.
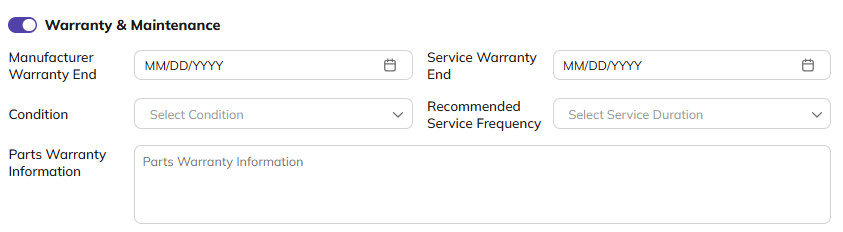
Warranty & Maintenance
-
Manufacturer Warranty End / Service Warranty End: The dates each warranty expires.
-
Condition: The current condition of the asset. The options are:
-
Good
-
Excellent
-
Fair
-
Poor
-
Critical
-
-
Recommended Service Frequency: How often the asset should be serviced. The options are:
-
Every 3 months
-
Every 6 months
-
Annually
-
-
Parts Warranty Information: Details of any warranty on parts.
Assignment
-
Assign To: The technician responsible for the asset.
-
Assign Date: The date the asset was assigned.
-
Notes: Any notes about the assignment.
Notes, Photo and Attachments
-
Assets Notes: General notes about the asset.
-
Attachments: Upload PDF, JPEG, PNG or DOC files, up to 50 MB.
-
Asset Photo / Nameplate: A photo of the asset and of its manufacturer’s nameplate.
Click Save to create the asset or Cancel to discard it.
Import Assets
Use Import Assets to add many assets at once from a spreadsheet. Click Import Assets on the Assets List to start. The import has four steps: Upload File, Map & Fix Columns, Review & Fix Rows and Create Assets.
Upload File
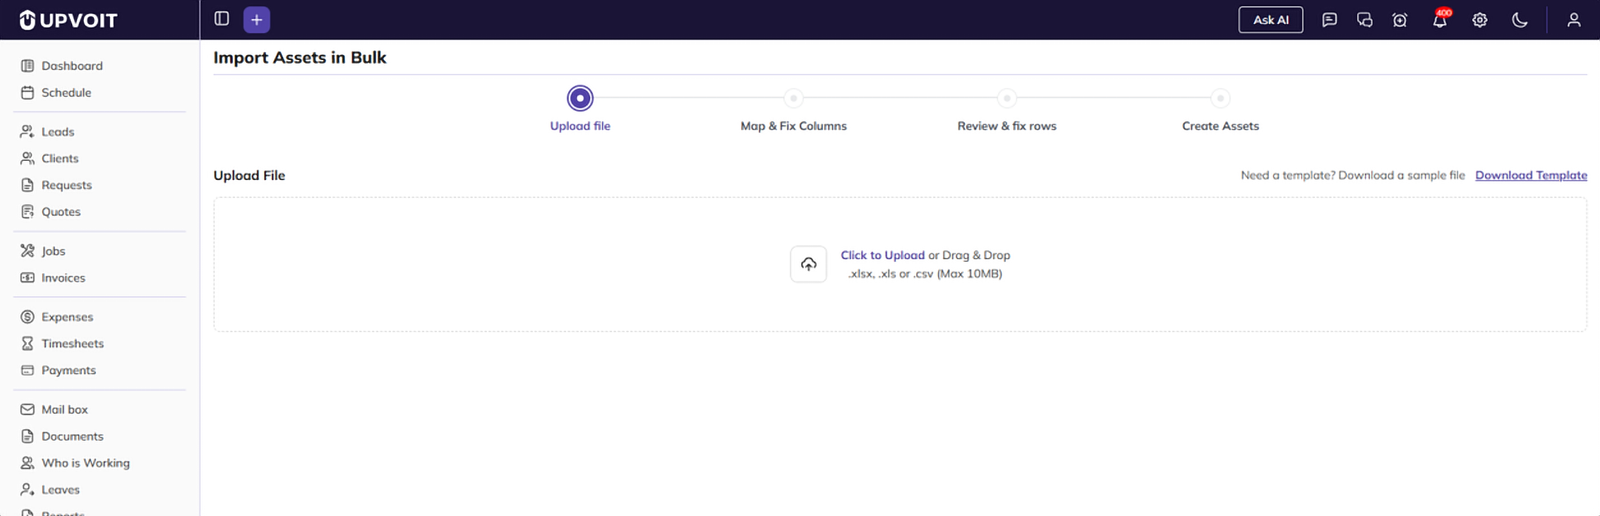
-
Click Download Template to get a sample file with the correct columns.
-
Fill in your asset details in the file. Asset Title, Status, Owned By, Asset Type and Serial Number are required for every row.
-
Click Click to Upload, or drag and drop the file into the upload area. Supported formats are .xlsx, .xls and .csv, up to 10 MB.
Note: For assets with Asset Type set to Installed Equipment, you can also include Installation Date and Installed By in the file.
Map & Fix Columns

Upvoit reads your file and matches each column to an asset field. The file name, along with the number of rows and columns detected, is shown at the top right.
-
Your column & what we detected: The column name from your file.
-
Maps to Upvoit field: The asset field the column is matched to. Change it from the dropdown if the match is wrong, or select Ignore to skip the column.
-
Map: Shows Mapped when the column is matched, or Not Mapped when it is ignored.
The total number of Mapped and Ignored columns is shown above the list. To upload a different file, click Import Again. When the mapping is correct, click Preview Assets.
Review & Fix Rows
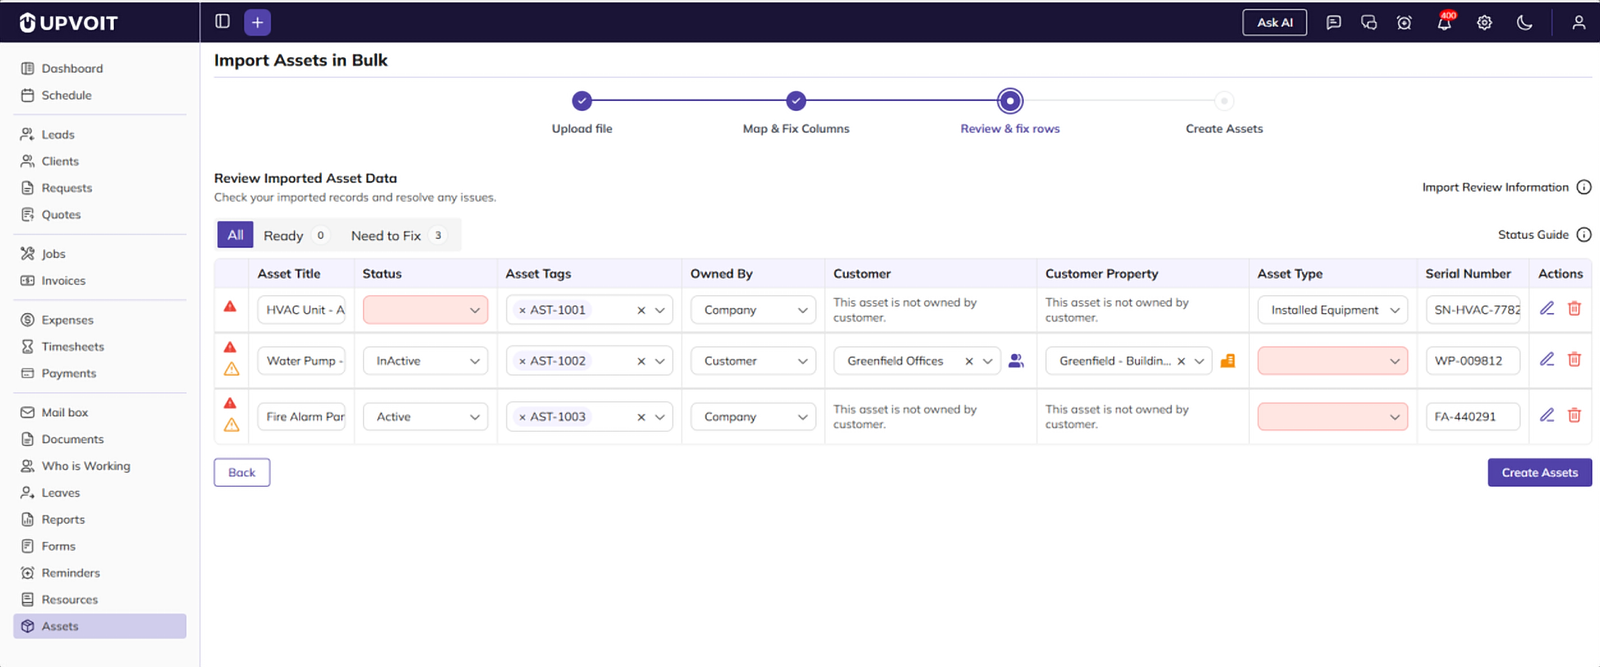
This step shows every row from your file so you can check and correct it before the assets are created. You can edit most values directly in the table.
Use the tabs to filter the rows:
-
All: Every row in the file.
-
Ready: Rows with no errors, ready to be created.
-
Need to Fix: Rows with errors that must be corrected.
Each row is marked with a status icon. Click Status Guide to see what each icon means:
-
Ready: The row has no issues.
-
Warning: The row can be created, but something will change. For example, a customer property that doesn’t exist will be created during import.
-
Error: The row has a problem that must be fixed, such as a missing or invalid Status.
-
New Client: The customer in the row doesn’t exist and will be created.
-
New Property: The property in the row doesn’t exist and will be created.
Hover over the error or warning icon on a row to see the details.
Note: New clients and properties are created only for customer-owned assets. If a row’s customer or property doesn’t exist in Upvoit, it is created during import. For company-owned assets, no client or property is created, and the Customer and Customer Property columns show “This asset is not owned by customer.”
Fixing a row

-
Click the Edit icon on the row. The Fix Asset window opens with the same fields as Create Asset, including Installation Details for Installed Equipment.
-
Correct the details.
-
Click Save Row.
To remove a row from the import, click the Delete icon. To go back to the mapping step, click Back.
When the rows are ready, click Create Assets. Only Ready rows are created. Rows still marked Need to Fix are skipped.
Create Assets
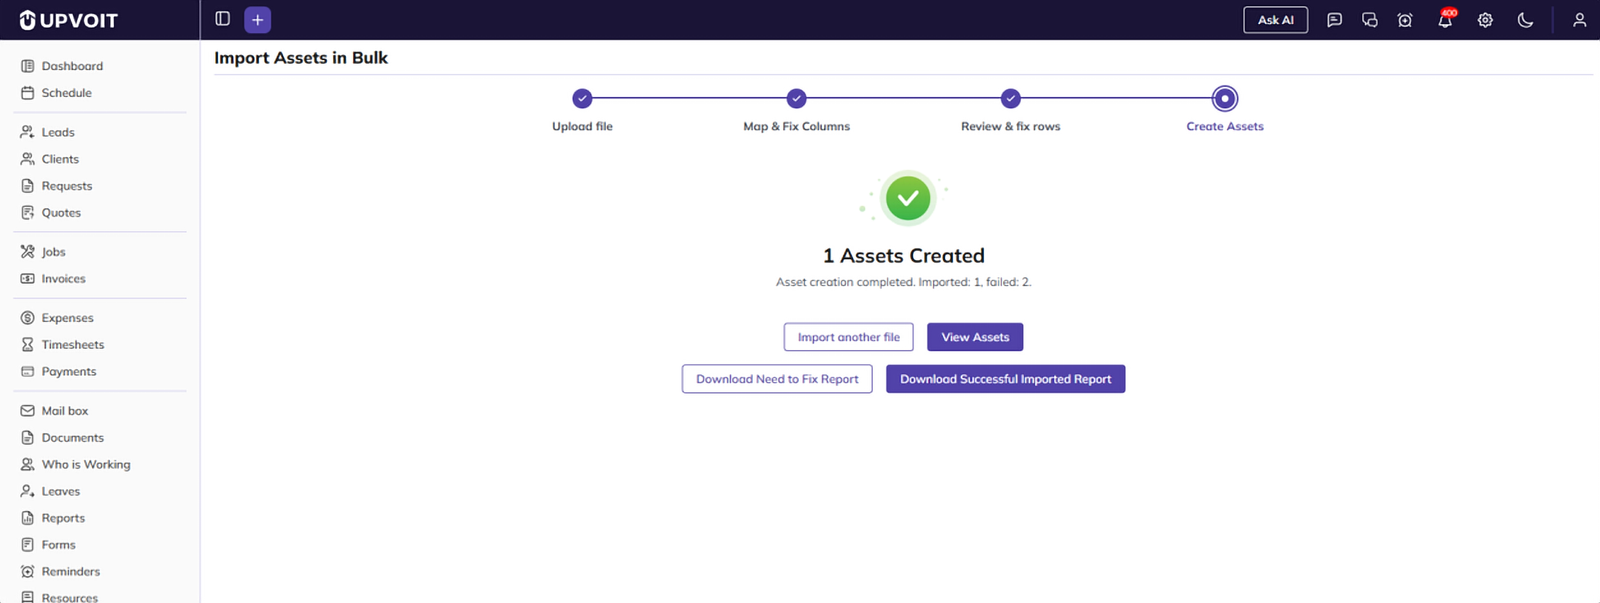
Upvoit creates the assets from the Ready rows and shows how many were imported and how many failed. Skipped Need to Fix rows are counted as failed. From here you can:
-
Import another file: Start a new import.
-
View Assets: Go to the Assets List.
-
Download Need to Fix Report: Download the rows that failed, so you can correct them and import them again.
-
Download Successful Imported Report: Download the list of assets that were created.
Installed Date
Installation Date and Installed By can be entered while creating the asset, or left empty.
When the asset is added to a job (work order) with Action on this Job set to Installed, they are updated from the job. This happens whether they were empty or already filled in:
-
The date the asset is added to the job becomes its Installation Date.
-
The technician selected for the asset on the job is shown as Installed By.
-
The asset’s Status changes to Installed.
-
If an asset is marked Installed on more than one job, the latest date is used.
Example: The Industrial Vacuum Cleaner was added to job 0032 as Installed on Oct 16, 2026. Its Installed Date in the Assets List therefore shows Oct 16, 2026.
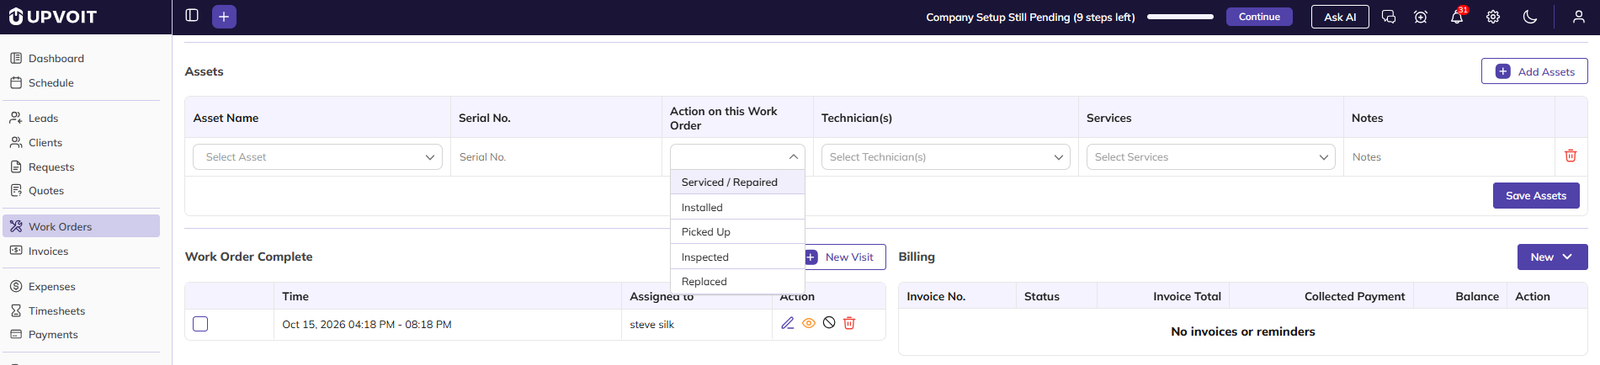
Assets are added to a job from the job’s Assets section (see the Jobs chapter). For each asset, you choose an Action on this Job: Serviced / Repaired, Installed, Picked Up, Inspected or Replaced. Every action is recorded in the asset’s Service History.
Note: Only the Installed action changes the asset’s Status and Installation Details. The other actions are recorded in the Service History only. This sync works one way: changes made to Installation Details on the asset don’t update the job.
Asset Detail Page
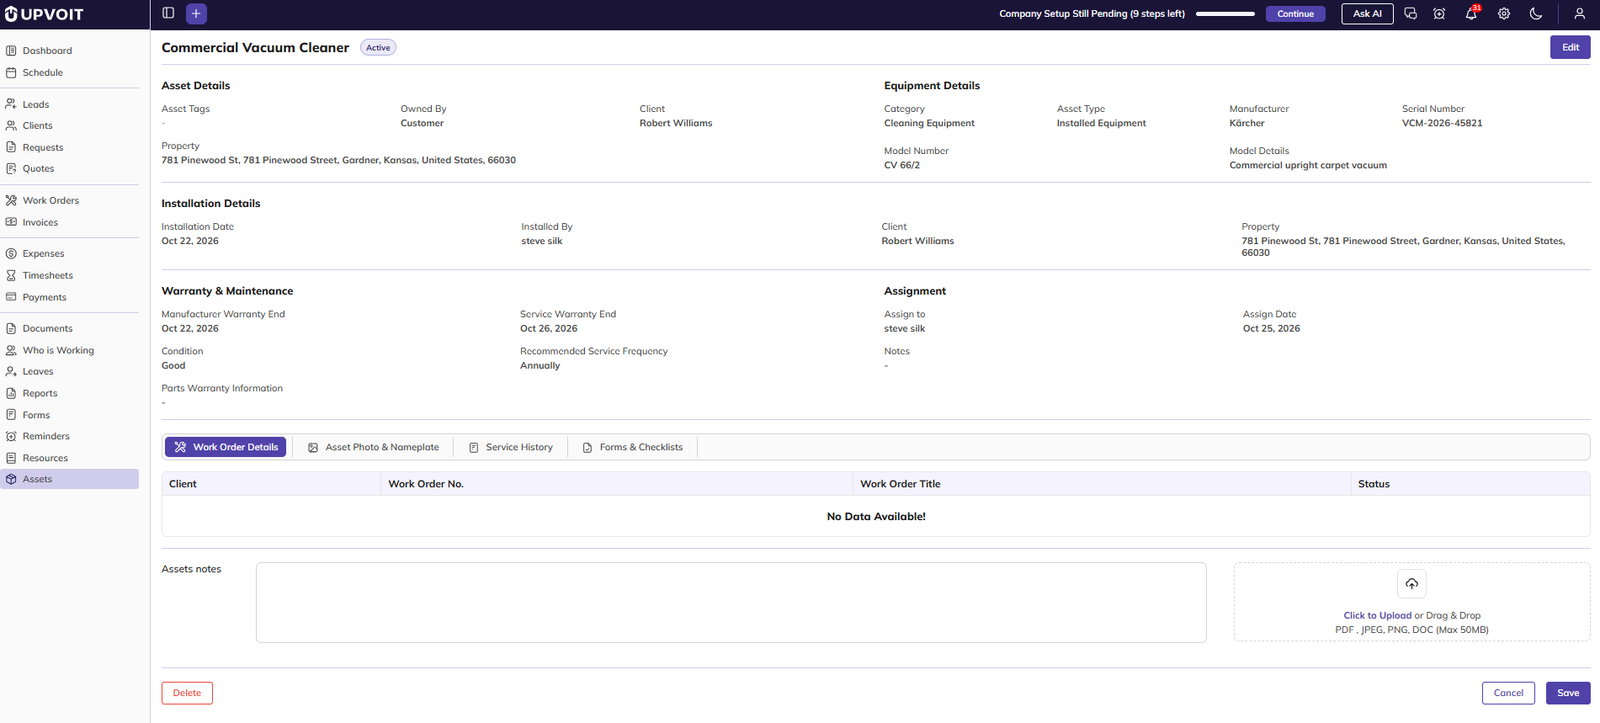
Click an asset in the list to open its detail page. The asset name and status badge appear at the top, with an Edit button to change its details. The page shows:
-
Asset Details and Equipment Details: The information entered when the asset was created.
-
Installation Details: The installation date, the technician who installed it, and the client and property where it was installed.
-
Warranty & Maintenance and Assignment: Warranty dates, condition, service frequency and the assigned technician.
Job Details
This tab lists every job the asset has been added to, with the Client, Job No., Job Title and Status. Click a job number to open that job.
Asset Photo & Nameplate

This tab shows the asset photo and nameplate image uploaded for the asset. It shows “No Data Available!” when nothing has been uploaded.
Service History

This tab shows a timeline of every action recorded on the asset across jobs, newest first. Each entry shows:
-
Job number and action: For example, 1832 – Serviced / Repaired.
-
Job Title, Technician and Notes: Taken from the job.
-
Date: When the action was recorded.
Forms & Checklists

This tab shows the custom forms and checklists filled in on jobs that include this asset. Each card shows:
-
Type and job number: Custom Form or Check List, with the job it belongs to.
-
Job Title
-
Custom Form Title / Check List Title: The name of the form or checklist.
Click the ↗ icon on a card to open that form or checklist.
Notes and Attachments
At the bottom of the page, you can add Assets Notes and upload attachments, then click Save.
Delete Asset

To delete an asset:
-
Open the asset’s detail page and click Delete.
-
A confirmation box asks “Are you sure you want to delete?”
-
Click Yes to delete the asset, or Cancel to keep it.
Note: You can’t delete an asset that is linked to one or more jobs. If you try, an error message tells you the asset is linked to jobs. Check the Job Details tab to see which jobs use it.
Edit Asset
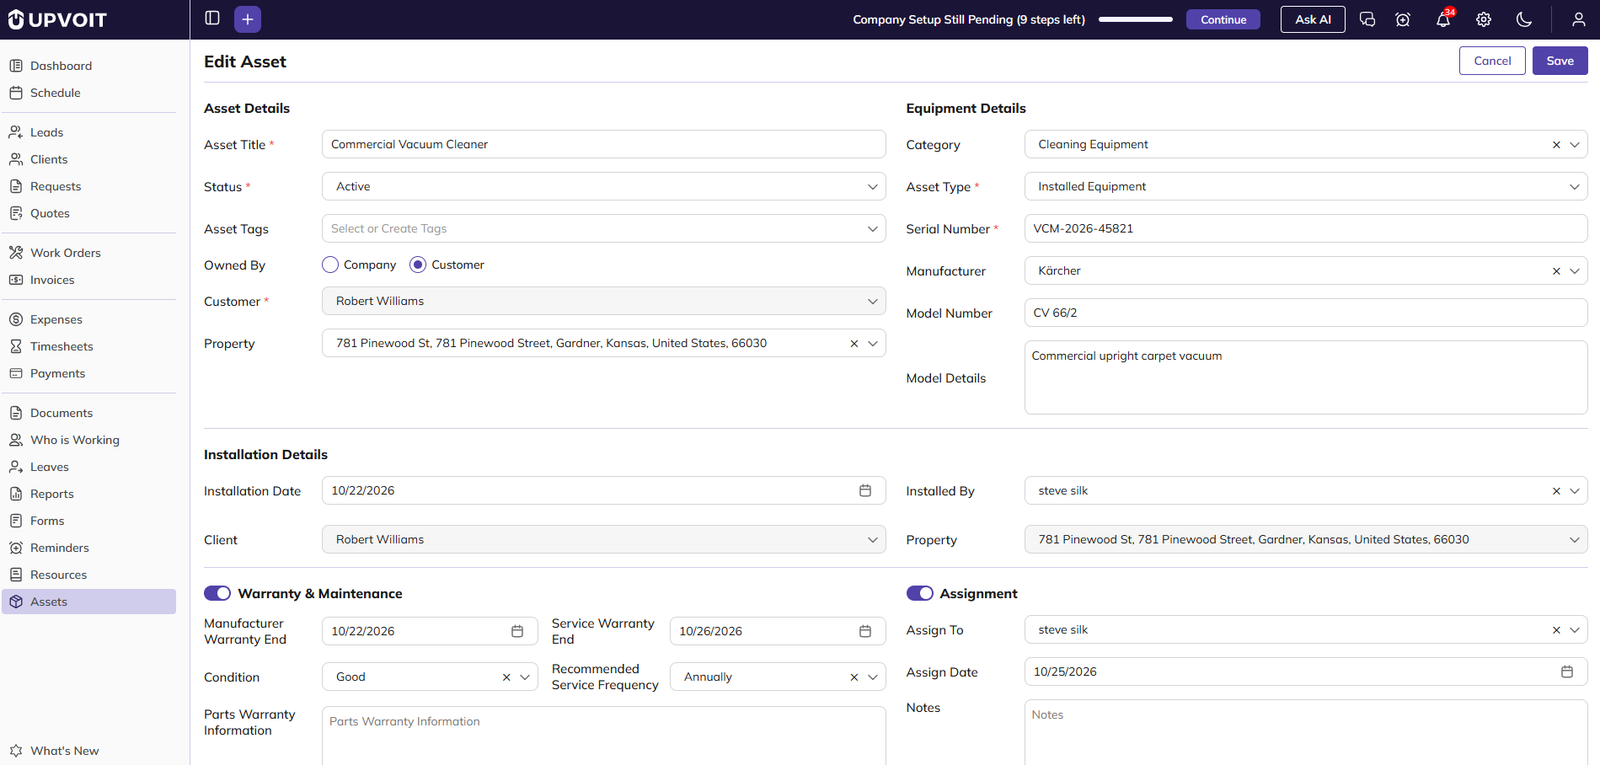
To edit an asset, click Edit on its detail page. The Edit Asset screen has the same fields as Create Asset, filled in with the asset’s current details.
Note: The Customer is locked once the asset is created and can’t be changed.
For Installed Equipment assets, the screen also shows the Installation Details section:
-
Installation Date: The date the asset was installed. You can change it here.
-
Installed By: The technician who installed the asset. You can change it here.
-
Client / Property: The client and property where the asset is installed. For customer-owned assets, these follow the Customer and Property in Asset Details and are locked. For company-owned assets, you can change them here.
Note: Installation Date and Installed By always show the latest change. If you edit them here and the asset is later marked Installed on a job, the job’s date and technician replace your changes.
Make your changes and click Save.
Did this answer your question?


