
Leave Management Overview
The Leaves module lets you record and track time off for your team. You can apply leave for an employee, review the jobs and assessments it affects, and approve, reject or cancel requests from one screen.
Leaves List
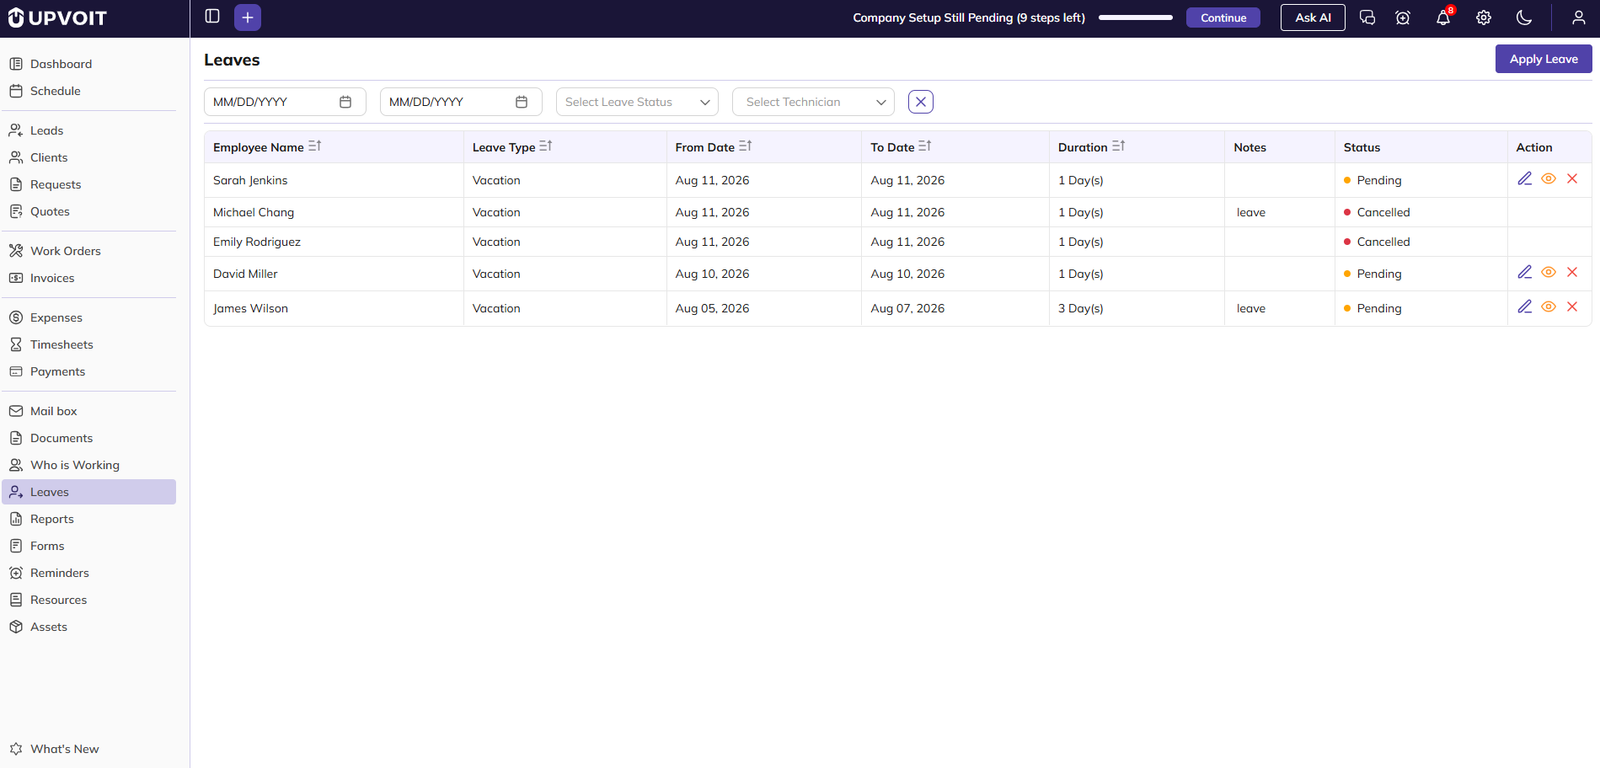
To open the module, click Leaves in the left sidebar. The page lists all leave requests, newest first.
Filtering Leaves
Use the filter bar above the list to narrow the results:
-
From Date: Shows leaves starting on or after this date.
-
To Date: Shows leaves ending on or before this date.
-
Leave Status: Shows only leaves with the selected status.
-
Technician: Shows leaves for one team member.
-
Clear (X): Removes all filters and shows the full list again.
List Columns
-
Employee Name: The team member the leave is for.
-
Leave Type: Vacation, Day-Off, Medical or Others.
-
From Date / To Date: The first and last day of the leave.
-
Duration: The total number of leave days.
-
Notes: The notes added to the leave. Long notes are shortened.
-
Status: The current state of the leave (see below).
-
Action: The edit, view and cancel icons. These appear only for Pending and Rejected leaves.
You can sort the list by Employee Name, Leave Type, From Date, To Date or Duration by clicking the sort icon next to the column name.
Leave Statuses
-
Pending: Waiting for a decision.
-
Approved: Accepted. The employee is off on these dates.
-
Rejected: Declined. It can still be edited or approved later.
-
Cancelled: Withdrawn. The leave stays in the list for reference.
Approved and Cancelled leaves are locked. They cannot be edited, viewed or cancelled.
Apply Leave
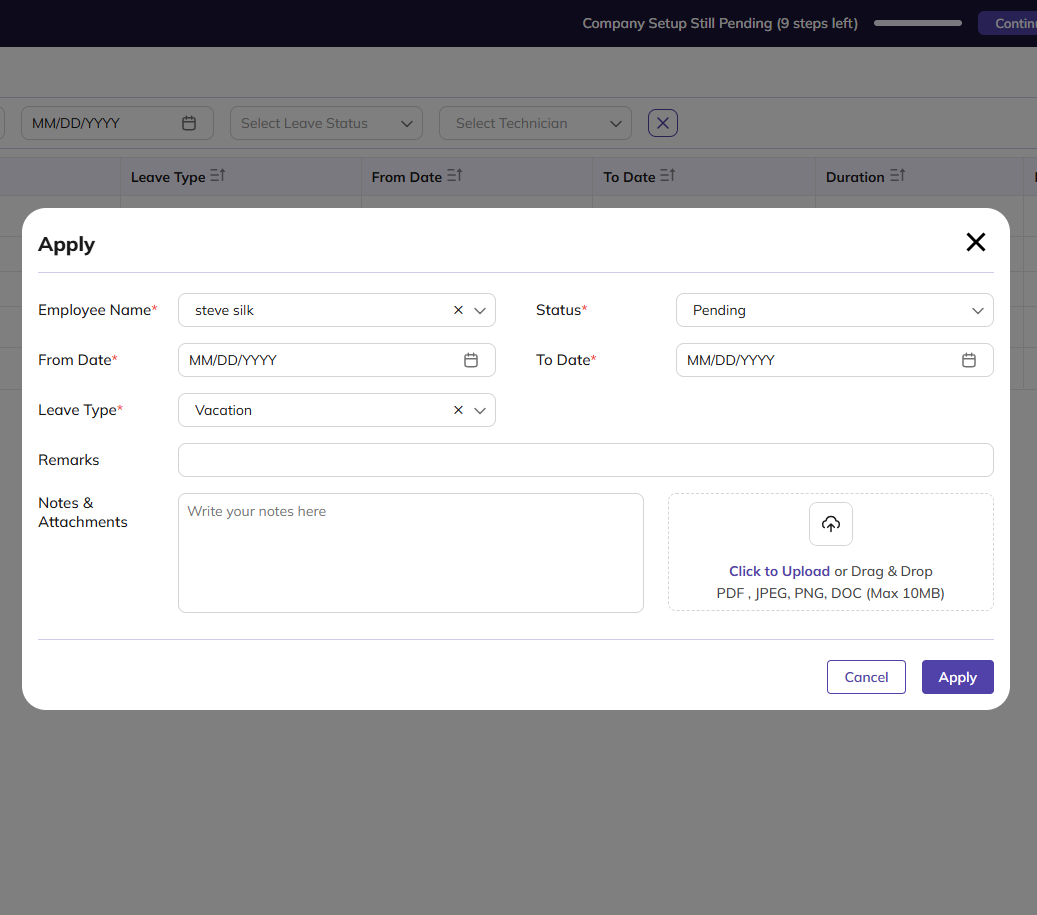
Click Apply Leave in the top-right corner of the Leaves page. The Apply window opens.
-
Employee Name: Select the team member the leave is for.
-
Status: Set the status of the leave. Select Pending if the leave still needs a decision. Select Approved to record a leave that has already been agreed.
-
From Date / To Date: Select the first and last day of the leave. The duration is calculated from these dates.
-
Leave Type: Select the kind of leave: Vacation, Day-Off, Medical or Others. These types are fixed and cannot be added or changed.
-
Remarks: Add a short comment about the leave.
-
Notes & Attachments: Add notes and upload supporting files, such as a medical certificate. You can upload PDF, JPEG, PNG or DOC files up to 10 MB. The notes are shown in the Notes column of the list.
Fields marked with a red asterisk (*) are required.
Click Apply to save the leave. Click Cancel to close the window without saving.
Leave Review
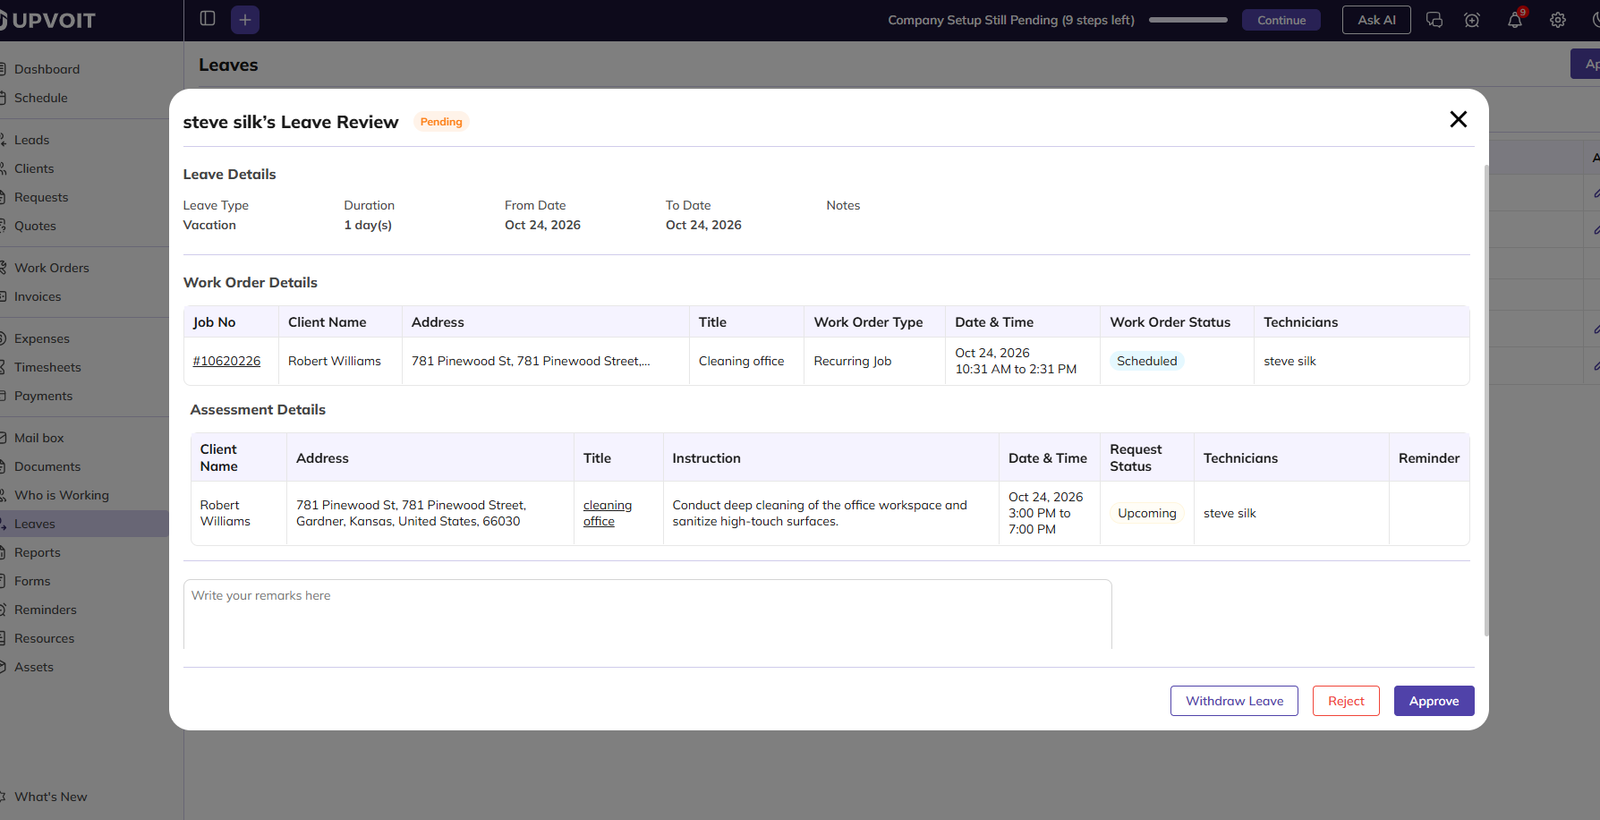
Click the View (eye) icon next to a Pending or Rejected leave to open the Leave Review window. The window shows the employee’s name and the current status of the leave. You approve or reject the leave here.
Leave Details
This section shows the Leave Type, Duration, From Date, To Date and Notes of the leave.
Job Details
This section lists every job visit assigned to the employee during the leave dates, including jobs shared with other technicians. Use it to see which work the leave affects before you approve.
-
Job No: Click the number to open the job.
-
Client Name / Address / Title: The client, the job location and the job title.
-
Job Type: Shows whether the job is a One-off Job or a Recurring Job. Each visit of a recurring job is listed as a separate row.
-
Date & Time: The date and time of the visit.
-
Job Status: The current status of the job, such as Scheduled or In Progress.
-
Technicians: All technicians assigned to the job.
If the employee has no jobs during the leave, the section shows No data available!
Assessment Details
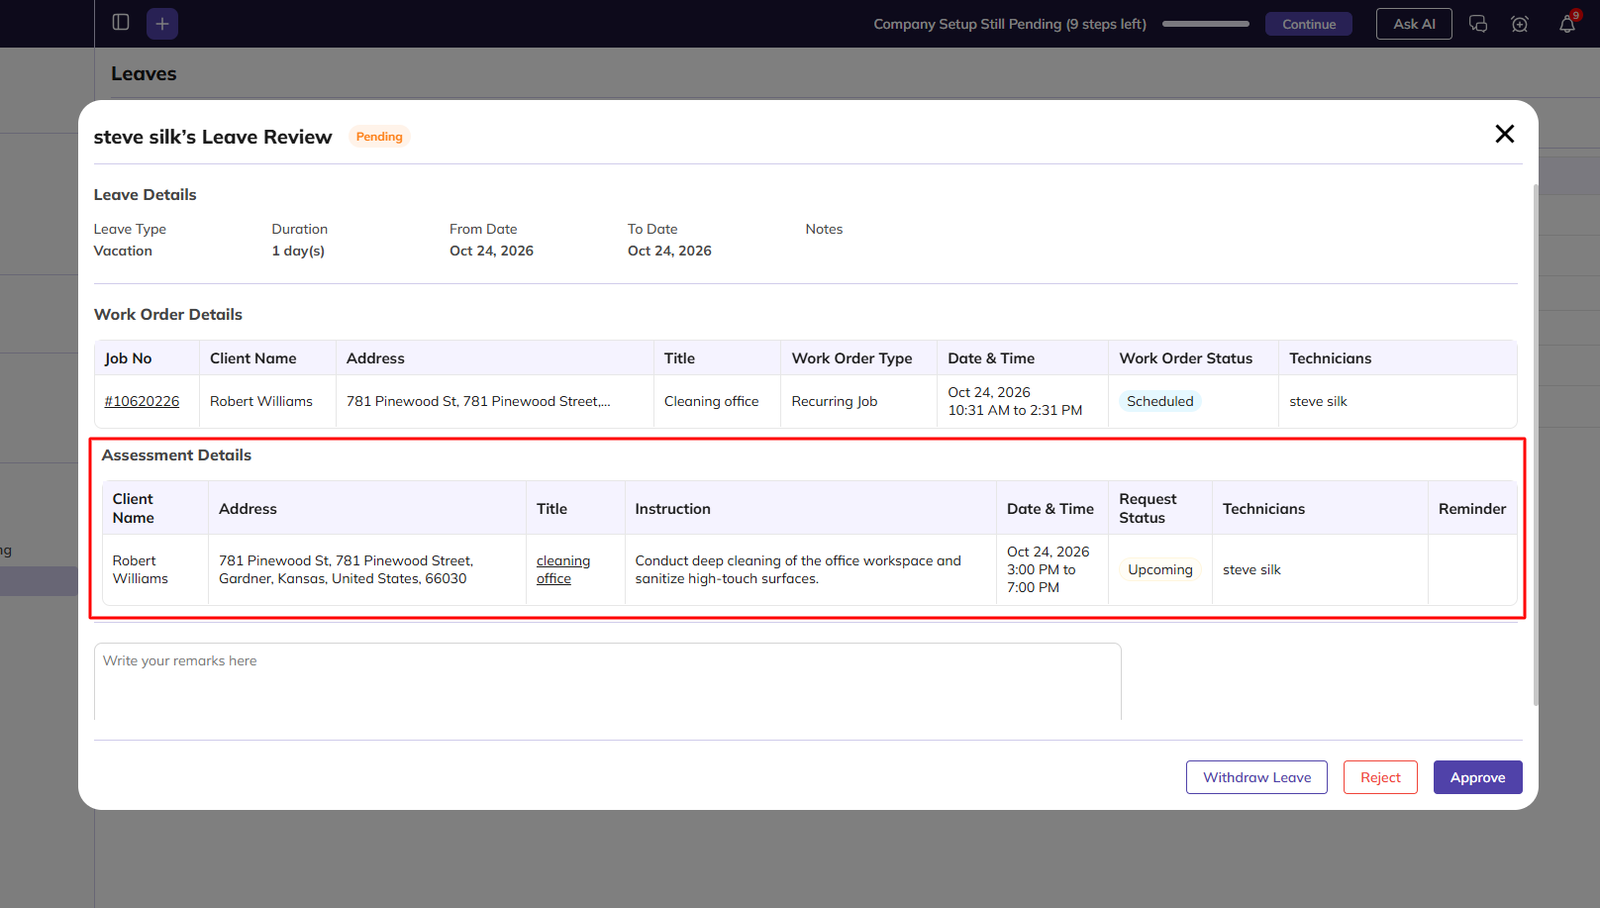
This section lists the assessments assigned to the employee during the leave dates.
-
Client Name / Address: The client and the assessment location.
-
Title: Click the title to open the related request.
-
Instruction: The instructions added for the assessment.
-
Date & Time: When the assessment is scheduled.
-
Request Status: The current status of the request, such as Overdue.
-
Technicians: All technicians assigned to the assessment.
-
Reminder: The reminder set for the assessment, if any.
If the employee has no assessments during the leave, the section shows No data available!
Remarks and Attachments
-
Remarks: Add an optional comment about your decision, such as the reason for a rejection.
-
Attachments: Lists the files uploaded with the leave. Click the download icon to save a file, or the delete icon to remove it.
Taking Action
The buttons at the bottom of the window:
-
Approve: Approves the leave. If the employee has jobs or assessments during the leave dates, the Approve Leave window opens first.
-
Reject: Declines the leave. The status changes to Rejected. This button is shown only for Pending leaves.
-
Withdraw Leave: Cancels the leave. The leave stays in the list with the status Cancelled.
Approve Leave
If the employee has jobs or assessments during the leave dates, the Approve Leave window opens when you click Approve. It asks what should happen to that work. If the employee has nothing assigned during the leave, the leave is approved straight away.
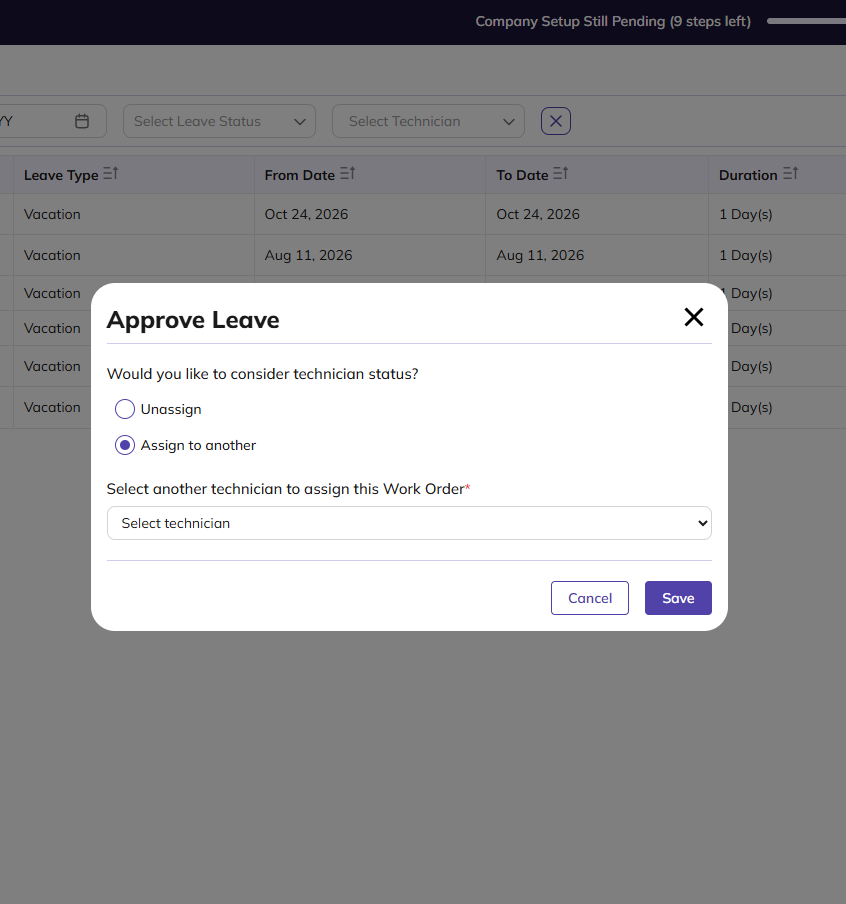
Choose one option:
-
Unassign: Removes the employee from the jobs and assessments during the leave dates. Any other technicians on them stay assigned.
-
Assign to another: Moves all of the employee’s jobs and assessments during the leave dates to one technician. When you select this option, a Select technician field appears. Choose the technician who will take over the work. This field is required.
Note: The technician list includes all team members, including the employee going on leave. Make sure you select a different technician.
Click Save to approve the leave and apply your choice. Click Cancel to close the window without approving.
Reject Leave
To decline a leave request:
-
Click the View (eye) icon next to a Pending leave. The Leave Review window opens.
-
Check the Job Details and Assessment Details if needed.
-
If you like, enter the reason for the rejection in the Remarks box. Remarks are optional.
-
Click Reject.
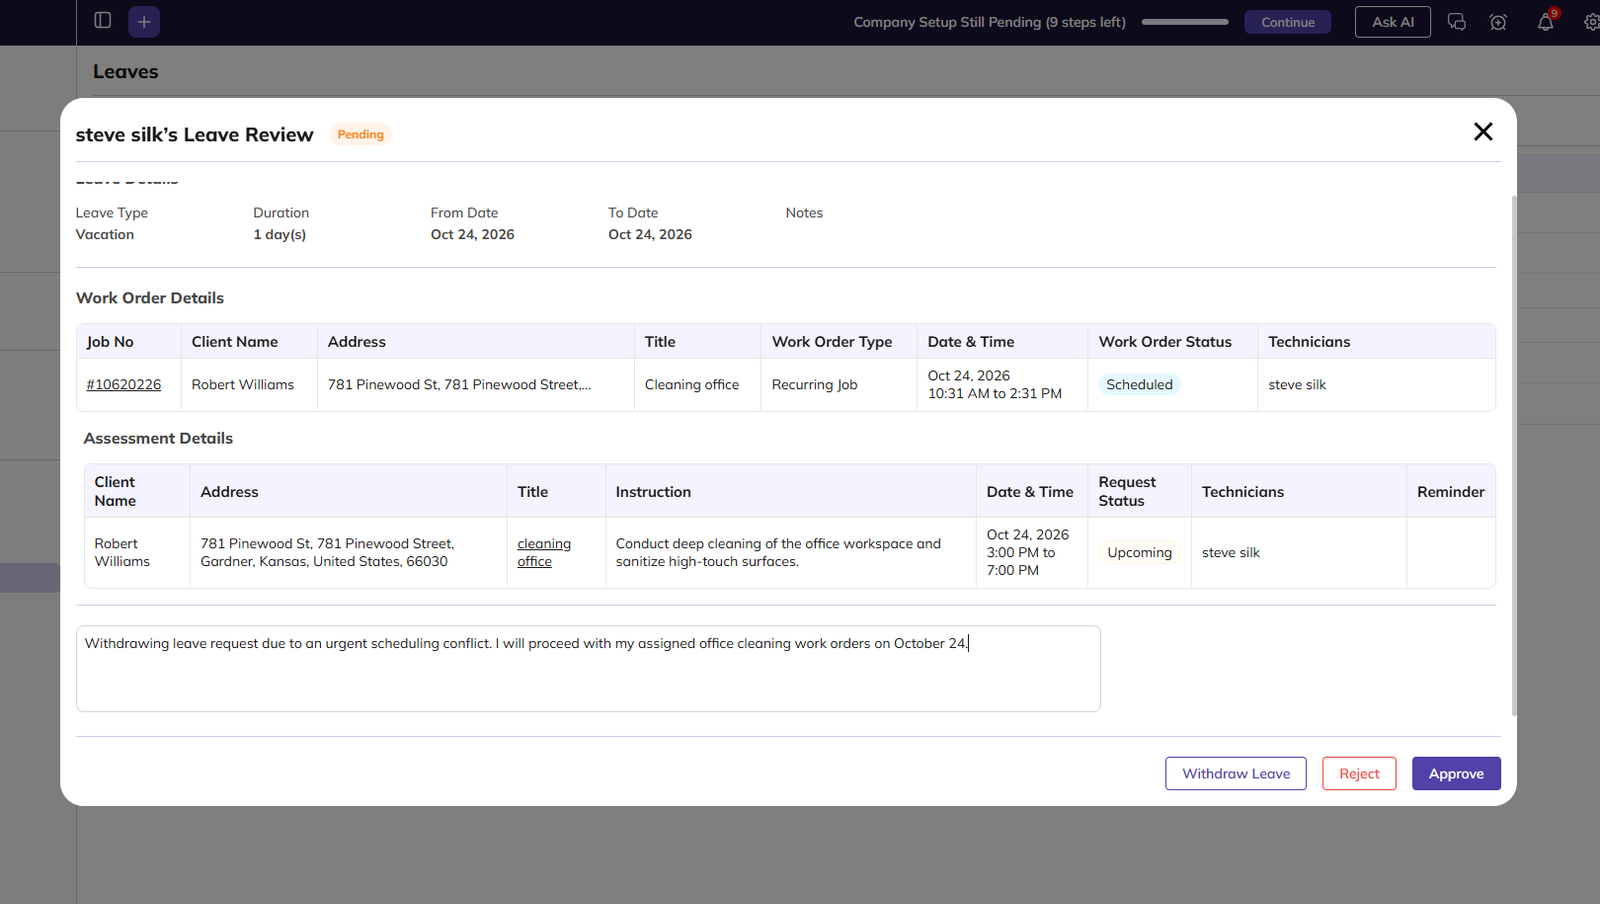
The leave is rejected straight away, with no confirmation step. Its status changes to Rejected, and the employee’s jobs and assessments are not changed.
After Rejection
When you open a rejected leave with the View (eye) icon, the Leave Review window shows:
-
Status: A Rejected label next to the employee’s name.
-
Remarks: The remarks entered at the time of rejection. Remarks are not shown in the Leaves list, only here.
-
Actions: Only Approve and Withdraw Leave are available. The Reject button is no longer shown.
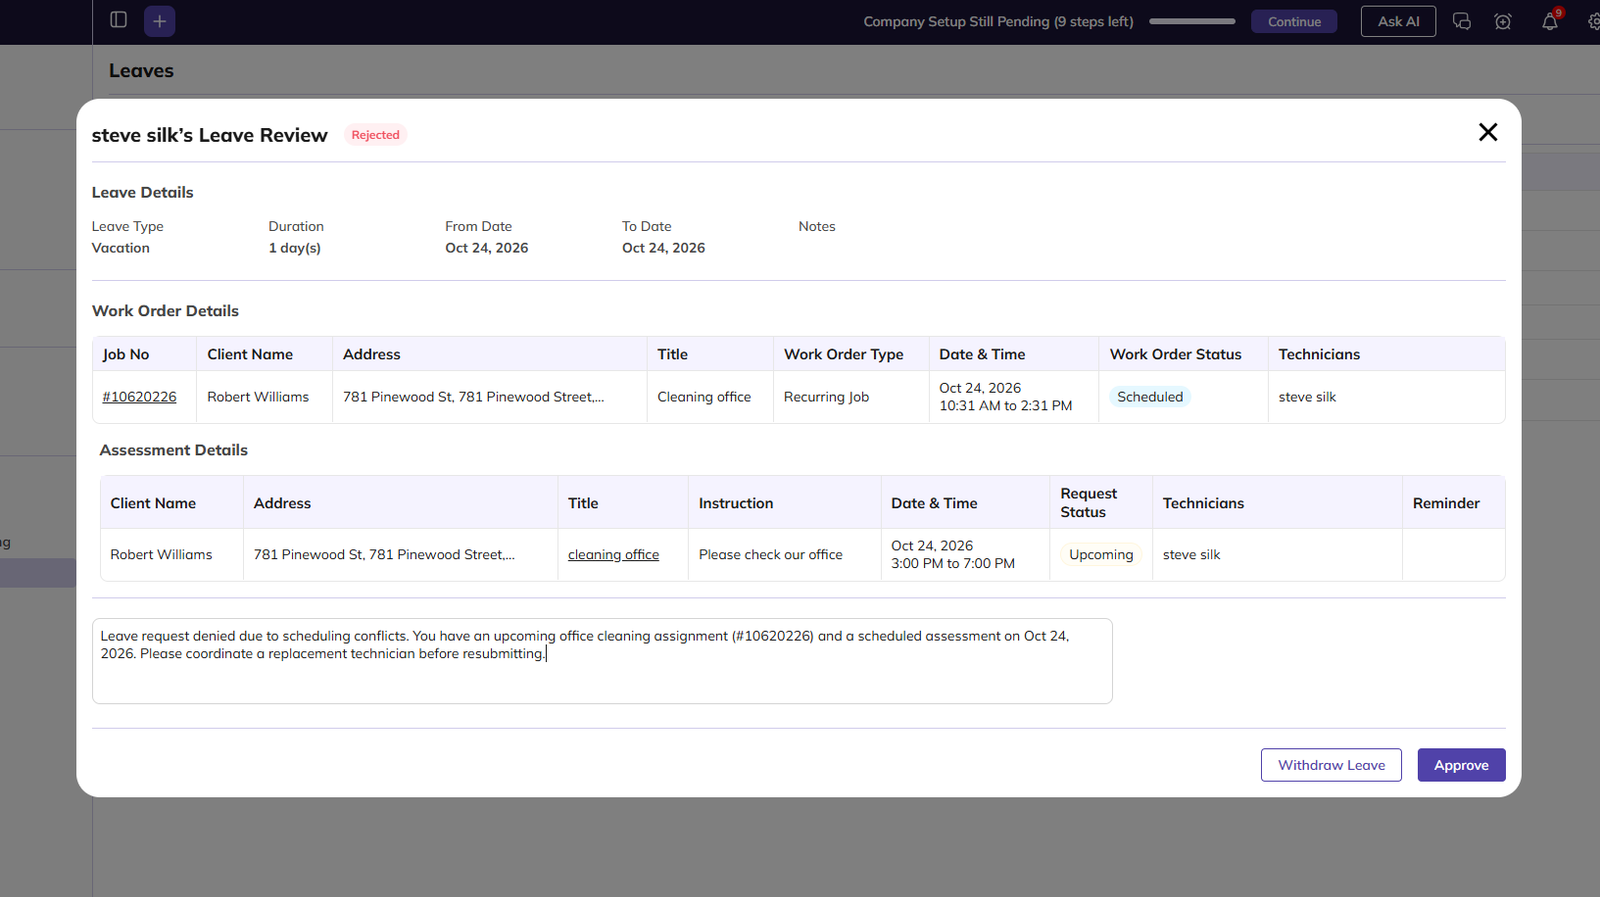
A rejected leave can still be changed later. You can:
-
Edit it to change the dates or details.
-
Approve it from the Leave Review window.
-
Cancel it with the X icon or Withdraw Leave.
Withdraw Leave
Use Withdraw Leave to cancel a leave that is no longer needed, for example when the employee’s plans change. You can withdraw a Pending or a Rejected leave.
To withdraw a leave:
-
Click the View (eye) icon next to the leave. The Leave Review window opens.
-
If you like, enter the reason in the Remarks box.
-
Click Withdraw Leave.

The leave status changes to Cancelled. The leave stays in the Leaves list for reference, but it is locked. It can no longer be edited, viewed or approved.
Tip: You can also cancel a leave directly from the list by clicking the Cancel (X) icon. This has the same result as Withdraw Leave.
Edit Leave
Click the Edit (pencil) icon next to a Pending or Rejected leave to open the Edit window. It has the same fields as the Apply Leave form, filled in with the current details.

-
Employee Name: Change the team member the leave is for.
-
Status: Change the status of the leave.
-
From Date / To Date: Change the leave dates. The duration updates to match.
-
Leave Type: Choose a different leave type.
-
Remarks: Update the short comment about the leave.
-
Notes & Attachments: Update the notes or upload more files.
Note: If you set the status to Approved here, the Approve Leave window does not open, so the employee’s jobs and assessments are not unassigned or reassigned. To handle that work, approve the leave from the View (eye) icon instead.
Click Update to save your changes. Click Cancel to close the window without saving.
Cancel Leave.
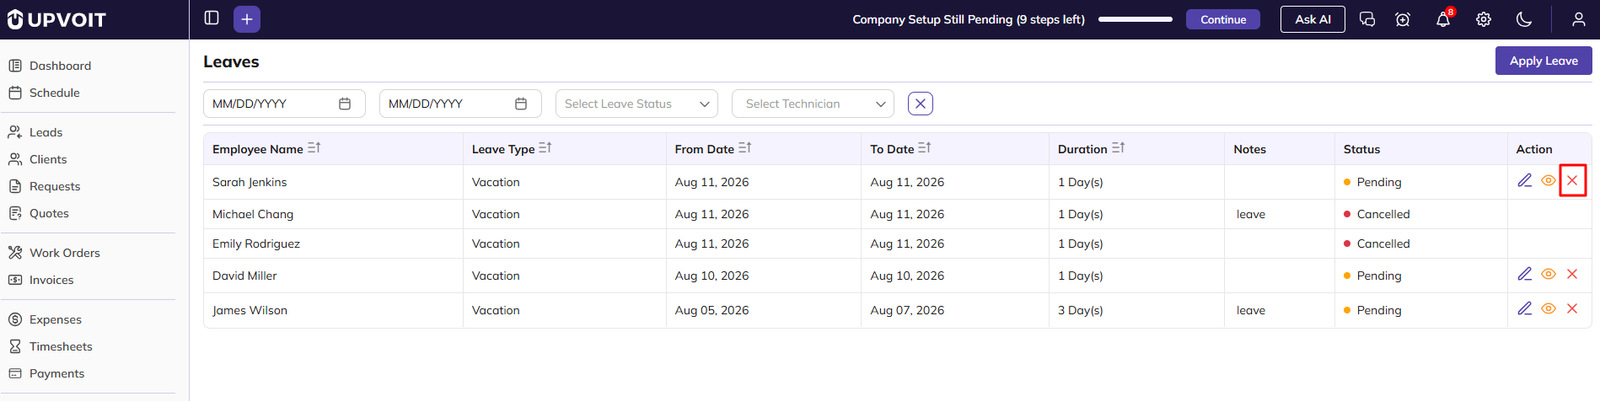
Click the Cancel (X) icon next to a Pending or Rejected leave to cancel it. This is the same as Withdraw Leave in the Leave Review window. The leave stays in the list with the status Cancelled and can no longer be changed.
Did this answer your question?


