
Schedule Management Overview
The Schedule module gives you a single view of all jobs, visits and requests across your team. You can view work on a calendar (by day, week or month), see job locations on a map, assign or reassign technicians, message technicians or clients, and resolve scheduling conflicts.
Calendar – Classic View
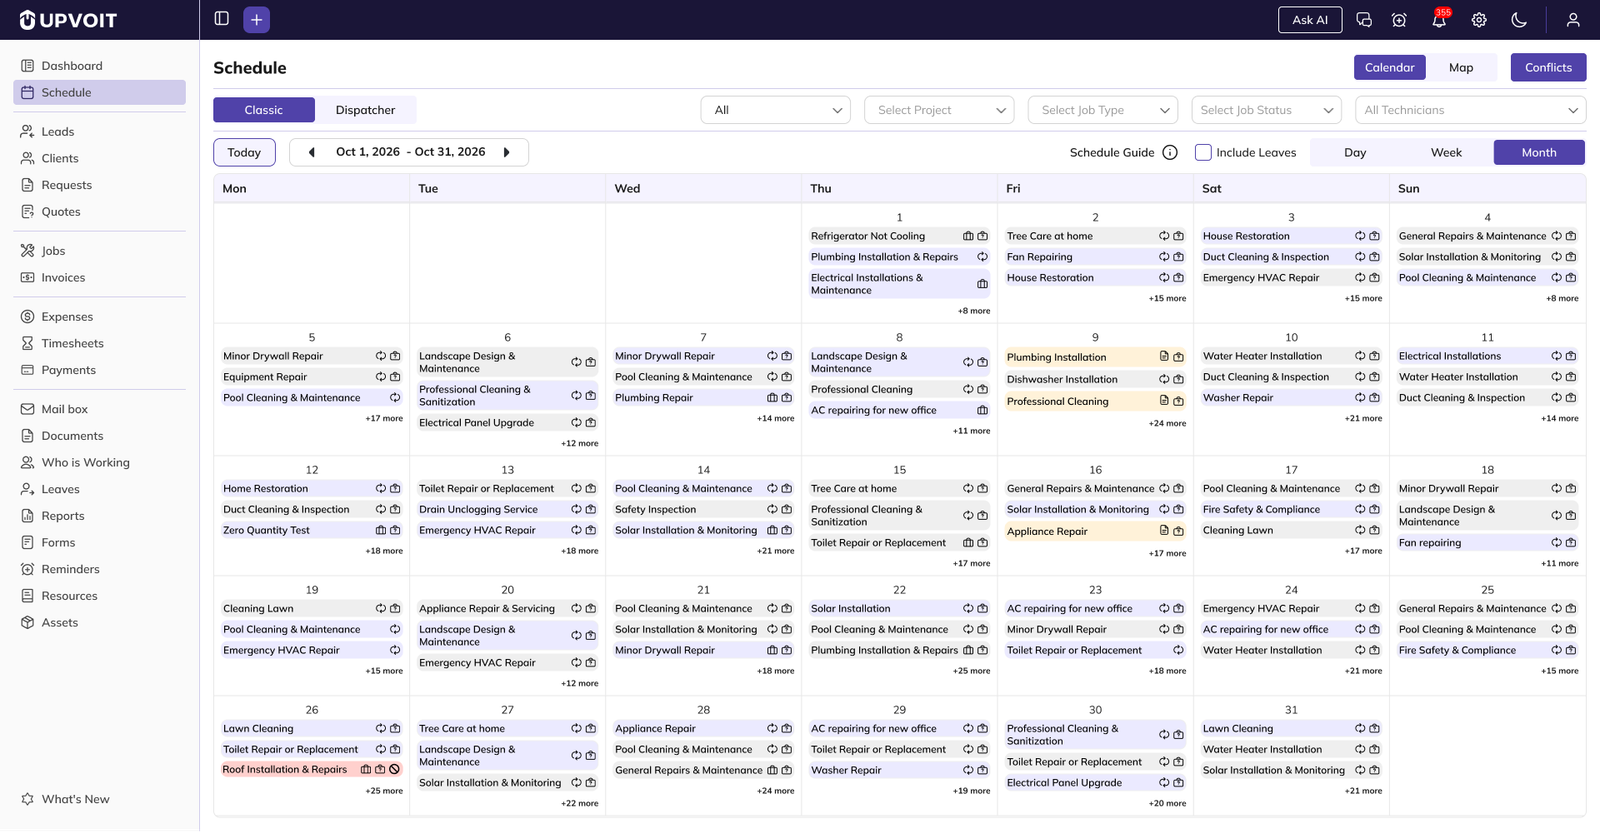
The Classic view shows scheduled work on a calendar. Use the buttons at the top right to switch between Calendar, Map and Conflicts.
Month View
-
Calendar / Map / Conflicts: Switch between the calendar, map view and the conflicts window.
-
Classic / Dispatcher: Switch between calendar layouts.
-
Filters: Narrow down what appears on the calendar (see below).
-
Today: Jump back to the current date.
-
Date navigation: Move to the previous or next day, week or month.
-
Schedule Guide: Hover over the info icon to see what each icon means.
-
Include Leaves: Show technician leaves on the calendar as “On Leave” entries.
-
Day / Week / Month: Change the calendar range.
-
Calendar entry: Shows the job number or title, with icons for the entry type.
-
+ more: Shows how many more entries exist on that day.
Filters
-
All / Visits / Requests: Show everything, only job visits, or only requests.
-
Select Project: Show entries for a specific project.
-
Select Job Type: Filter by job type.
-
Select Job Status: Filter by job status.
-
All Technicians: Show the schedule for one or more technicians.

Viewing More Entries
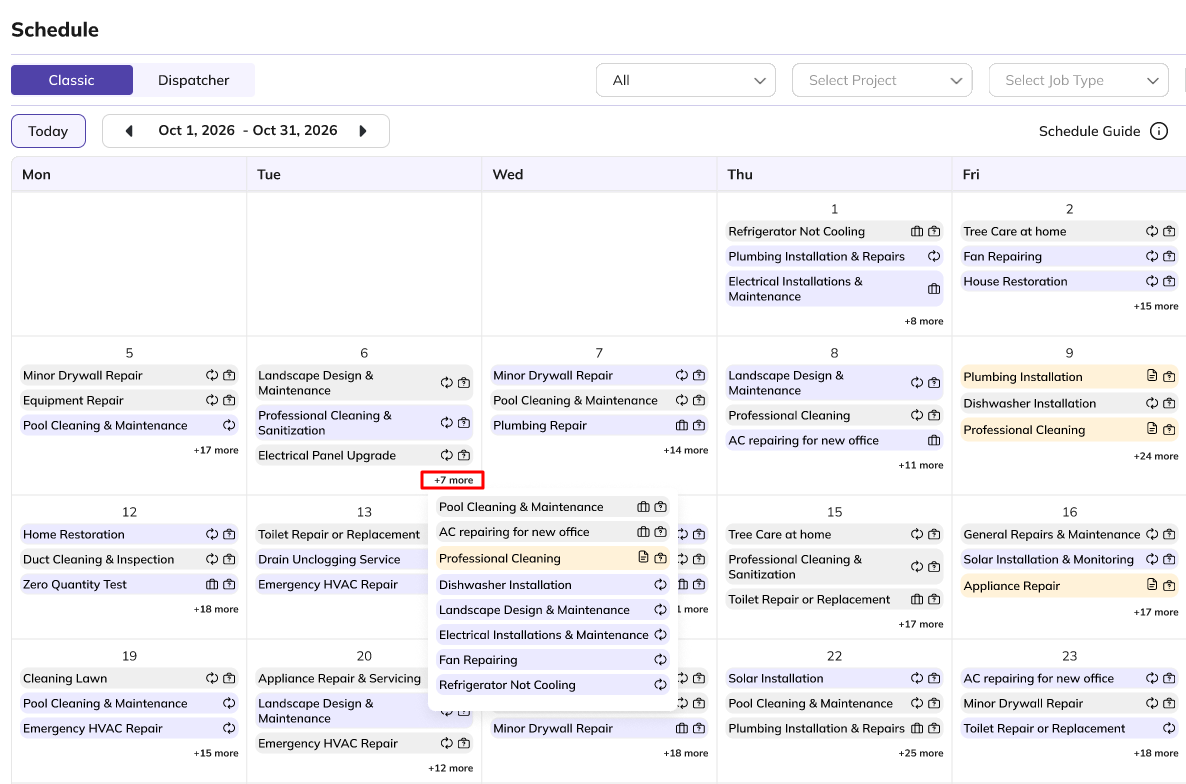
When a day has more entries than fit in the cell, a + more link shows how many are hidden. Click it to open a list of all entries for that day. Click any entry in the list to open it.
-
+ more: Opens the full list of entries for that day.
-
Entry list: All jobs, visits and requests for that day, scrollable.
Schedule Guide
The Schedule Guide explains the icons shown on calendar entries. Verification Pending, Request, Recurring Job, One Off Job, Cancelled, Rejected Job and Vacant Job.

-
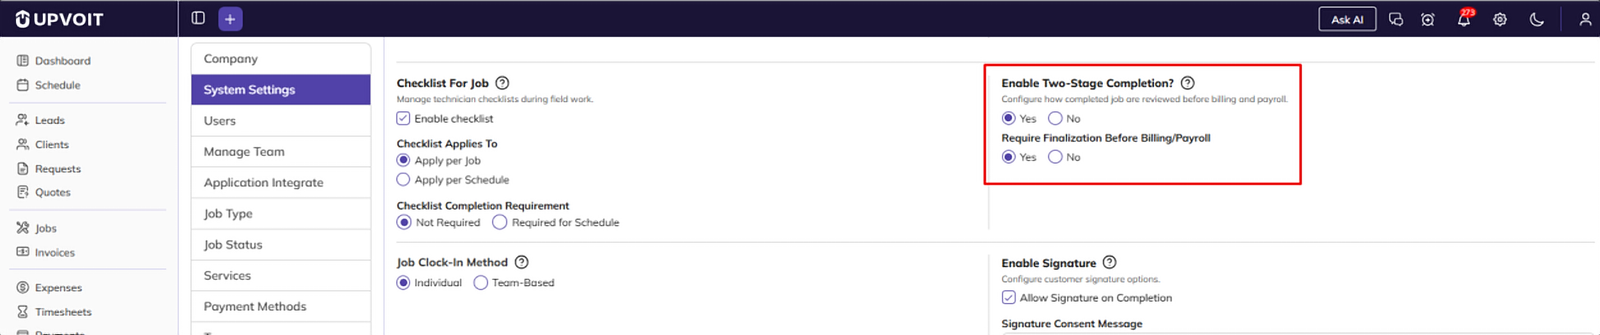
Verification Pending: The technician has completed the job, but an admin must verify it before billing and payroll. This status appears only when Enable Two-Stage Completion and Require Finalization Before Billing/Payroll are both turned on in Settings → System Settings → Job.
-
Enable Two-Stage Completion: Choose whether completed jobs are reviewed before billing and payroll.
-
Require Finalization Before Billing/Payroll: Choose whether a job must be verified before it can be invoiced or added to payroll.
Calendar Entry Colours
Each calendar entry uses the colour of the technician assigned to it, so you can see at a glance who is doing what. If a job has more than one technician, the first technician’s colour is used. Every technician has a colour. If you don’t choose one, the system gives them a default colour.
Vacant jobs, which have no technician assigned, are shown in the default light colour.
Visits that are completed, invoiced or cancelled are shown with a line through them, so you can tell finished work from upcoming work.
Technician colours are set in Settings → Users → Edit User → Basic Details → Color.

-
Color: Choose the colour used for this technician’s jobs on the schedule.
Showing Leaves
Select Include Leaves to show technician leaves, including pending ones, as On Leave entries on the calendar. Hover over an entry to see the leave details. This option is available in both Classic and Dispatcher views.

-
Include Leaves: Turn leave entries on or off.
-
On Leave entry: Shows that a technician is on leave that day.
-
Leave details: The technician’s name, leave type, leave status (pending or approved) and reason.
Calendar Entry Popup
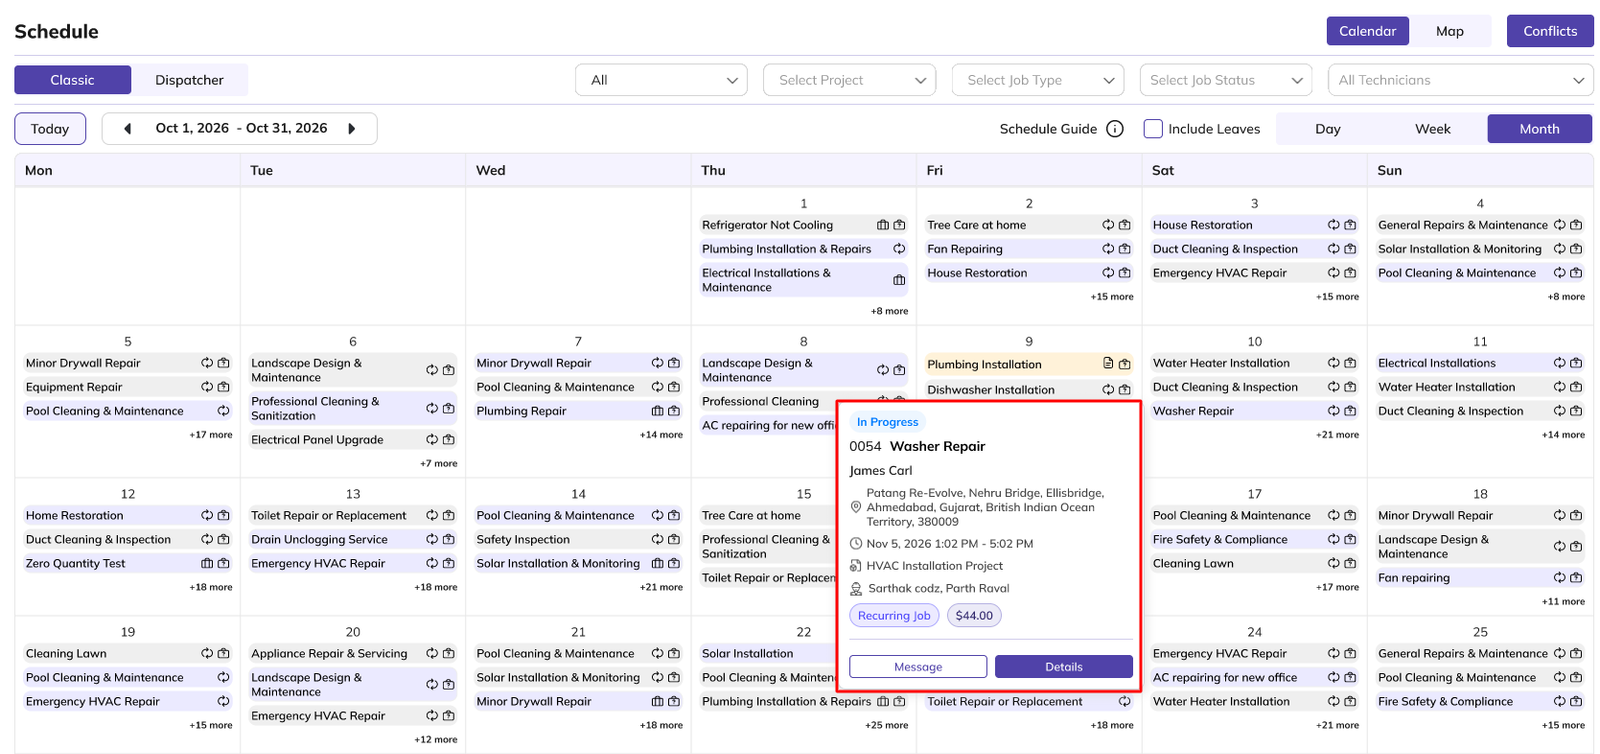
Hover over any calendar entry to see a quick summary of the visit.
-
Status: The visit’s current status.
-
Job details: Job number and title, client, address, date and time, and project name (“-” if the job has no project).
-
Team/Technician: Who is assigned. Vacant jobs show “No team/technician assigned.”
-
Job type: Recurring Job or One Off Job.
-
Message / Details: Message the technician or client, or open the visit details.
Day View
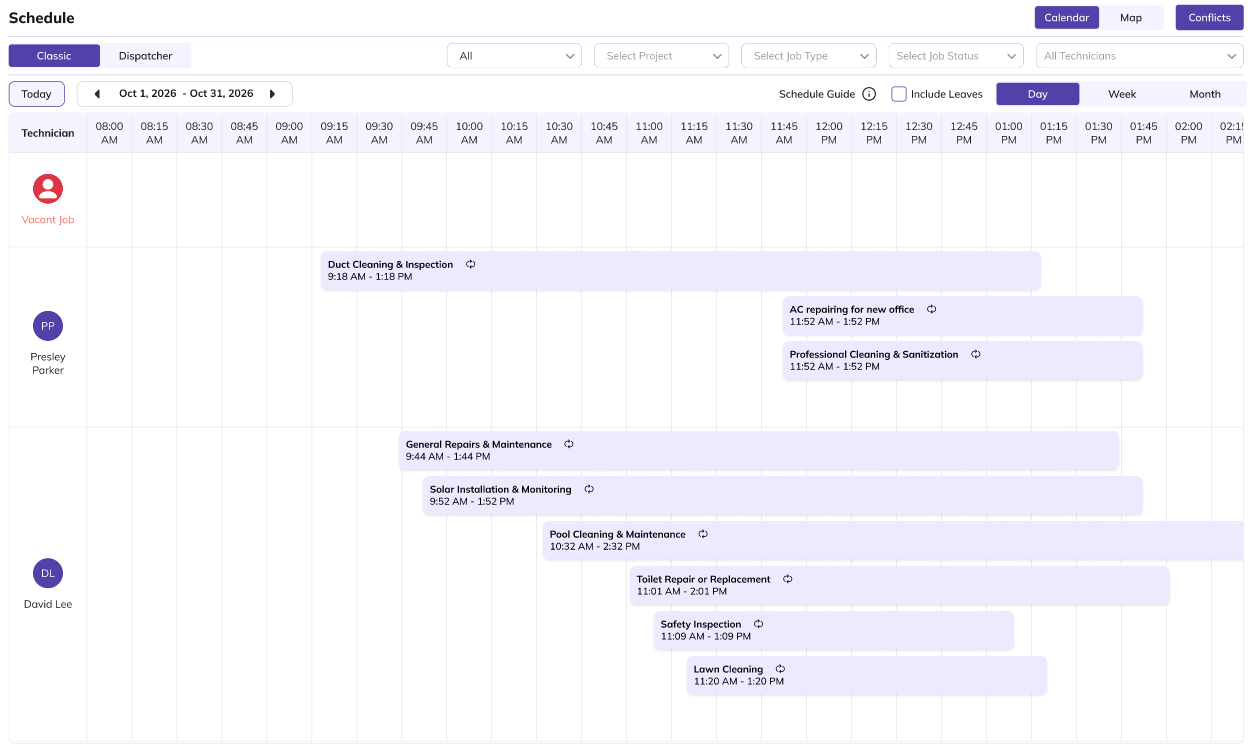
Day view shows a timeline for the selected date, with one row per technician. Unassigned jobs appear in the Vacant Job row at the top.
-
Technician column: Lists each technician. Vacant Job holds unassigned work.
-
Timeline: Shows the day in 15-minute slots.
-
Job block: Shows the job number, type icons and start–end time. The block length matches the job duration.
Week View
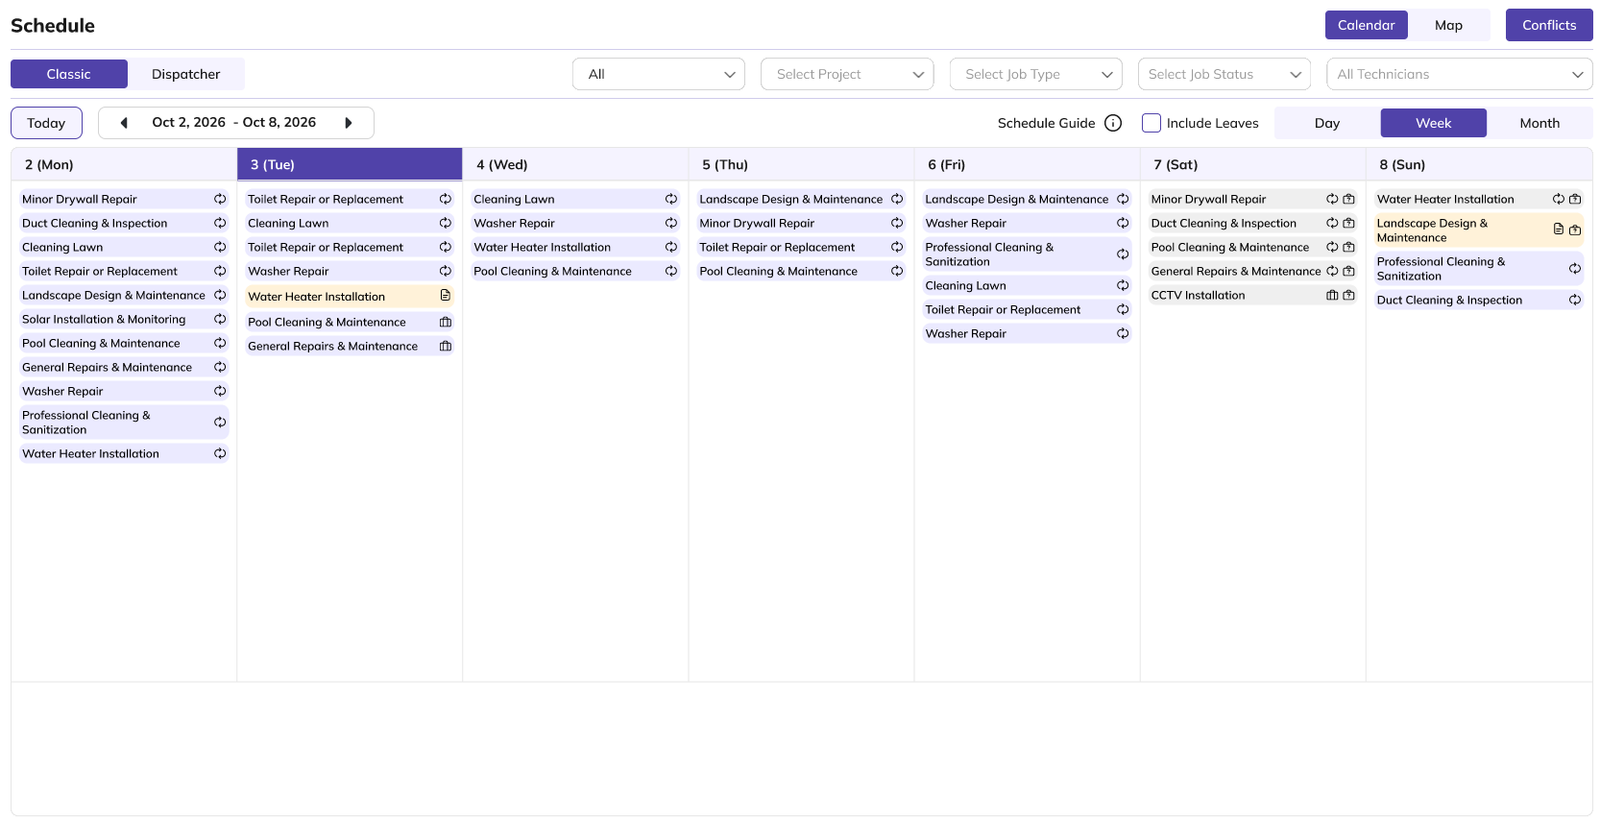
Week view shows all entries for the selected week, one column per day. The current day is highlighted.
-
Day column: Lists all jobs, visits and requests for that day.
-
Calendar entry: Shows the job number or title with type icons.
Rescheduling Jobs
You can reschedule a visit by dragging it to a new date or time and dropping it there. This includes completed, invoiced and cancelled visits. In the Dispatcher view, you can also drag a visit to another technician’s row to reassign it.
For recurring jobs, only the visit you drag is moved. The other visits in the series keep their original date and technician.

-
Moved visit: The Tuesday visit of job 0026, dragged from Peter Parker’s row to David Lee’s row.
-
Unchanged visits: The other visits of job 0026 stay in Peter Parker’s row on their original days.
Calendar – Dispatcher View
The Dispatcher view shows the schedule as a grid, with one row per technician and one column per day. It helps you balance workload across your team and spot gaps or overloaded technicians. Unassigned jobs appear in the Vacant Job row at the top.

-
Classic / Dispatcher: Switch to the Dispatcher layout.
-
Filters: Filter by type (All / Visits / Requests), technician, project, job type and job status.
-
Users / Admin: Choose whether rows show users (technicians) or admins.
-
Today / Date navigation: Jump to today or move to the previous or next day or week.
-
Day / Week: Change the range shown.
-
Technician column: Each technician has their own row. Vacant Job holds unassigned work.
-
Day column: Shows the jobs for each technician on that day, in the technician’s colour.
You can drag a job to another day to reschedule it, or to another technician’s row to reassign it.
Map View
Map view shows the day’s jobs on a map, alongside a list of job cards. Use it to see where work is happening and take quick actions on each job.

-
Date: Select the date to view.
-
Filters: Filter by type (All / Visits / Requests), technician and job type.
-
Show Completed: Include completed jobs on the map and list.
-
Clear filters (X): Reset all filters.
-
Status tabs: Show the number of jobs in each status. Click a tab to filter the list: All, On Site, On The Way, Scheduled, Completed, Unassigned, Conflict.
-
Job card: Shows the job number and title, status, client, address, time, assigned technicians, job type, amount and a Conflict tag if applicable.
-
Message: Send a message to the technician or client.
-
Assign / Reassign: Assign a technician to an unassigned job, or change the assigned technician.
-
Details: Open the visit details panel.
-
Map / Satellite: Switch the map style.
-
Job marker: Shows the job location, labelled with the client’s initials. Hover to see a summary.
-
Fullscreen: Expand the map to full screen.
Job Marker Popup
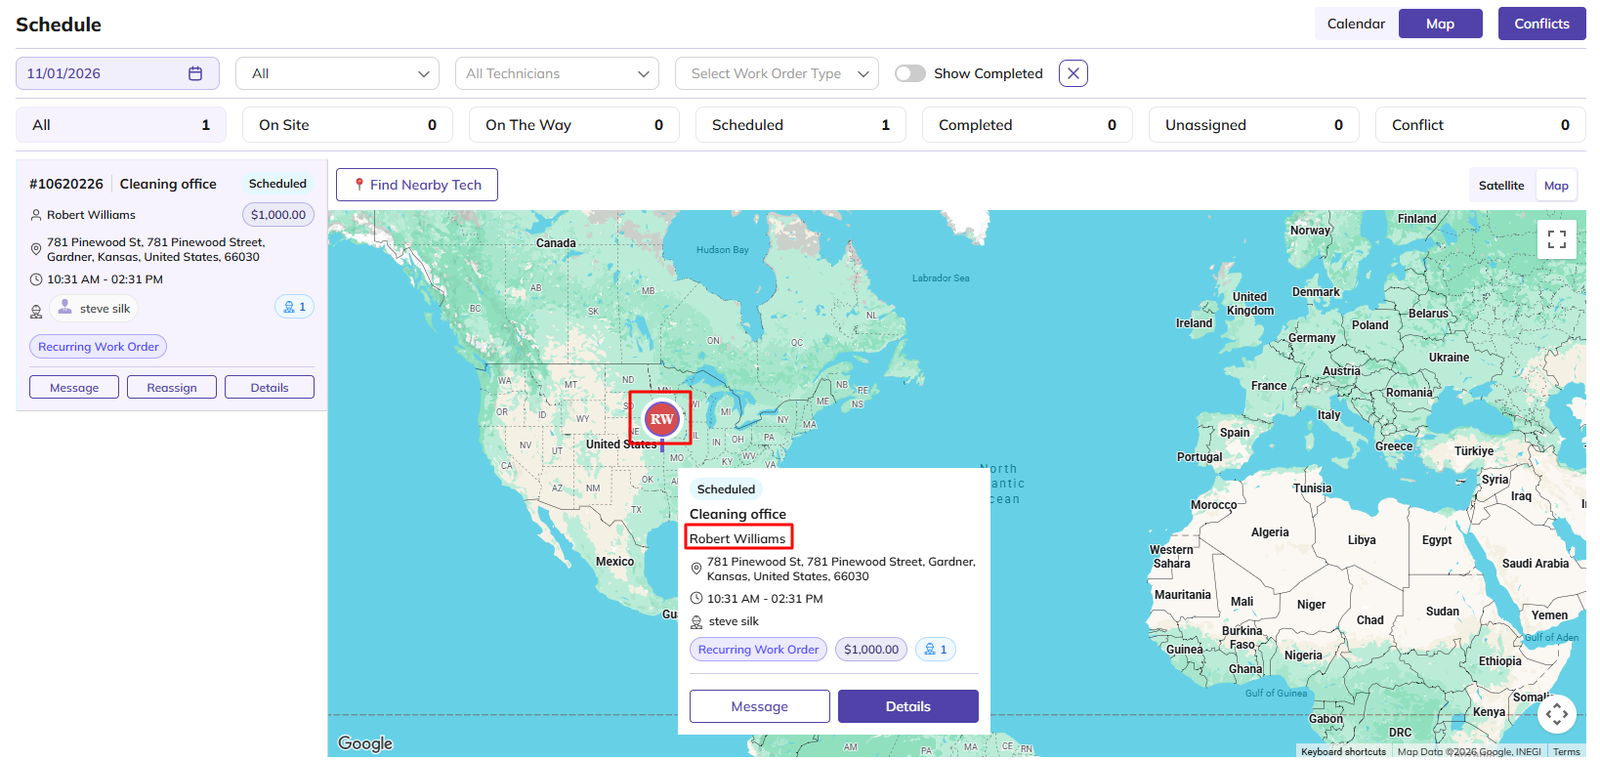
Hover over a marker to see a quick summary of the job.
-
Status: Current job status.
-
Job details: Job number, client, address and time.
-
Technician: Assigned technician, or “-” if unassigned.
-
Job type and amount: Job type tag and job value.
-
Message / Details: Message the technician or client, or open the visit details.
Marker Clusters
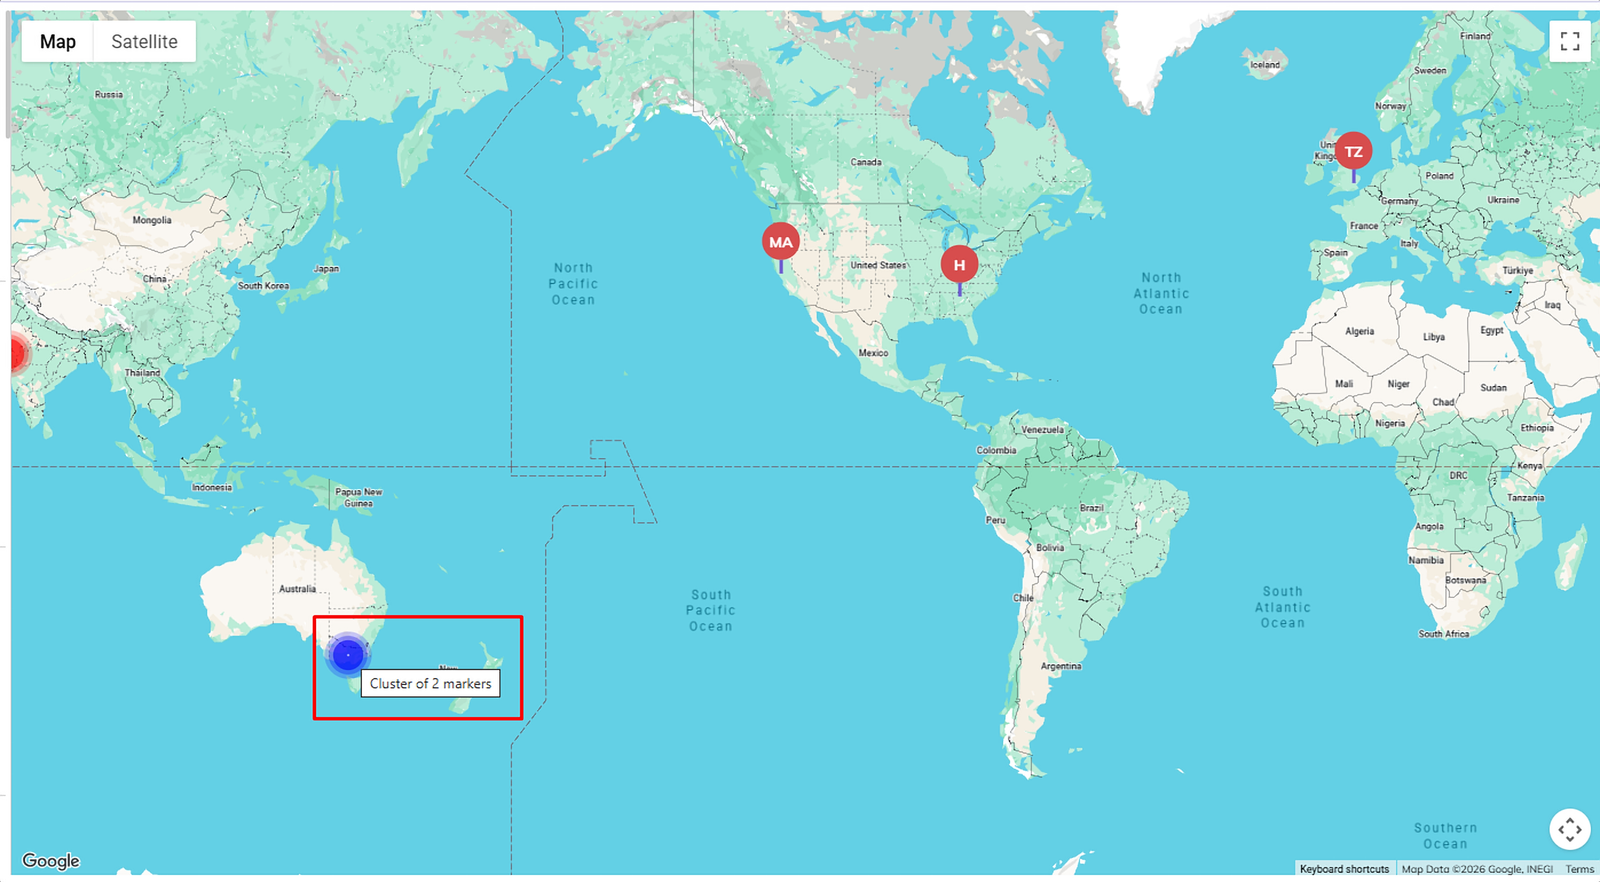
When several jobs are close together, they are grouped into a single cluster marker that shows the number of jobs. Zoom in or click the cluster to see the individual markers.
Requests in Map View
Select Requests in the type filter to show only requests on the map and in the list.

-
Requests filter: Show only requests.
-
Request card: Marked REQ, with the request title, status, client and address.
-
Assign: Assign a technician to the request.
-
Message / Details: Message the technician or client, or open the request details.
Assign Technician
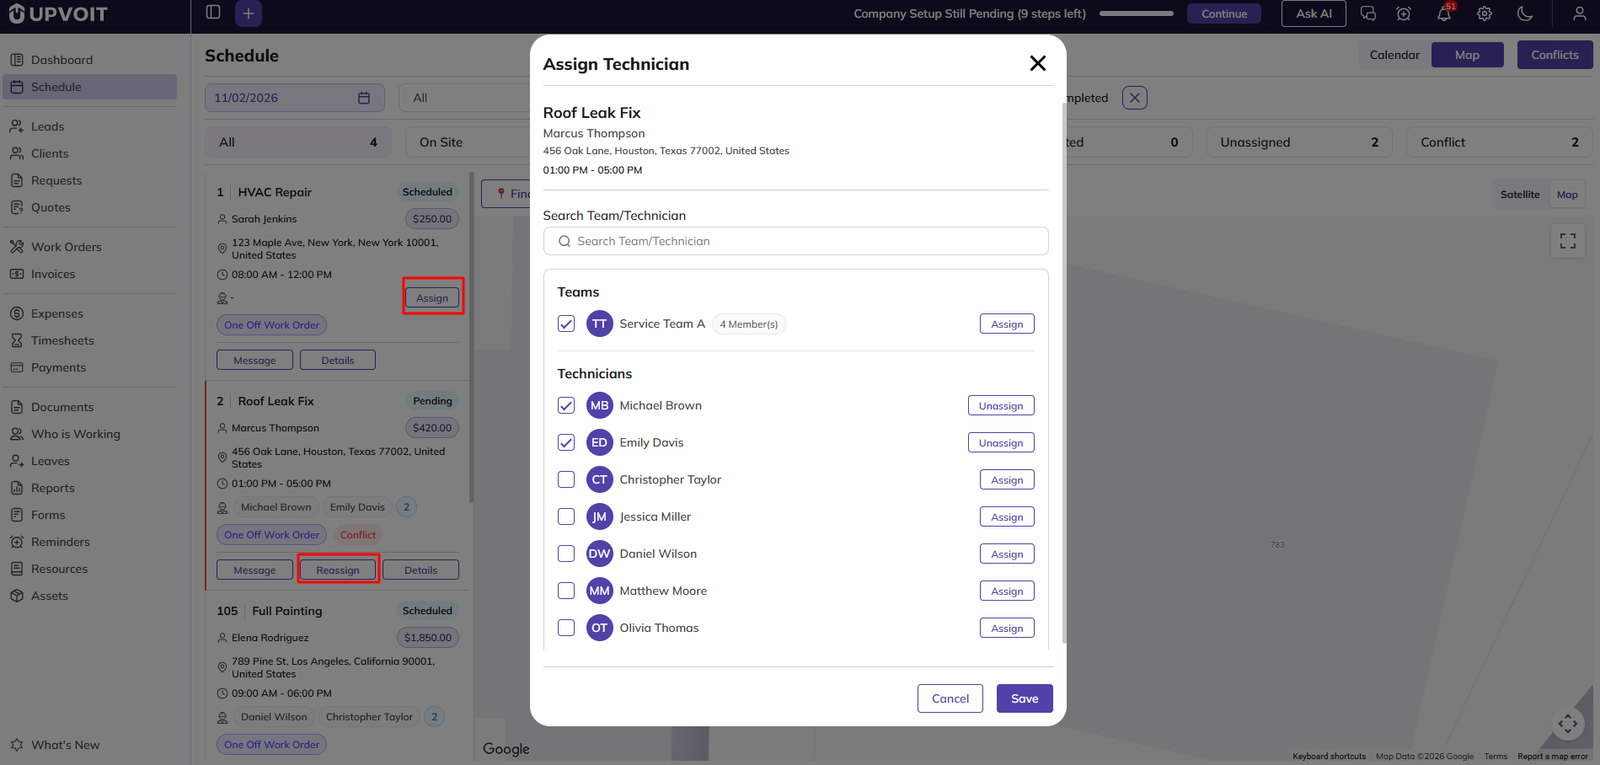
Click Assign or Reassign on a job card to choose who will do the job. You can assign a whole team or individual technicians.
-
Job details: Job number, client and address.
-
Search Team/Technician: Find a team or technician by name.
-
Teams: Select a team. The number of members is shown next to each team.
-
Technicians: Select one or more individual technicians.
-
Assign: Assign that team or technician directly.
-
Save: Save the selected assignments.
Send Message
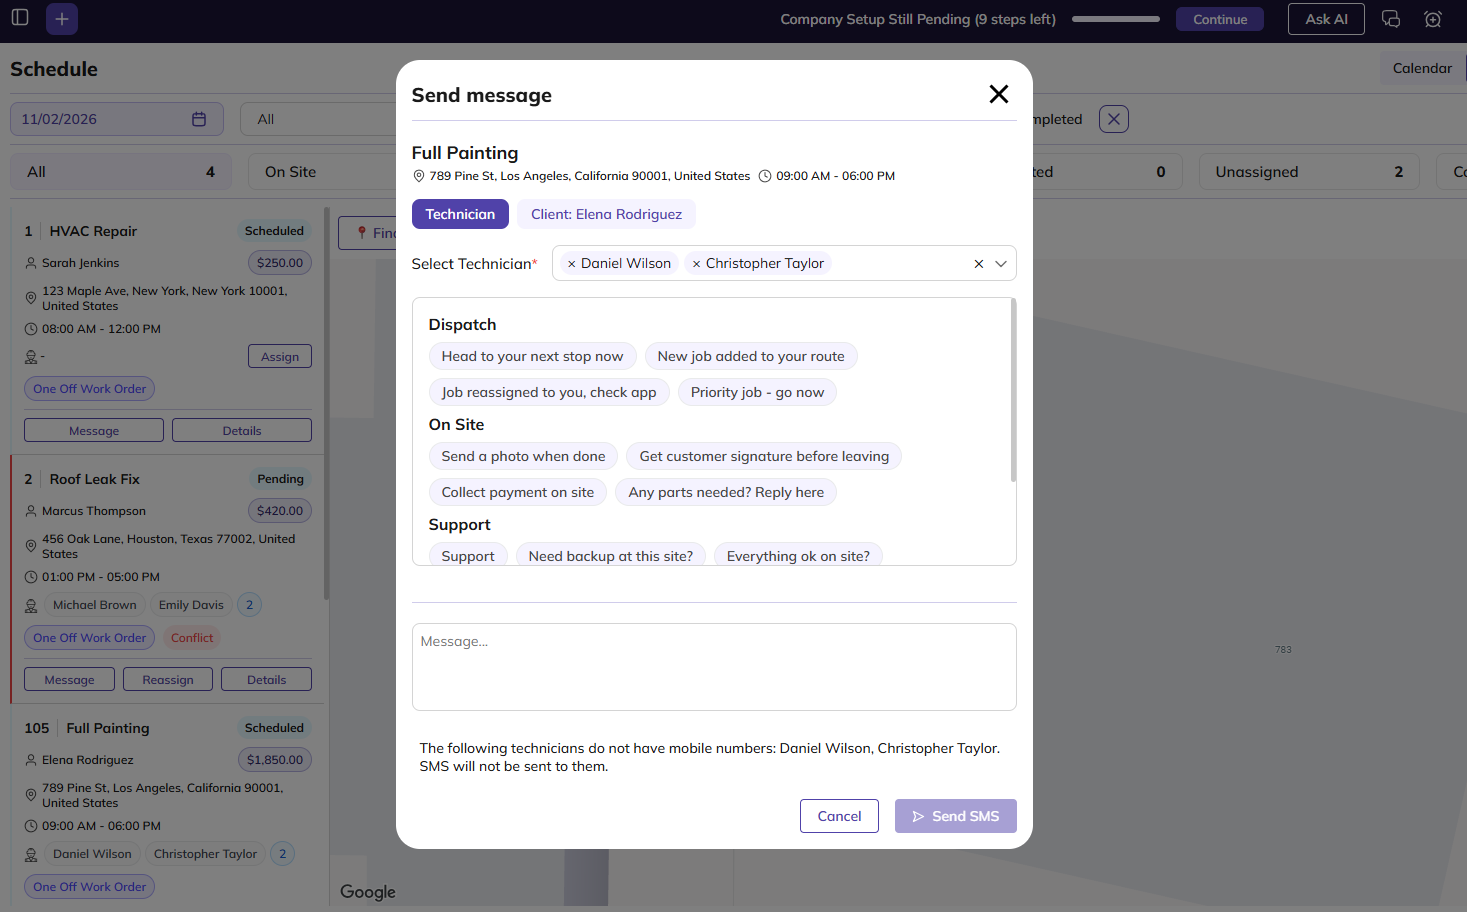
Click Message on a job card, map popup or calendar entry popup to send an SMS to the assigned technician or to the client.
-
Technician / Client: Choose who the message goes to.
-
Select Technician: Pick from the technicians assigned to the job.
-
Quick messages: Click a ready-made message to add it to the message box. Messages are grouped by purpose:
-
Dispatch: Route and assignment updates, such as a new or priority job.
-
On Site: Reminders for the job, such as taking a photo, getting a signature or collecting payment.
-
Support: Checking whether the technician needs help on site.
-
Timing: Updates on delays, breaks and arrival times.
-
-
Message: Type or edit the message.
-
Send SMS: Send the message.
Visit Details
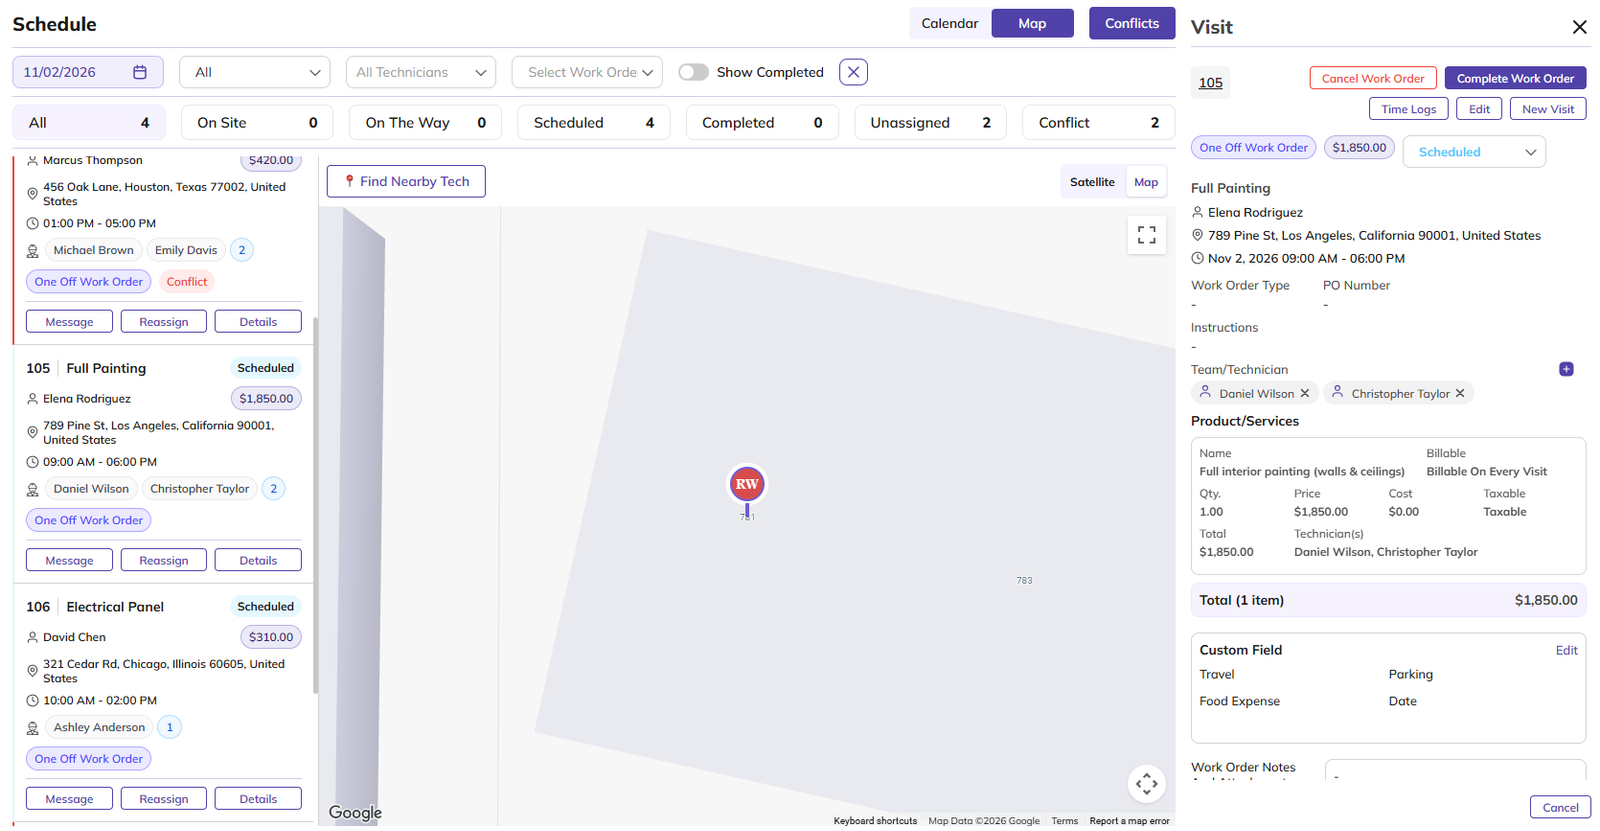
Click Details to open the visit panel on the right side of the screen.
-
Job number: Click to open the full job.
-
Cancel / Complete: Cancel the visit or mark it as complete. For one-off jobs these buttons read Cancel Job and Complete Job. For recurring jobs they read Cancel Visit and Complete Visit, and apply only to that visit. The rest of the series is not affected.
-
Edit: Edit the visit.
-
New Visit: Add another visit to the job.
-
Job type, amount and status: Shows the job type and value. Use the status dropdown to update the visit status: Created, Scheduled, In Progress, On Hold, Waiting For Parts, Completed or Cancelled.
-
Job information: Client, address, date, job type, PO number and instructions.
-
Team/Technician: Shows who is assigned. Click + to assign someone.
-
Product/Services: Items on the visit, with quantity, price, cost, tax and total.
-
Custom Field: Custom field values. Click Edit to update them.
-
Job Notes and Attachments: Notes and files added to the job.
-
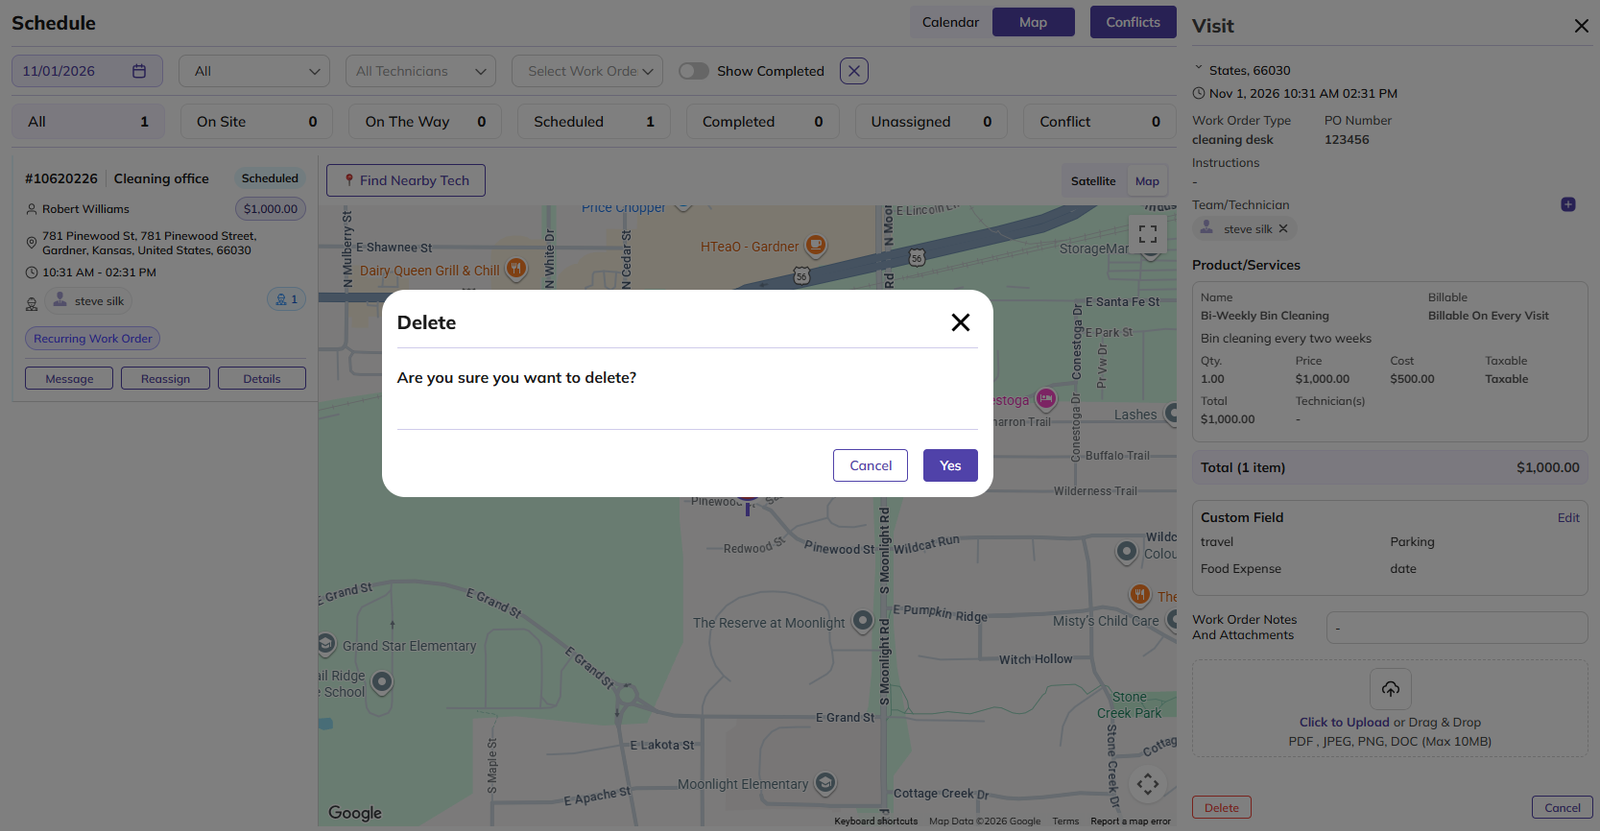
Delete: Delete the visit. A confirmation message appears. Click Yes to delete or Cancel to keep it. For recurring jobs, only that visit is deleted.
Request Details
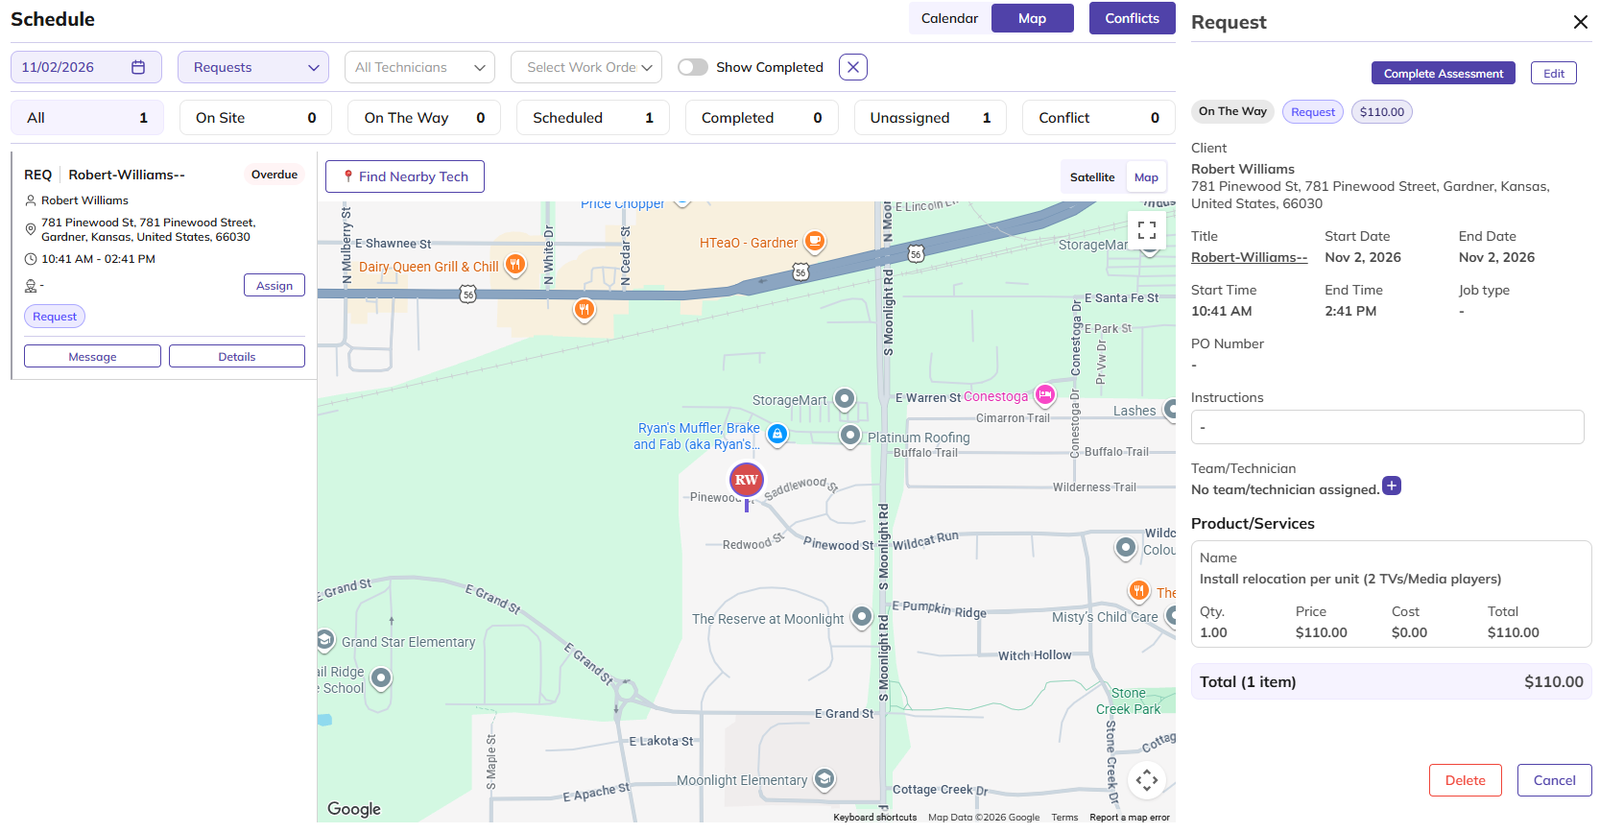
Click a request on the calendar, or click Details on a request card in Map view, to open the request panel on the right side of the screen.
-
Complete Assessment: Mark the request’s assessment as complete.
-
Edit: Edit the request.
-
Status, type and amount: Shows the request status, the Request tag and the request value. A request can be New, Assessment Completed, Overdue, Today, Upcoming, Unscheduled or Converted.
-
Request information: Client, title, start and end date and time, job type, PO number and instructions.
-
Team/Technician: Shows who is assigned. Click + to assign someone.
-
Product/Services: Items on the request, with quantity, price, cost, markup and total.
-
Delete: Delete the request, after confirming.
Conflicts
Click Conflicts (available in both Calendar and Map view) to see jobs that need attention. The window has two tabs.
Conflict Job
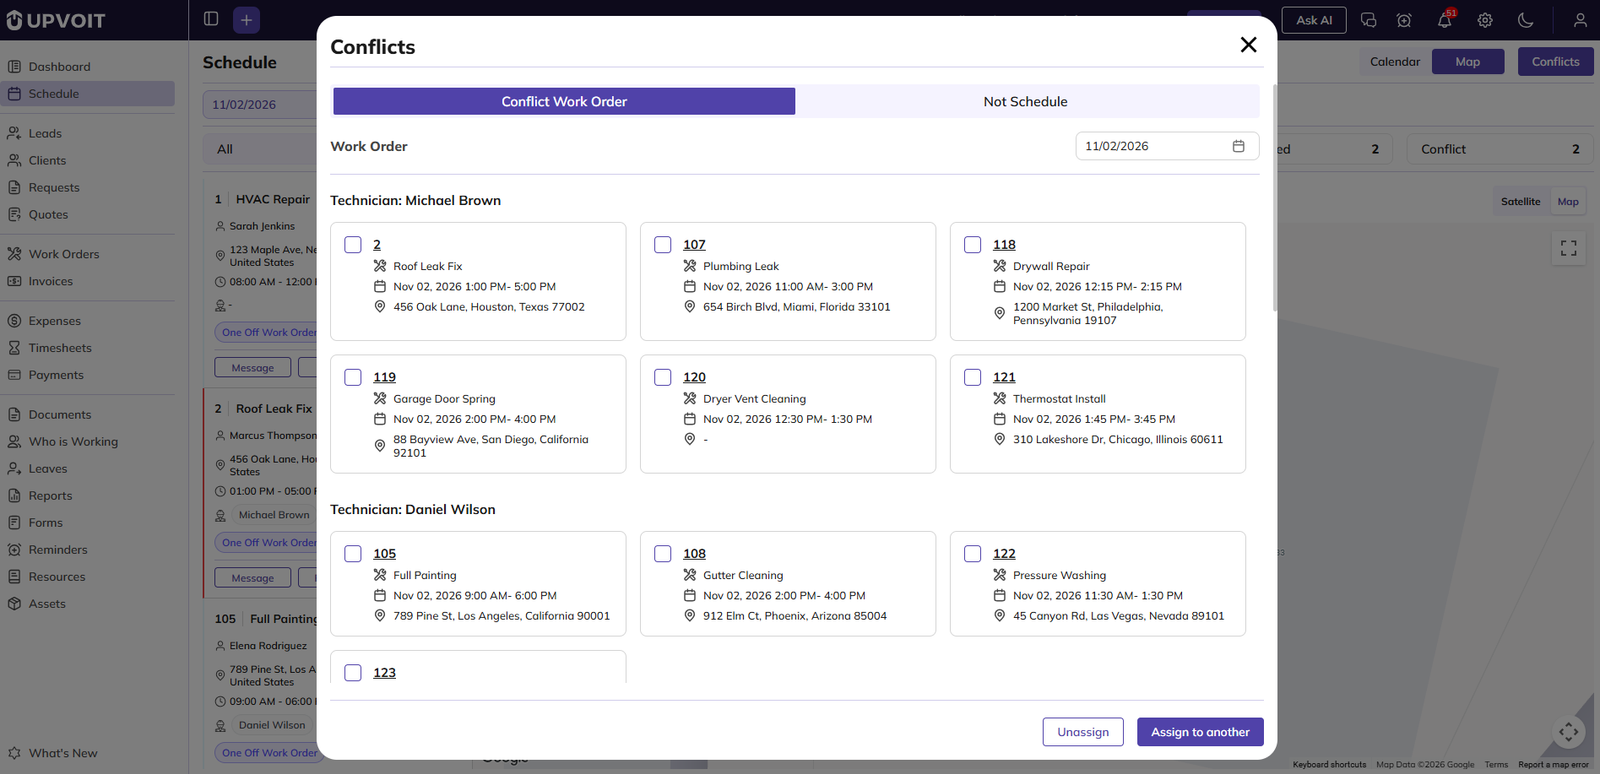
Lists jobs where a technician has overlapping time slots on the selected date, grouped by technician.
-
Date: Select the date to check.
-
Technician group: Jobs that overlap for each technician.
-
Job card: Job number, title, date and time, and address. Select the checkbox to take action.
-
Requests: Requests with conflicts on that date.
-
Unassign: Remove the technician from the selected jobs.
-
Assign to another: Move the selected jobs to a different technician.
Assign a New Technician
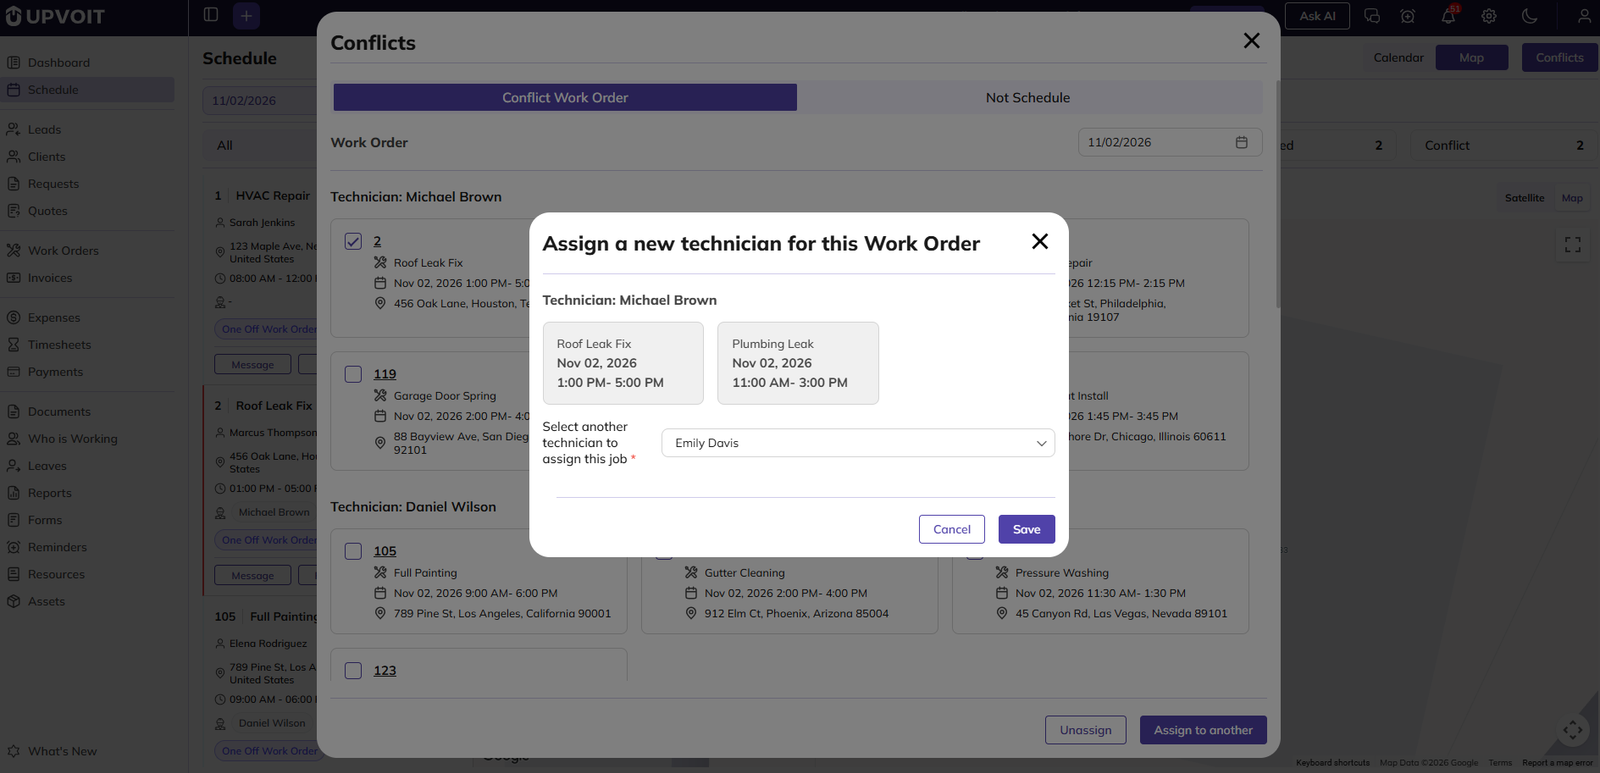
To move conflicting jobs to someone else, tick the jobs and click Assign to another.
-
Current technician: The technician the jobs are moving from.
-
Selected jobs: The jobs you ticked, with their date and time.
-
Select another technician: Choose the technician who will take over the selected jobs.
-
Save: Move the selected jobs to the new technician.
Not Schedule
Lists jobs and requests that don’t have a schedule yet. These jobs don’t appear on the calendar until a date and time are added.

-
Job card: Job number, client and job title or work order details. Click the job number to open it.
-
Requests: Requests that are not yet scheduled.
Did this answer your question?


